
Creating a Rule
Fully customize a rule or create a new one on the basis of a rule template predefined by Axonius.
Note
You can create custom rules only.
You can define rules per data scope (as with queries).
Rules cannot use private queries (as in the Action Center).
To create a Finding
- On the Monitoring page page, click Create Rule
 . The Create Rule dialog opens. The Rule type is System Rule.

- From the Rule Template dropdown, select a template on which to base the new rule.
-
Select Custom (the default) to define a rule from scratch. In this case, the fields of the Create rule dialog are filled in with default values.
-
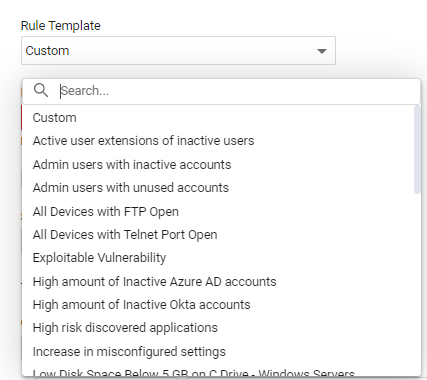
Select an Axonius-defined rule template to use as a basis for the new rule. The available rule templates are listed in the dropdown in alphabetical order (see screen below). Once selected, the fields in the Create Rule drawer are filled in with those of the selected rule template. You can modify these fields, as described in the following steps.
-
- In Rule name, type a unique name for the rule. For template-based rules, the rule name defaults to the template name. In this case, it is recommended to change the name.
- In the Description field, type a description of the rule (optional).
- If a Custom rule, click + Add description to open this Description field.
- For template-based rules, you can modify the description.
- Select the Severity of the rule: Informational, Low (default), Medium, High, or Critical.
- From the Rule category dropdown, select the category of the new rule.
- Add labels to group and filter your rules (optional).
- Set the trigger condition.
- Schedule when to run the rule to check for criteria on the selected assets.
- Enable Alert only when the result changes to create an alert only when the condition starts to be met (optional).
- Add mute conditions to pause notifications for a certain period of time.
- Add an external action to the rule (optional).
- Click Create. Note that the Create button becomes enabled only after all required fields for creating the rule are filled in.
Adding Labels
Use Labels to group rules and to filter the rules table. A label is free text. For example, PCI or CIS Control 1. A rule can have many labels.
You need the Monitoring Modify permission to add or change the labels of a rule.
To add labels to a rule
- In the Create Rule dialog, or when you edit a rule, go to Labels.
- Select a label that other rules use, or type a new label and press Enter. A comma also ends a label.
- Save the rule.
- A rule can have up to 20 labels. Each label can have up to 64 characters.
- Axonius removes spaces at the start and the end of a label, and removes empty labels.
- Axonius removes a repeated label. The check isn't case-sensitive, and the first spelling stays.
- Rules that existed before you upgraded to 10.0.0 have no labels.
For example, add the label CIS Control 1 to the three rules that check your asset inventory. In the Category pane of the Monitoring page, select CIS Control 1 to see only these three rules.
Setting a Trigger Condition
You can configure a rule to trigger alerts based on the number of assets returned by the query.
You can configure Findings with complex conditions, including the following types:
- Simple query threshold
- Compares the number of assets
- Triggers an alert when a query returns more/less than X (number) results. For example, when:
- Adapter failed fetches
>0 - There are more than 100 devices with 100+ installed SW
- Query comparison - Trigger an alert when query A returns X or X% more/less assets than query B. This enables cross-entity comparison, using a different asset in each query. For example, when:
- Devices with Tanium fall below 95% of all devices.
- The number of devices is not more than 20% of the number of users.
- More than 10% of all devices have over 50 critical CVEs.
- There is more than a 10% difference between the number of Tanium and Windows devices.
- Query change over time - Timeline comparison. Trigger an alert when a query returns X or X(%) more, less, or a changed number of results (more or less) compared to Y days earlier. For example, when:
- AD group gains more than 10% a week.
- Number of managed devices rises or falls by 10% or more in a week.
- Number of CVEs grows more than 20% per day.
- Number of managed devices drops more than 15% a week.
Setting the Simple Query Threshold Trigger
You can configure a Simple Query Threshold condition to trigger an alert in either of the following scenarios:
- The number of assets returned by the query is more/less than the specified number.
To set the Simple Query Threshold trigger
-
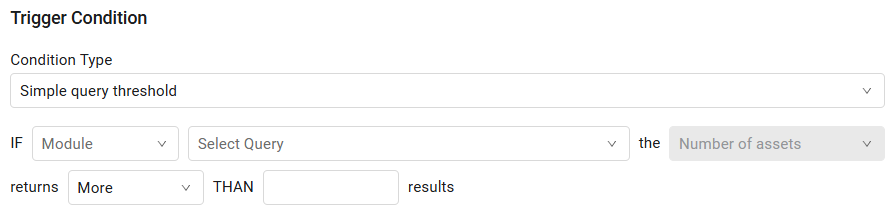
From the Condition Type dropdown, select Simple query threshold. The following condition opens.
-
From the Module dropdown, select an asset module.
-
From the Select Query dropdown, select a query.
-
The comparison is based on Number of assets returned from the query. This is currently the only option.
-
Select More or Less.
-
In the value box, type a number - the threshold to compare the number of assets or aggregated value returned by the query. Minimum possible value is 0.
Setting the Query Comparison Trigger
You can configure a Query Comparison condition to trigger an alert in either of the following scenarios:
- When query A returns X or X% more/less assets than query B.
To set the Query Comparison trigger
-
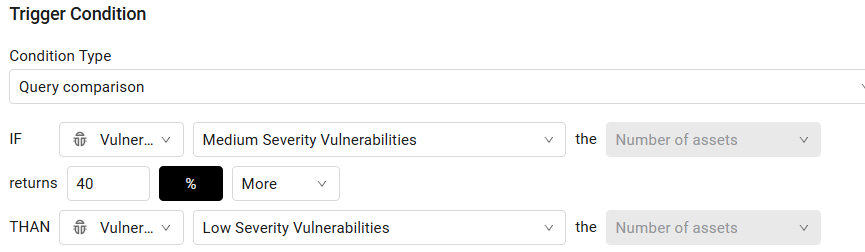
From the Condition Type dropdown, select Query Comparison. The following condition opens.

-
From the Module dropdown, select the asset module for query A.
-
From the Select Query dropdown, select query A.
-
The comparison is based on Number of assets returned from the query. This is currently the only option.
-
In the value box, type a number. Minimum possible value is 0.
-
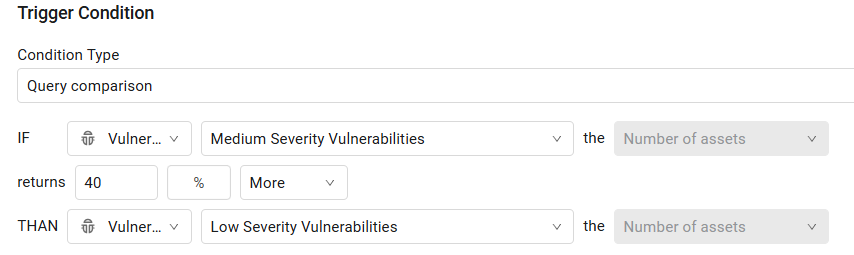
Click the % sign (blacken) to compare percentage, or leave as is to compare actual values.
-
Percentage comparison:
-
Actual values comparison:
-
-
Select More or Less.
-
Repeat steps 2-4 for query B.
Setting the Query Change over Time Trigger
You can configure a Query change over time condition to trigger an alert in either of the following scenarios:
- When a query returns X or X% more/less assets compared to Y days before the current execution time.
- When a query with calculation returns an aggregated value X or X% greater/less than the aggregated value returned Y days before the current execution time.
- When the number of results rose or fell by X or X% compared to Y days before the current execution time.
To set the Query change over time trigger
-
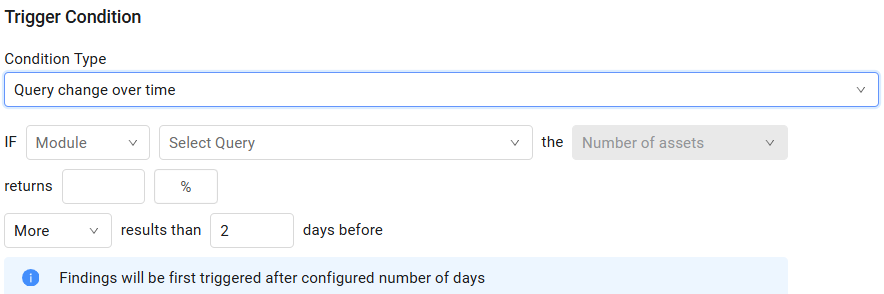
From the Condition Type dropdown, select Query change over time. The following condition opens, with a note that Findings will be first triggered after the configured number of days.
-
From the Module dropdown, select an asset module.
-
From the Select query dropdown, select a query.
-
The comparison is based on Number of assets returned from the query. This is currently the only option.
-
In the value box, type a number. Minimum possible value is 0.
-
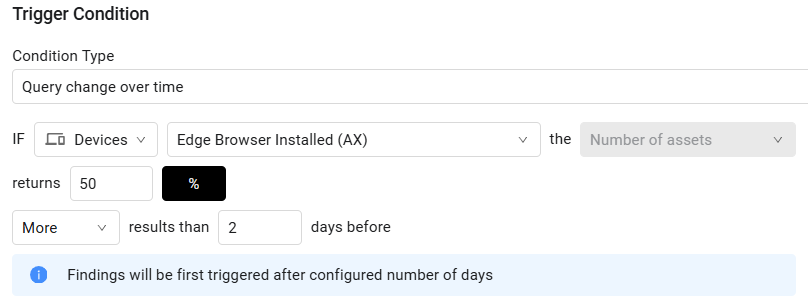
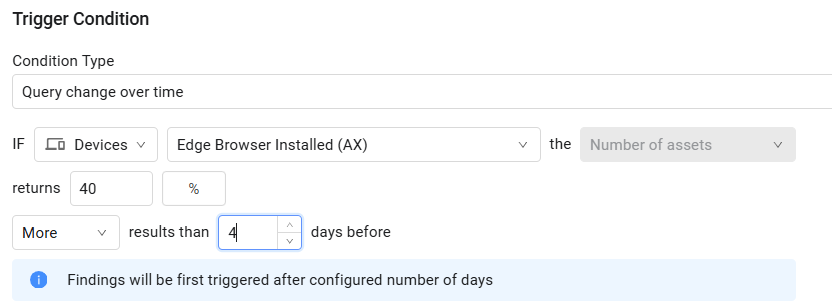
Click the % sign (blacken) to compare percentage, or leave as is to compare actual values.
-
Percentage comparison
-
Actual values comparison
-
-
Select More, Less, or Changed (more or less).
- Changed (more or less) - Trigger the alert when the number of results rose or fell by the value or more. With %, the alert triggers when the number rose or fell by that percent or more. Rules that existed before 10.0.0 keep More or Less.
-
In the days before box, type the number of days in the timeline prior to the current execution time. When the query executes, the number of resulting assets is compared to the number of assets resulting from the query run executed the configured number of days earlier.
- With Changed (more or less) and %, the rule doesn't trigger when the query returned 0 results on the earlier day, because 0 has no base for a percentage.
- With Changed (more or less) and a fixed value of 0, the condition is always met.
- Changed (more or less) is available only in the Query change over time condition type.
- The alert adds a sentence that gives the direction of the change.
For example, to track the saved query Managed Laptops, set the condition to IF Managed Laptops returns 10 Percent (%) Changed (more or less) results than 7 days before. If the number of results goes from 500 to 440, the rule triggers, and the alert says that the result count fell by 60.
Scheduling the Rule Checking
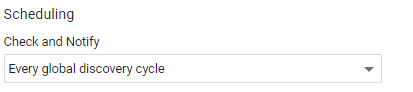
You can schedule when to check whether the assets returned by the query meet the trigger condition. The following scheduling is available:
- Every global discovery cycle (default)
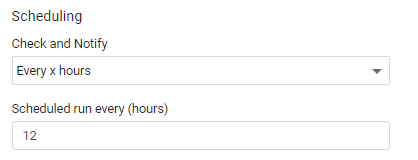
- Every x hours
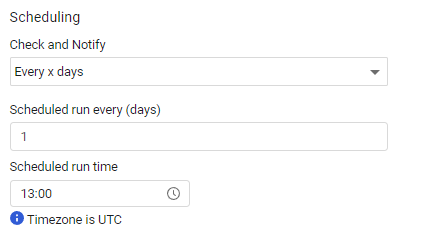
- Every x days
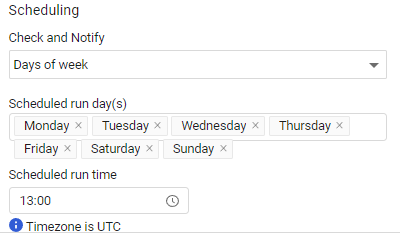
- Days of week
- Days of month
To schedule the rule
- Click the Check and Notify box. The scheduling options dropdown opens.
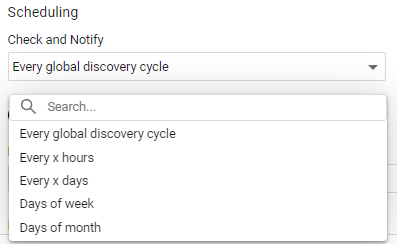
- From the Check and Notify dropdown, select one of the following options:
-
Every global discovery cycle (the default)
-
Every x hours - For this option, in Scheduled run every (hours), type the frequency in hours that the rule runs and checks.
-
Every x days - For this option, in Scheduled run every (days), type the frequency in days that the rule runs and checks, and in Scheduled run time, click the clock to select the time at which to run on those days.
-
Days of week - In Scheduled run day(s), remove the days on which not to run the rule, and in Scheduled run time, click the clock to select the time at which to run on those days.
-
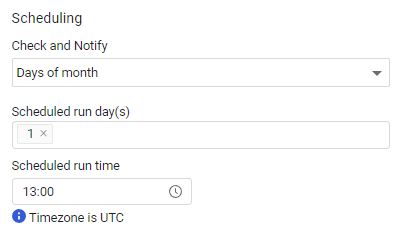
Days of month - In Scheduled run day(s), remove the days on which not to run the rule, and in Scheduled run time, click the clock to select the time to run on those days.
-
Alerting Only When the Result Changes
Use Alert only when the result changes to create an alert when the trigger condition starts to be met, and not on every run while the condition stays met.
You need the Monitoring Modify permission to save the rule.
To alert only when the result changes
- In the rule form, after the scheduling settings, enable Alert only when the result changes.
- Click Create for a new rule, or Save Changes for an existing rule.
- This option is disabled by default. When it's disabled, each run in which the condition is met creates an alert.
- When it's enabled, the rule creates an alert on the first run in which the condition is met. The rule creates no new alert while the condition stays met on the next runs.
- When the condition stops being met on one run, and is met again on a later run, the rule creates a new alert.
- The option works with all trigger condition types: Simple query threshold, Query comparison, and Query change over time.
- When the trigger condition uses a query calculation that groups the results by a field, the rule checks each value of that field separately. A new value that meets the condition creates an alert. Values that met the condition on the last run don't.
- Mute conditions still apply.
- The option is available in rules with the System Rule type. Behavior analytics rules don't have this option.
- Duplicating, exporting, and importing a rule keep this setting. A duplicated rule has no history of past runs, so its first run that meets the condition creates an alert.
For example, a rule creates an alert when the query Devices without EDR returns more than 5 devices, and the rule runs every discovery cycle. With this option enabled, the rule creates one alert when the number goes above 5, and no more alerts while the number stays above 5. If the number goes down to 3 and then up to 8, the rule creates a new alert.
Adding Mute Conditions
You can define mute conditions per rule to suppress the rule checks for a specified period of time. Instead of the same rule checking for matches over and over again, you can make a pause following the first match, giving you the opportunity to fix the alert, enabling the best signal-to-noise ratio. Some examples:
- Pause for 24 hours after the first match.
- Suppress alerts on users who haven't changed passwords from December 23rd until January 6th.
- Trigger an alert if Tanium coverage suddenly drops. If you know it will take you one or two weeks to fix it, you can define a mute period of two weeks before you get another alert.
To add mute conditions
- Toggle on Add Mute Conditions.
- From the Mute Type dropdown, select one of the following:
-
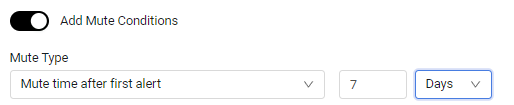
Mute time after first alert (default) - Select the number of days to mute alerts after the first match.
-
Mute on specific dates -Select a specific period of time to mute alerts.

-
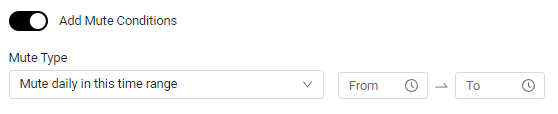
Mute daily in this time range - Select a specific time range during which to mute alerts every day. In From and To, select the start time and end time.
-
To remove mute conditions
- Toggle off Add Mute Conditions.
Adding an External Action
Add an external action to run an Enforcement Action when the rule creates an alert. You can send a notification or create an incident or ticket. See Adding an External Action.
Updated 7 days ago