
DocuSign
DocuSign helps organizations connect and automate how they prepare, sign, act on, and manage agreements.
Types of Assets Fetched
This adapter fetches the following types of assets:
- Users
- Roles
- Groups
- Licenses
- Application Settings
- SaaS data
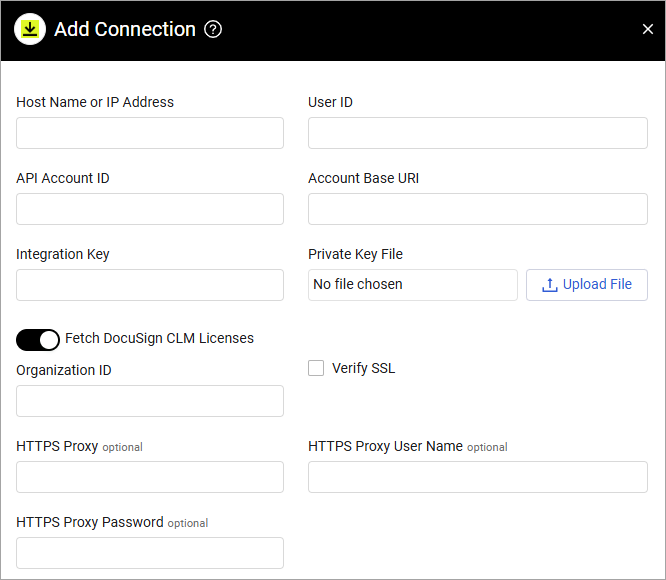
Parameters
- Host Name or IP Address (required) - The hostname or IP address of the DocuSign server. This is usually
http://account.docusign.com. - User ID - The DocuSign User ID.
- API Account ID (required) - Specify the API Account ID. To generate the API Account ID, see Create API Account ID and Keys.
- Account Base URI (optional) - Enter the identifier of the resource to use. To generate the Account Base URI, see Create API Account ID and Keys.
- Integration Key (required) - Enter the integration key. To generate the Integration Key, see Create API Account ID and Keys.
- Private Key File (required) - Select to upload a private key file. To generate a private key, see Create API Account ID and Keys.
- Fetch DocuSign CLM Licenses (optional) - Enrich users with permission profiles.
- Organization ID - When the 'Fetch DocuSign CLM Licenses' is enabled, add DocuSign Organization ID.
Note
When this option is enabled, the
user_readscope must be added to authentication scopes.
- Verify SSL - Select whether to verify the SSL certificate of the server against the CA database inside of Axonius.
- HTTPS Proxy (optional) - Connect the adapter to a proxy instead of directly connecting it to the domain.
- HTTPS Proxy User Name (optional) - The user name to use when connecting to the value supplied in Host Name or IP Address via the value supplied in HTTPS Proxy.
- HTTPS Proxy Password (optional) - The password to use when connecting to the server using the HTTPS Proxy.
To learn more about common adapter connection parameters and buttons, see Adding a New Adapter Connection.
Create a Permission Profile in DocuSign
Note
This is only needed for retrieving SaaS data.
Create a custom permission profile in DocuSign to provide the Axonius account with the least privileges permission.
- From the account admin console in DocuSign, select the Settings tab, and under Users and Groups, select Permission Profiles.
- Click Add Permission Profile. The Add Permission Profile window is displayed.
- Enter a name for the permission profile.
- Under the Admin Permissions tab, click Allow Some and select the following permission levels.
| Permission | Level of Access |
|---|---|
| Users and Groups | View Only |
| Envelope Sharing | View & Edit |
| Document Retention | View & Edit |
| Account Settings | View & Edit |
| Security Settings | View & Edit |
-
Under the Admin Permissions tab, keep all options as defined by default.
-
Click Add.
Exclude your User Account from 2FA
Note
This is only needed for retrieving SaaS data.
-
Log in with the user account you created for Axonius in DocuSign.
-
Click the user profile icon (avatar), and then click on Manage Profile.
The My Profile view is displayed.
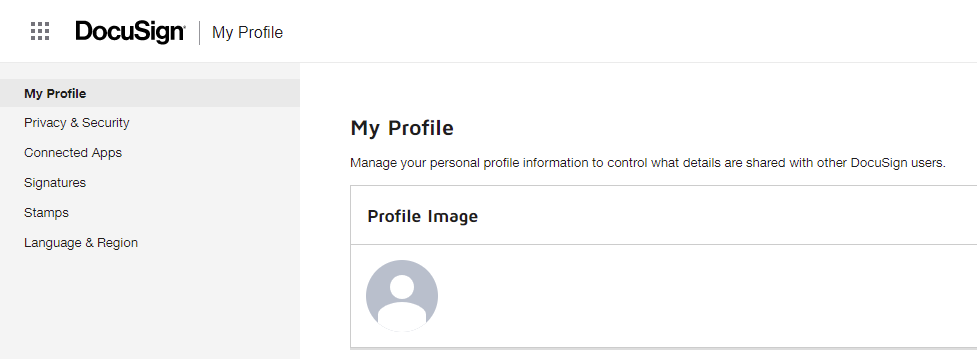
-
From the left navigation menu, click on the Privacy & Security menu.
-
Under the Sign-In Security section, disable the Passwordless Login and the Two-Step Verification options.
-
Under the Device Security section, disable the New Device Verification option.
-
Make sure no App Password is generated. If such exists, revoke it.
Create API Account ID and Keys
To create the API Account ID, Account Base URI, Integration Key, and Private Key
Note
Initial consent in DocuSign is required for setup of this adapter, in some of the configurations.
-
Create a DocuSign Developer Account by navigating to Get your Free Developer Account and filling-in your details.
-
From the Settings tab, under Integrations, select Apps and Keys.
-
Click Add App and Integration Key. The Add Integration Key window is displayed.
-
Click the Copy icon to copy the Integration Key for later use.
-
In App Name, specify the name of the app and click Create App. The Authentication window is displayed.
-
Under User Application, select No.
-
Fill in the redirect URI with the following value:
http://localhost/adapters/docusign_adapter -
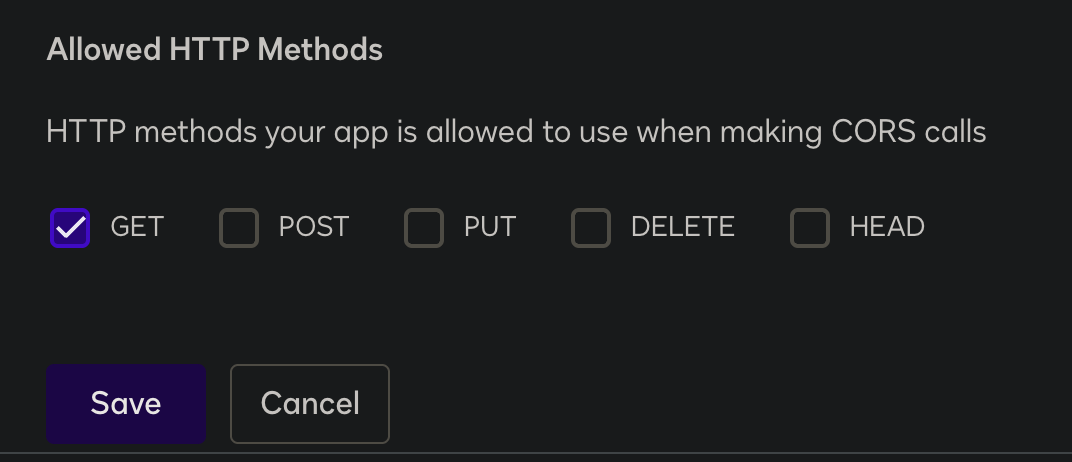
In the Additional settings section, under Allowed HTTP Methods, select GET.
-
Copy the User ID, API Account ID, and Account Base URI for later use.

-
Navigate to your browser and access this URL template (replace the UPPERCASE values with your actual integration key):
https://account-d.docusign.com/oauth/auth?response_type=token&scope=signature&client_id=YOUR_INTEGRATION_KEY&redirect_uri=http://localhost/adapters/docusign_adapter -
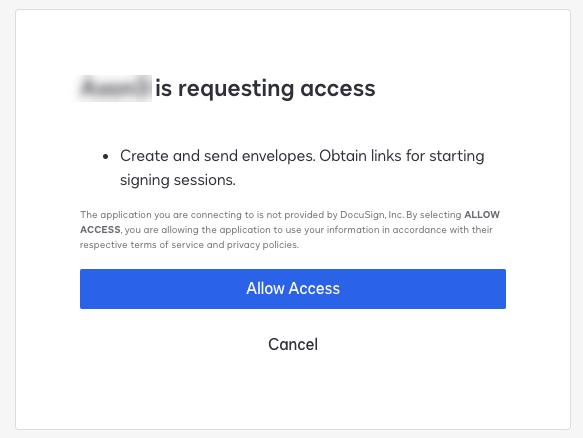
Follow the prompt to log in.
-
Click Allow Access to permit the app to make calls. The browser redirects to the
localhostURL.
-
In the URL in the browser's Address bar, copy the value of the
ACCESS_TOKENparameter.
For example:https://localhost/adapters/docusign_adapter#access_token=ACCESS_TOKEN&expires_in=28800&token_type=bearer&scope=signature -
Using the Access Token, API Account ID, and Account Base URI values that you copied earlier, run this curl command at least 20 times before the
ACCESS_TOKENexpires.
Please allow up to thirty minutes for this to register in the Docusign console. A successful output will include a ‘remaining requests’ value that decreases with each run.
Linux/OSX:
curl -H "Content-Type: application/json" -H "Authorization: Bearer ACCESS_TOKEN" -i "ACCOUNT_BASE_URI/restapi/v2.1/accounts/API_ACCOUNT_ID"Windows:
curl.exe -H "Content-Type: application/json" -H "Authorization: Bearer ACCESS_TOKEN" -i "ACCOUNT_BASE_URI/restapi/v2.1/accounts/API_ACCOUNT_ID"Note
You can use the following script to automatically repeat the command. Insert the correct values into the variables at the beginning and run
chmod +x loop_curl.sh. To execute, use./loop_curl.sh).#!/bin/bash # Define the required variables ACCESS_TOKEN="your_access_token_here" ACCOUNT_BASE_URI="your_account_base_uri_here" API_ACCOUNT_ID="your_api_account_id_here" # Run the curl command 25 times for i in {1..25} do curl -H "Content-Type: application/json" -H "Authorization: Bearer $ACCESS_TOKEN" -i "$ACCOUNT_BASE_URI/restapi/v2.1/accounts/$API_ACCOUNT_ID" sleep 10 # Sleeping for 10 seconds between requests. done
After the Docusign console reflects the successful connections, the app is approved and you can promote it to production.
-
Promote the App to live:
-
Navigate to Action > Select Go Live Location.
-
Choose the relevant production account.
-
After verifying that the new app appears in your DocuSign account, repeat Steps 2 -6.
-
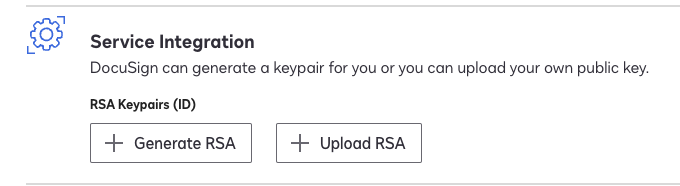
Under Service Integration, select Generate RSA to generate the public and private keys. The RSA Keypair page generates a public key and a private key. Save the values for later use.
-
Paste the private key into a .pem file, which you will need to retrieve later. The file must be in a Linux or MAC format with LF as the end of line sequence. This RSA key is the Private Key file for the Axonius Configuration.
-
In the Additional settings section, Add URIs.
-
In the Redirects URIs field, enter
https://localhost/adapters/docusign_adapter. -
In the Additional settings section under Allowed HTTP Methods select GET, POST.
-
The My Account Information now shows the User ID, API Account ID, and Account Base URI.
-
Copy the User ID, Account ID, and Account Base URI from the ‘live’/production app and paste the values into their corresponding fields in Axonius’s Docusign Adapter Connection configuration.
-
Click Save or Save and Fetch.
-
The adapter will produce an error message containing a URL.
Follow this URL to perform the final Authentication in a web browser.
Refer to these resources for additional information:
Getting an Access Token using Auth Code Grant
How to get an access token with Implicit Grant
Advanced Settings
Note
Advanced settings can either apply for all connections for this adapter, or you can set different advanced settings and/or different scheduling for a specific connection, refer to Advanced Configuration for Adapters.
- User Status Filter - Select a status to filter users by: Active, Closed, or Activation Sent.
Note
To learn more about Adapter Configuration tab advanced settings, see Adapter Advanced Settings.
Required Permissions
The value supplied in the User ID must have write permissions in order to fetch SaaS data.
Troubleshooting
When connecting the adapter the first time, an error message with a link is displayed.
To resolve the connection issue
- Copy the link to a browser and click Allow.
- In the Host Name or IP Address parameter, specify: your Account ID at DocuSign followed by docusign.com.
- Click Save and Fetch to reconnect. The adapter is subsequently connected.
Supported From Version
Supported from version 5.0
Updated 9 months ago