
Oracle NetSuite
Oracle NetSuite is a cloud-based ERP solution that provides global business management solutions.
The Oracle NetSuite adapter integrates with your business management suite to provide visibility into operational data and asset-related financial information.
Asset Types Fetched
- Users
- Expenses
- SaaS Applications
Service Account and Adapter Field Requirements
| Attributes | Axonius Cyber Assets | Axonius SaaS Applications |
|---|---|---|
| Service Account Required? | No | No |
| Required Adapter Fields | Company ID Client ID Certificate ID Private Key Private Key Algorithm | Company ID Client ID Certificate ID Private Key |
Before You Begin
Authentication Methods
The connection between Axonius and Oracle NetSuite uses OAuth 2.0 Client. You need to set up OAuth 2.0 Client Credentials. Follow the instructions in Setting up OAuth 2.0 Client Credentials.
The following authentication parameters are used:
- Client ID
- Private Key / Private Key Algorithm
APIs
Axonius uses the NetSuite Applications Suite API to retrieve asset data.
The adapter retrieves expense assets from these three endpoints: /expenses, /vendorBill, and /vendorPayment.
Required Permissions
You must enable the following permissions to fetch user and device data from Oracle NetSuite:
- Advanced Employee Permissions
- Employee Record
- Perform Search
- SuiteAnalytics Workbook
- SuiteScript
For Accounts with Axonius SaaS Applications
You must enable the Expense Reports feature to fetch SaaS data (expenses) from Oracle NetSuite.
Setting Up the Integration
See the Oracle NetSuite documentation for instructions on setting up an integration.
- Ensure that the following options are selected on the Setup
>Company>Enable Features page:- In the SuiteBundler section, select Create Bundles with SuiteBundler.
- In the SuiteTalk (Web Services) section, select SOAP Web services and REST Web Services.
- In the Manage Authentication section select Token-Based Authentication and OAuth 2.0.
- On the Setup
>Integration>Manage Integrations>New page, in the OAuth 2.0 section, select Authorization Code Grant and REST Web Services.
Setting Up OAuth 2.0 Client Credentials
OAuth 2.0 client mapping must be done by an administrator or a user with a role with the OAuth 2.0 Authorized Applications Management permission.
Creating a Mapping for the Client Credentials Flow
When you configure a new mapping, it is added to the list on the OAuth 2.0 Client Credentials (M2M) Setup page. The list includes the data you entered, as well as the data imported from the certificate. The system creates a record for every unique combination of application and certificate.
- Navigate to Setup
>Integration>Manage Authentication>OAuth 2.0 Client Credentials (M2M) Setup. - Click Create New.
- In the pop-up window, choose the entity, role, and application to be mapped.
- Upload the public part of the certificate from your computer.
Note that you can only select the application if the Client Credentials (Machine to Machine) Grant box is selected on the associated integration record. - Click Save.
Creating a Certificate for the OAuth 2.0 Client Credentials Flow
The certificate must contain two parts:
- Public part – An Administrator or a user with the OAuth 2.0 Authorized Applications Management permission uploads the public part of the certificate as part of the client credentials flow mapping process.
- Private part (Private Key) – The private part of the certificate provides the signature of the JWT token in the POST request to the token endpoint. This is the private key that must be uploaded to Axonius. For more information, see POST Request to the Token Endpoint and the Access Token Response.
The certificate must meet the following requirements:
- The public part of the certificate must be in x.509 format with a file extension of .cer, .pem, or .crt.
- The length of the RSA key must be 3072 or 4096 bits. The length of the EC key must be 256 bits, 384 bits, or 521 bits.
- The maximum certificate validity is two years. If the certificate is valid for a longer time period, the system automatically shortens the validity to two years.
- One certificate can only be used for one combination of integration record, role, and entity. If you want to use the same integration record for multiple entities or roles, you must use a different certificate for each unique combination.
Examples
The following examples show how to create a valid certificate using OpenSSL:
ES256
openssl req -new -x509 -newkey ec -pkeyopt ec_paramgen_curve:prime256v1 -pkeyopt ec_param_enc:named_curve -nodes -days 365 -out public.pem -keyout private.pem
ES512
openssl req -new -x509 -newkey ec -pkeyopt ec_paramgen_curve:secp521r1 -pkeyopt ec_param_enc:named_curve -nodes -days 365 -out public.pem -keyout private.pem
RSA – PSS
Note
When you change the scheme to RSA – PSS, you must also change the algorithm used for signing in to PS256.
The -days parameter is optional.
openssl req -new -x509 -newkey rsa:4096 -keyout private.pem -sigopt rsa_padding_mode:pss -sha256 -sigopt rsa_pss_saltlen:64 -out public.pem -nodes -days 365
openssl req -x509 -newkey rsa:4096 -sha256 -keyout auth-key.pem -out auth-cert.pem -nodes -days 730.
Supported from Version
This adapter is supported from Axonius version 6.0.
Connection Parameters
To connect the adapter in Axonius, provide the following parameters.
Required Parameters
- Company ID - Enter the NetSuite account ID (company identifier). The company parameter is a NetSuite-specific parameter. Extract only the company ID from
https://COMPANY_ID.netsuite.com - Client ID - Enter your Client ID. To locate your Client ID, in your Oracle NetSuite account, follow these steps:
- Go to Setup.
- Select Integrations
>Manage Integrations. - Select the Axonius integration. See below section for instructions on how to set up this integration.
- Click Edit.
- You can see the Client ID at the bottom of the editing pane. Note that the credentials will only be shown once, so ensure to copy them.
- If you cannot see the credentials, click Reset to generate them.
- Certificate ID - Enter the certificate ID for the Private Key file, refer to Create a Certificate for the OAuth 2.0 Client Credentials Flow.
- Private Key - Upload the private key you have generated.
- Private Key Algorithm (default: RS256) - Select the algorithm used for the private key file. Refer to Create a Certificate for the OAuth 2.0 Client Credentials Flow.
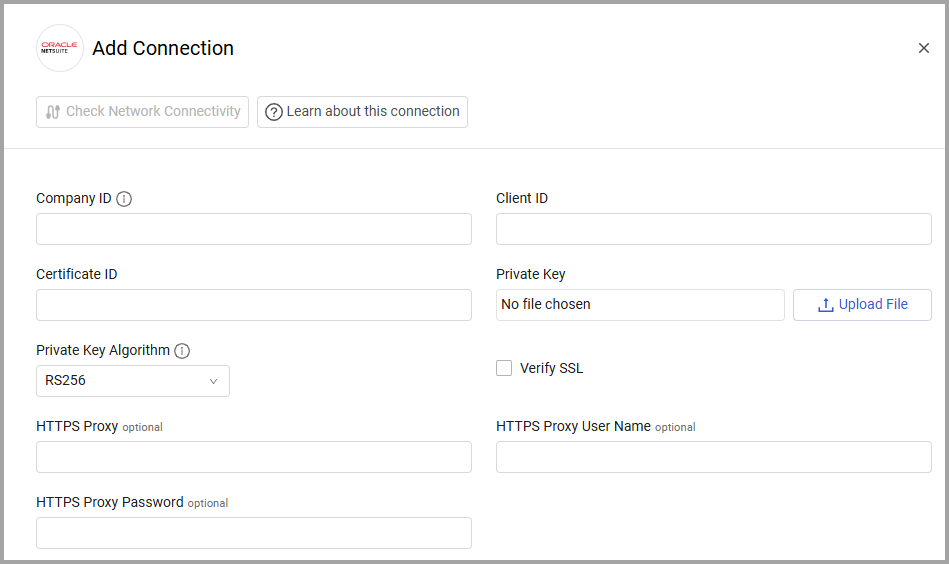
Optional Parameters
-
Verify SSL - Select whether to verify the SSL certificate of the server against the CA database inside of Axonius. For more details, see SSL Trust & CA Settings.
-
HTTPS Proxy - Enter an HTTPS proxy address to connect the adapter to a proxy instead of directly connecting it to the domain.
-
HTTPS Proxy User Name - Enter the user name to use when connecting to the value supplied in Host Name or IP Address via the value supplied in HTTPS Proxy.
-
HTTPS Proxy Password - Enter the password to use when connecting to the server using the HTTPS Proxy.
To learn about additional optional/common adapter connection parameters, see Adding a New Adapter Connection.
Advanced Settings
Note
- Advanced settings can apply to either all connections of this adapter, or to a specific connection. For more detailed information, see Advanced Configuration for Adapters.
- For more general information about advanced settings, see Adapter Advanced Settings.
Endpoints Configuration
- Fetch Users from List All Users (default: enabled)
- Enrich List All Users with Role Details Endpoint (default: enabled)
- Enrich List All Users with User Permissions Endpoint (default: disabled)
- Fetch SecurityRoles from Role Details Endpoint (default: disabled)
- Fetch Expenses of sub type expense_report from List All Expense Reports (default: enabled) - Retrieves expense reports and creates them as expenses in Axonius.
- Fetch Expenses of sub type vendor_bill from Vendor Bill Details (default: disabled) - Retrieves vendor bills and creates them as expenses in Axonius.
- Within last x days (optional; default: 3) - Enter the look-back period for fetching transactions. Only vendor bills published within this many days of the current date will be retrieved.
- Fetch Expenses of sub type vendor_payment from List Vendor Payments (default: enabled) - Retrieves vendor payment details and creates them as expenses in Axonius.
- Accounts Regular Expression (optional, default: .*) – Enter a regular expression to enrich the query results with specific accounts. For example: if you enter
^1100.*, it restricts the data fetch to only include accounts whose names or numbers start with "1100," such as specific operational bank accounts. - Match Parameters (optional) – Select one or more of the following modifiers to define how the Accounts Regular Expression is applied during the fetch:
- Case Insensitive - Ignore letter case (for example:
accountwill match "Account" or "ACCOUNT"). - Case Sensitive - Strictly match the letter case exactly as entered in the regular expression.
- . matches newline - Allow the wildcard dot (.) character in your regex to match newline characters as well.
- Source is multiple lines - Treat the source string as multiple lines, allowing the start (^) and end ($) anchors to match the start and end of each individual line.
- Ignore whitespace - Ignore non-escaped white space characters within the regular expression pattern.
- Case Insensitive - Ignore letter case (for example:
- Payments within last x days (optional; default: 3) - Enter the look-back period for fetching transactions. Only vendor payments published within this many days of the current date will be retrieved.
Related Enforcement Actions
Updated 5 months ago