
Creating New Custom Fields
Attention
- You can only create custom Single Value or Multi Value field types from an Assets page. To create Single Select or Multiple Select field types, you must navigate to the Custom Data Management page.
- Once you create a field, you can never change its Field type. You can only edit the Value type and Value.
To add a new custom field to the system, when in the Edit Custom Fields dialog:
- In the Field name box, start typing a name. It is recommended to include in a custom field name characters A-Z and 0-9 only.
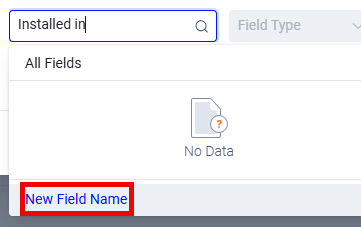
If a field of that name already exists, it is displayed. Continue to type the full name of the new field, then, at the bottom of the Field list, click New Field Name.
Note
Although it is recommended to include in a Custom Field name characters A-Z and 0-9 only, special characters (i.e., characters other than A-Z and 0-9) are also supported.
The only limitation is that the system does not support giving a new custom field a name that is the same as an existing custom field name besides for different special characters. For example: If CustomField*1 is a defined custom field, it is not possible to name new custom fields CustomField$1 or CustomField#1.
If you do give similar field names, when you click Apply to save the changes, the following notification is displayed: Failed to Save Field, and the field is dropped.
-
In Field Type, select one of the following:
- Single Value - To create a single-value field.
- Multiple Values - To create a list field.
-
In the Value Type list, select one of the available types:
- When Field Type is Single Value, the following Value Types are available:
- String
- Date - See Adding a Custom Date Field.
- Float
- Integer
- Boolean
- When Field Type is Multiple Values, the following Value Types are available:
- String
- Date - See Adding a Custom Date Field.
- Float
- Integer
Note About Float Custom Fields
For float custom fields, you can control how many digits are displayed after the decimal point across the Axonius system. The default number of digits is 2, but you can set it to be between 1 and 9. For example, if you set the number to 4, a field value such as
98.123436will be displayed as98.1234.To set the number of digits to display after the decimal point:
- Navigate to System Settings → GUI → UI.
- Scroll down to the following setting: Set the number of digits to show after the decimal for custom float fields.
- Enter a number between 1 and 9.
- Click Save.
- When Field Type is Single Value, the following Value Types are available:
-
Fill in a value or values in the text box:
-
When the Field Type is Single Value, type a single value in the empty text box. The value is determined by the Value Type.
-
When the Field Type is Multiple Values, in the Add text box, type the list of field values. Press Enter, comma, or semicolon to add another value. You can click the x of a value to remove it, or click a value to edit it.

-
-
Choose how to proceed, as explained in step 4 of Adding or Editing Custom Fields on a Single Asset.
Adding a Custom Date Field
You can add one or more dates in a custom field. This is useful, for instance, to identify the first time an asset was noncompliant. You can add either a Single Value or Multiple Value date field.
To add a new custom date field to the system, when in the Edit Custom Fields dialog:
-
In the Field name box, start typing a name. If a field of that name already exists, it is displayed. Continue to type the full name of the new field, then, at the bottom of the Field list, click New Field Name.
-
In Field Type, select one of the following:
- Single Value - To add a single date.
- Multiple Values - To add a list of dates.
-
Under Value Type, select Date.
-
Under Value, add one or more dates:
-
For a Single Value date field: Click Select Date and set the date and time.
-
For a Multiple Values date field: Click Add Date, set the date and time, then click Add Date again, and so on.
-
-
Click Save or Save & Close.
Updated 7 days ago