
Workflows Page
The Workflows page is your central hub for creating, viewing, modifying, and managing the status of your automated workflows.
Accessing the Workflows Page
To access the Workflows page
- Click the Action Center
 icon in the left navigation panel, and then click the Workflows tab.
 - In Axonius New Navigation Experience, access Workflows from the Action Center menu.
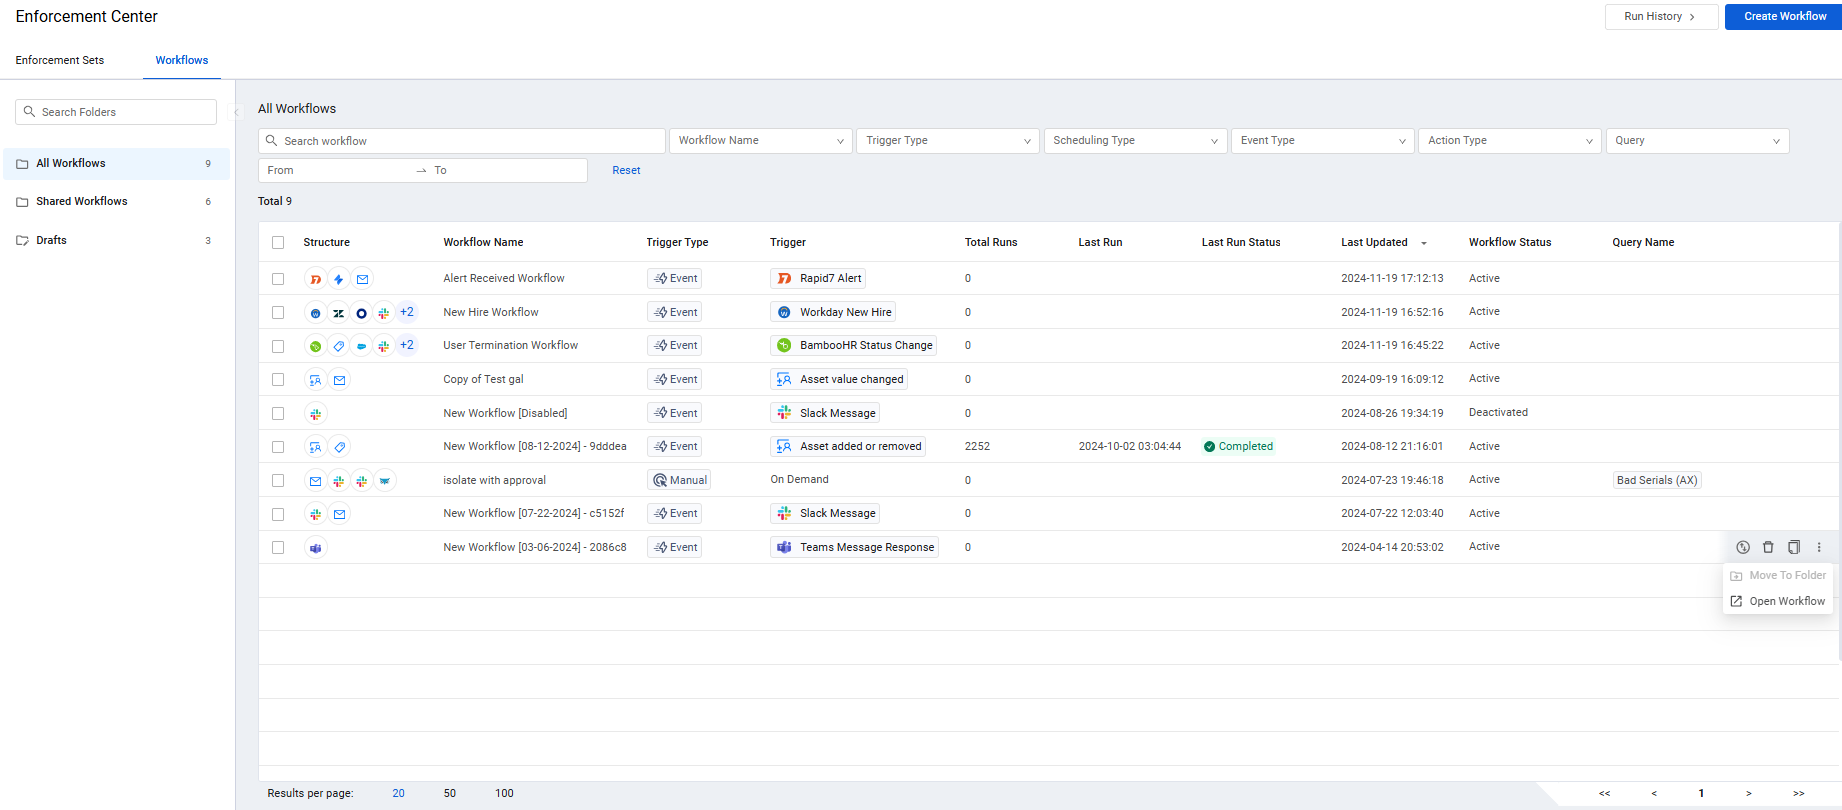
The Workflows page is organized into three main sections:
- Folders pane (left) - Enables you to organize and navigate your workflows using folders. Refer to Managing Workflows for detailed instructions.
- Search and Filter bar (top) - Enables quickly locating specific Workflows using search and filtering options.
- Workflows table (main area) - Displays a list of workflows with key details.
The Workflows Table
The Workflows table provides the following information for each workflow. Users can only see the Workflows created by other users in the same Data Scope.
The Workflows table includes the following fields:
- Structure - Displays the first four icons of the events and actions configured in the Workflow and indicates the number of additional ones. Hovering over the icons displays a preview of the full Workflow.
- Workflow Name – The name assigned to the Workflow.
- Trigger Type – Specifies how the workflow is initiated: Event, Scheduled, or Manual
- Trigger - Details the specific trigger:
- Event - The name of the selected triggering event.
- Scheduled - The schedule defined for running the Workflow.
- Manual - 'On Demand' run.
- Total Runs – The total number of times the Workflow was run.
- Last Run – The date and time of the most recent Workflow run (UTC).
- Last Run Status - Indicates the outcome of the last run: Awaiting, Completed, Delayed, Failed, In Progress, Terminated, Timed Out.
- Last Updated – The date and time of the last workflow modification (UTC).
- Workflow Status – The current status of the Workflow. Possible statuses: Active, Paused (as defined in the Workflow settings), Deactivated, or Terminated.
- Query Name - (For Action-triggered workflows) The query used to select assets for the action.
Filtering and Searching
Use the search and filter bar to refine the workflow list:
-
Search workflow – Searches across all text fields.
-
Workflow Name – Filters workflows with the selected workflow names.
-
Trigger Type – Select from the dropdown the type of Workflow trigger: Event, Manual, Scheduled
-
Scheduling Type - For Scheduled triggers, filters by frequency: Every global discovery cycle, Every x hours, Every x days, Days of week, Days of month.
-
Event Type – Filters workflows with the selected types of event.
-
Action Type – Filters workflows with the selected types of actions.
-
Query - Filters workflows configured with actions having the selected queries.
-
From/To – Filters the Workflows that ran in the specified period of time.
* Click **From** and select the date and optionally the time (right pane) from which to display results. Repeat for **To** and then click **OK**.
* Both **From** and **To** dates must be filled in and be earlier than or on the current date.
* Click the arrows to the left/right of the Month/Year header to open the previous/next month's or year's calendar page.
* To filter results only for a specific date, select the same date twice.

<Image align="center" border={false} src="https://files.readme.io/6b19ca195289e1ee67a949b991005bec6fc46d86a40a9b080d92b17d01ead376-FromToFilter.png" />
You can click the following to perform quick actions on filters:
- Select All - Selects all options in a specific filter.
- Clear All - Clears all selections in a specific filter.
- Reset - Clears all filters and displays the entire table.
Creating a Workflow
Click Create Workflow to configure a new workflow. To learn more, see Creating a Workflow.
Performing Actions on Workflows
Directly from the Workflows page, you can perform the following actions on one or more Workflows:
- Change the status (activate/deactivate) of one or more selected Workflows.
- Delete one or more selected Workflows.
- Duplicate a single Workflow.
- Open a Workflow in a new tab.
- Move selected Workflows from one folder to another.
Note
When you select the checkboxes of one or more Workflows, the number of selected Workflow records is displayed next to the Total results. For example, Total 9 / 2 selected
Changing the Workflow Status
By default, a newly created Workflow is in Active status. Directly from the Workflows page, you can activate one or more deactivated Workflows or deactivate one or more active Workflows.
Note
You can also deactivate/activate a single Workflow from the Settings on its configuration page.
To change the status of one or more Workflows directly from the Workflows page
- In the All Workflows table, hover over the row of a Workflow, and then at the end of the row, click the Change Workflow Status icon
.png) or select the checkboxes of one or more Workflows, and then on the top right of the table, click the Change Status action
or select the checkboxes of one or more Workflows, and then on the top right of the table, click the Change Status action 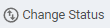 .
.
Note
When you select all Workflows in the system (by clicking Select All above the table), the Change Status action is disabled.
- From the Status dropdown that opens, click the relevant status (only one is enabled): Activate Workflow or Deactivate Workflow. Under the Workflow Status column, the status of the selected Workflows changes to Active or Deactivated, respectively.
Deleting Workflows from the System
You can permanently remove one or more entire Workflows from the system directly from the table on the Workflows page. This requires confirmation. Once deleted, you can't retrieve the Workflows.
To delete one or more Workflows from the Workflows page
- In the All Workflows table, hover over the row of a Workflow, and then at the end of the row, click the Delete icon
 or select the checkboxes of one or more Workflows (the number of selected workflows is displayed alongside the Total results), and then on the top right of the table, click the Delete action
 .png) . The system asks you to confirm the deletion. You can also select all records in the table or clear your selection.
. The system asks you to confirm the deletion. You can also select all records in the table or clear your selection. - Click Delete Workflow/Delete Workflows to confirm. The selected Workflows are completely deleted from the system. This can't be undone.
Note
You can also delete a single Workflow from its configuration page.
Duplicating a Workflow
You can duplicate a single Workflow directly from the Workflows page. Duplicating a Workflow is useful if you want to create a new Workflow that has a similar structure.
To duplicate a Workflow
- In the All Workflows table, hover over the row of the Workflow that you want to duplicate, and then at the end of the row, click the Duplicate icon
.png) or select the checkbox of one Workflow, and then on the top right of the table, click the Duplicate action. You can duplicate only one Workflow at a time. The 'Make a copy of the workflow' dialog opens.
or select the checkbox of one Workflow, and then on the top right of the table, click the Duplicate action. You can duplicate only one Workflow at a time. The 'Make a copy of the workflow' dialog opens.
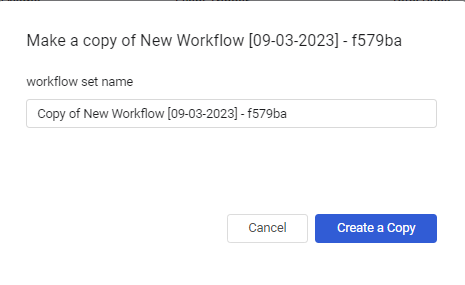
-
Use the name provided or type a Workflow name of your choice.
-
Click Create a Copy. The Workflow canvas opens and a message is displayed on top informing you that the Workflow was created successfully.
-
Make the required changes to the new Workflow and save it. The new workflow now appears in the Workflow table.
Opening a Workflow in a New Tab
You can open a Workflow in a new tab. To open a Workflow in a new tab
- In the All Workflows table, hover over the row of the Workflow that you want to open, and then at the end of the row, under the More Actions menu, click the Open Workflow action, or select the checkbox of one Workflow, and then on the top right of the table, under the More Actions menu, click the Open Workflow action. You can open one Workflow only at a time. The Workflow opens in a new tab. The Workflow canvas is displayed in the left pane and the configuration of the triggering event/action is displayed in the right pane.
Moving Workflows to Another Folder
You can move one or more Workflows from the Shared Workflows folder or subfolder (or from the All Workflows folder) to another Shared Workflows subfolder. You cannot move Workflows from the Drafts subfolder.
To move Workflows to another folder
- In the All Workflows table, hover over the row of a Workflow, and then at the end of the row, click the Move to Folder icon or select the checkboxes of one or more Workflows, and then on the top right of the table, under the More Actions menu, click the Move to Folder action . A Folder List dropdown opens.
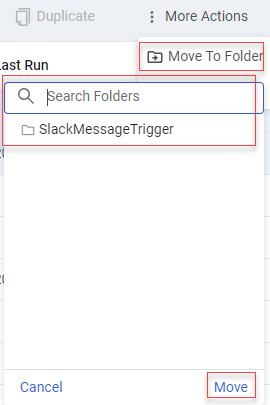
- Use the vertical and horizontal scrollbars to find the destination folder you want or search for a specific folder by entering part or all of its name in Search Folders.
- Click the destination folder, and then click Move. The Workflows are moved to the selected folder.
Viewing and Editing Workflows
You can view the configuration of any workflow that is listed in the Workflows table, and edit, as permitted. Learn more on viewing and editing Workflows.
Viewing Results of Workflow Runs
Click Run History to view the results of Workflow runs. To learn more, see Viewing Workflows Run History.
Updated 15 days ago