
Windows DHCP Server
Windows DHCP Server is a networking server used to lease IP addresses and manage other configuration information.
Types of Assets Fetched
This adapter fetches the following types of assets:
- Devices
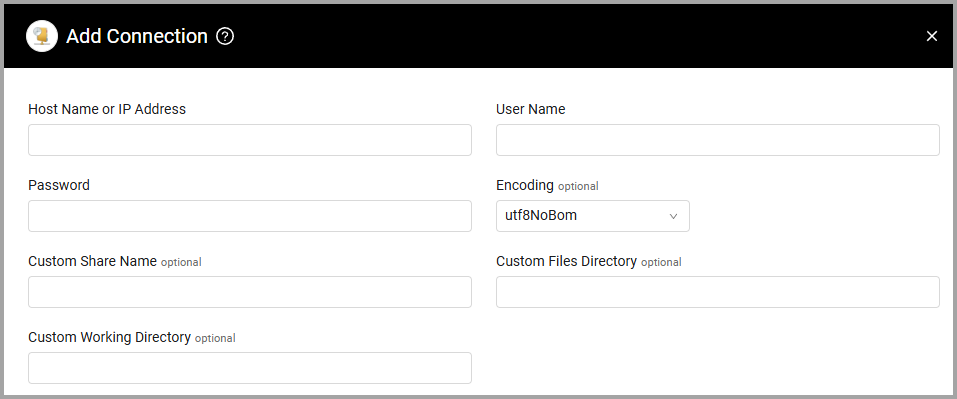
Parameters
- Host Name or IP Address (required) - The hostname or IP address of the Windows DHCP server.
- User Name and Password (required) - The credentials for a domain user account that has the Required Permissions to execute PowerShell code which queries the Windows DHCP server for information on the systems managed by that server.
- Encoding (optional, default: utf8NoBom) - Select from the dropdown a custom encoding for the temporary JSON file created on the Windows DHCP server before it is downloaded to Axonius.
- For PowerShell versions 7 and above, select utf8NoBom.
- For PowerShell versions prior to version 7, select utf8.
- For PowerShell version 2, select ASCII.
Note
If the encoding option of utf8NoBom is selected but you receive no data from the adapter fetch process, you might be using an older PowerShell version.
To resolve the issue, select utf8. The adapter fetch should operate as expected.
- Custom Share Name (optional) - The name of the Windows Share on the specified host, for example,
AxoniusShare$. If you do not specify a name, the adapter will useAdmin$. For more information, see Creating a Custom Share. - Custom Files Directory (optional) - The name of the directory to use within the specified Share, for example,
AxoniusDirectory. If you do not specify a name, the adapter will useaxonius. - Custom Working Directory (optional) - If file sharing is restricted in the domain, specify the physical path of the share specified in Custom Share Name.
To learn more about common adapter connection parameters and buttons, see Adding a New Adapter Connection.
Advanced Settings
Note
Advanced settings can either apply to all connections for this adapter, or to a specific connection. Refer to Advanced Configuration for Adapters.
- Number of parallel connections (required, default: 20) - Specify the maximum number of parallel connections permitted.
- Fetch Timeout Per Parallel Connection (seconds) (required, default: 300, min: 30) - Specify the timeout for data to be returned from each parallel connection.
- CIDR Exclusion List - Enter a comma-separated list of IP addresses and CIDRs to exclude from the fetch.
- Fetch statistics - Select this option to fetch statistical information about the DHCP service.
Note
For details on general advanced settings under the Adapter Configuration tab, see Adapter Advanced Settings.
Required Ports
- 135 (RPC)
- 445 (SMB)
- Random port in the range 1024-65535
Setting up a fixed port for WMI
The Windows DHCP Server adapter uses WMI.
You need to set up a fixed port to work with WMI.
WMI runs as part of a shared service host with ports assigned through DCOM by default. However, you can set up the WMI service to run as the only process in a separate host and specify a fixed port. For more details, see Microsoft Documentation - Setting Up a Fixed Port for WMI.
To set up a fixed port for WMI
- At the command prompt, type:
winmgmt -standalonehost- Stop the WMI service by entering:
net stop "Windows Management Instrumentation"or:
net stop winmgmt- Restart the WMI service again in a new service host by entering:
net start "Windows Management Instrumentation" or:
net start winmgmt- Establish a new port number for the WMI service by typing (e.g. the following example will establish port TCP 24158):
netsh firewall add portopening TCP 24158 WMIFixedPortTo undo any changes you make to WMI, enter:
winmgmt /sharedhostThen stop and start the winmgmt service again.
Creating a Custom Share
You can create a custom share and directory instead of ADMIN$ \ axonius. A custom share that is properly configured enables you to not require full local admin permissions to fetch data.
To create a custom share:
-
Create a local user, such as ‘axonius-usr’.
-
Add the user to the following groups:
- Distributed COM Users
- Remote Management Users
-
Create a directory for Axonius to use to store temporary files and to serve as a working directory, for example: C:\axonius
The name of this directory may be used later in the adapter configuration for DHCP in Axonius. -
Grant the following permissions to the local user:
- Read
- Write
- Modify
- Execute (or full control) permissions on the custom directory, subdirectories, and files
-
Share the directory that you created by using Sharing or Advanced Sharing. Verify that the local user has full permissions for this share. Specify a descriptive name for the shared directory, preferably a name which ends with a dollar-sign, such as: AxoniusShare$
The name of this share will be used later in the adapter configuration for DHCP in Axonius. -
Open WMI Management (wmimgmt.msc). Under Security, select Root (minimal: root/cimv2) namespace.
-
Click Security. Add the local user.
-
Click Advanced.
-
From the Applies to dropdown, select This namespace and subnamespaces.
-
Under the Allow column for the local user, select the Execute Methods, Enable Account, and Remote Enable options, and then click OK.
-
In Axonius, verify that the Custom Share Name and Custom Files Directory parameters are configured. The adapter will attempt to create the specified directory under the share.
-
If the above step fails, it means some sharing options are not enabled on the server. In such a case, add the full path to the share under Custom Working Directory.
Note
When using Custom Working Directory, this directory must be identical to all DHCP adapter connections, and needs to be specified in all adapter connections, even if using a local admin. Only use this option as a last resort.
Required Permissions
The value supplied in User Name and Password must be able to execute PowerShell code which queries the DHCP server for information on the systems managed by that server.
The supplied User Name must have the following permissions:
- Local admin permissions. Alternatively, ensure that you have full read/write/execute/delete/modify permissions for subfolders and files.
- Access RPC on the DHCP server.
- Execute PowerShell on the DHCP server and access the IPC$ share on the DHCP server.
- Read and Write Access to ADMIN$ share on the DHCP server. Alternatively, create an 'axonius' folder inside the \localhost\ADMIN$\ directory and ensure the Axonius account has Full Permissions to read and write to this newly created folder.