
Configuring an Action Node
Action nodes execute an Enforcement Action selected from the Select Action pane. For detailed information on each Enforcement Action and its fields, refer to the Enforcement Actions Library.
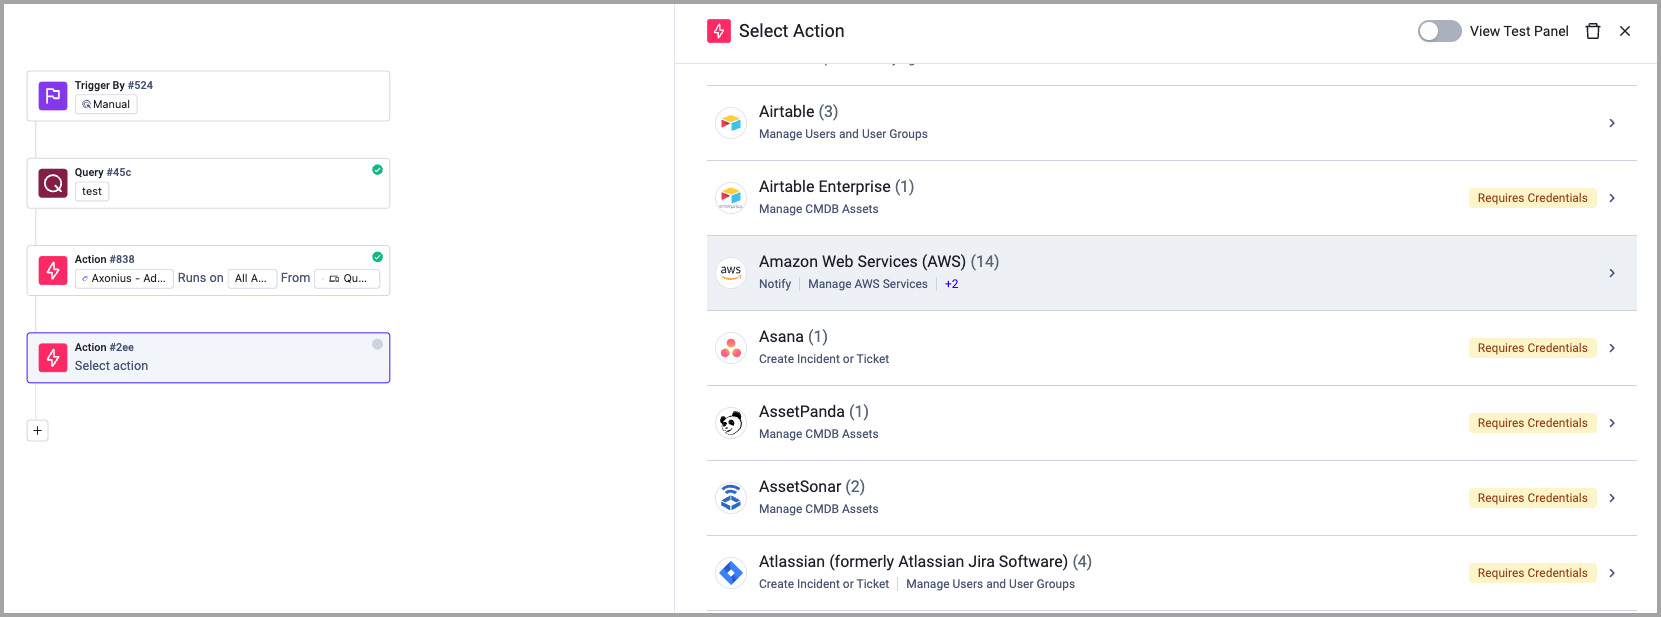
To select and configure a workflow Action
-
Hover over the + in the workflow canvas, and select Add Action.

- The selected action appears in the Action node on the Workflow canvas.
- The Action Setup pane automatically opens.
-
In the Select Action pane, choose the desired enforcement action.
-
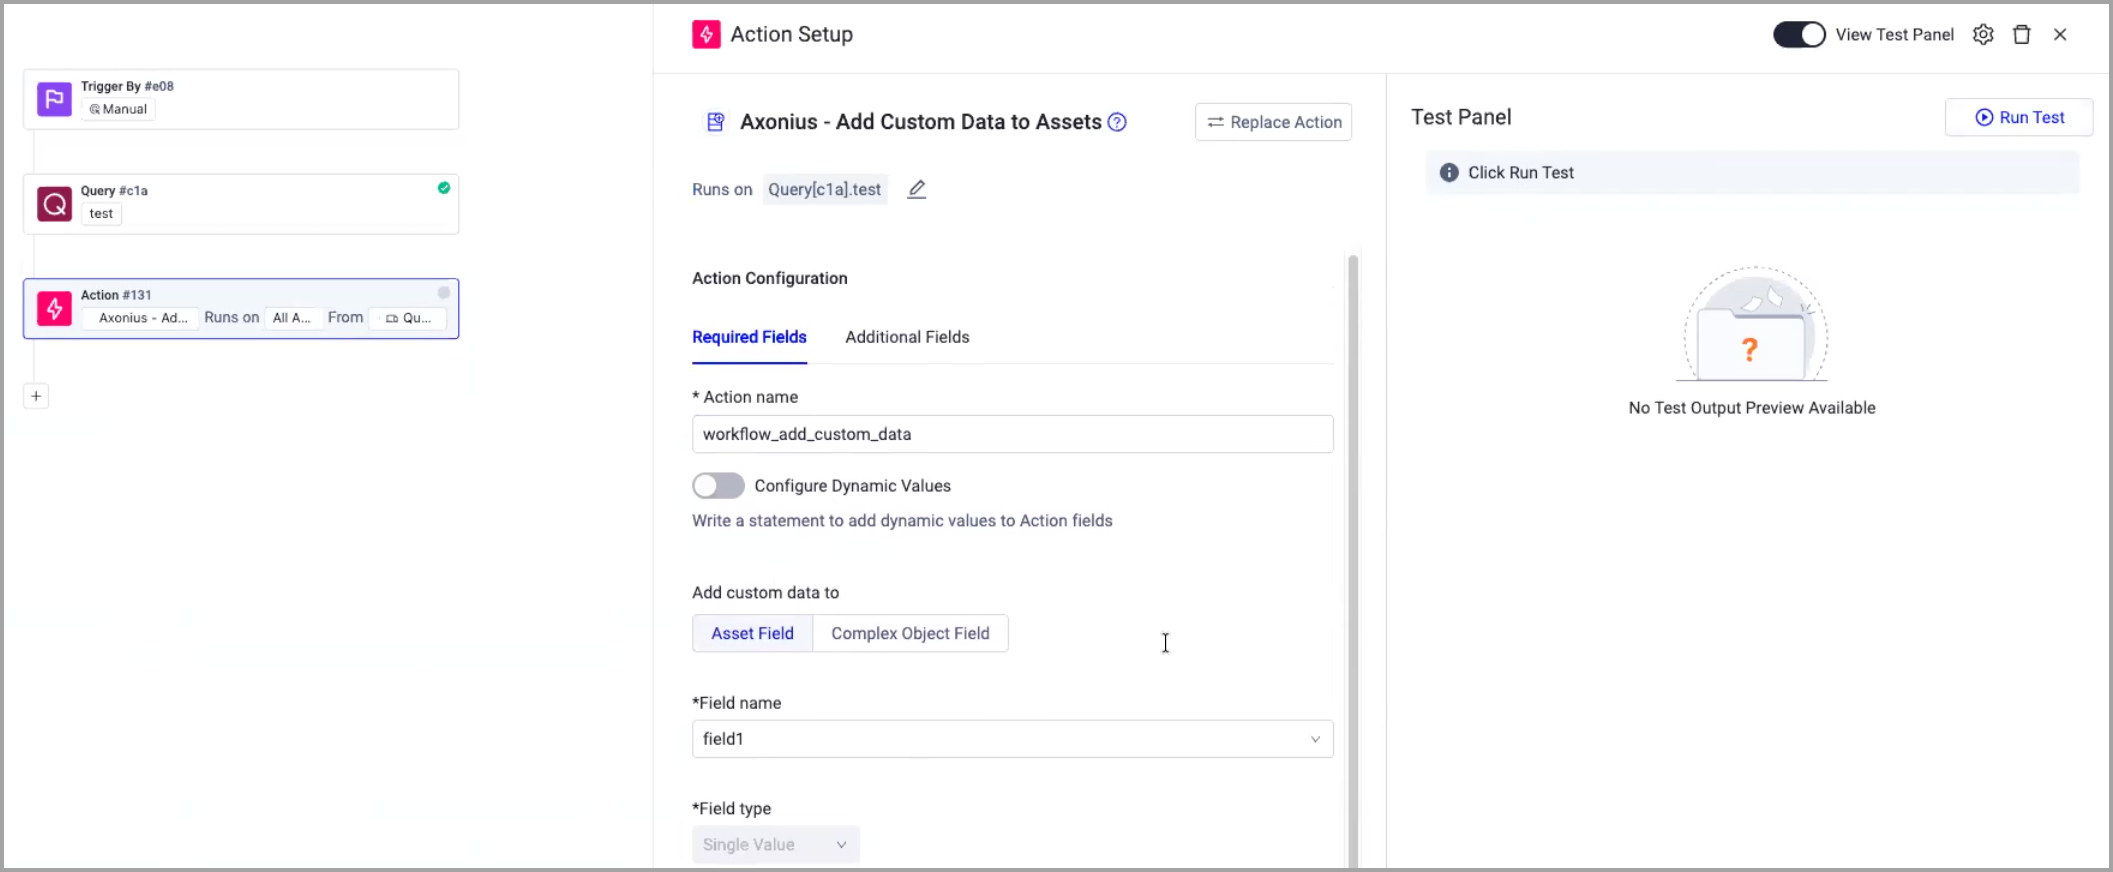
Configure the enforcement action.
- The default Action name begins with workflow_. You can either use this default name or enter a custom name.
- Fill in all Required Fields and any optional additional fields for the action. Click the ? icon next to the enforcement action name to access detailed documentation on these fields.
-
If the selected enforcement action is of the Create Issue/Incident/Ticket category, a Link with a Case button appears. Click it to open the Create A Case Set wizard and create a Case Set.

-
If the selected enforcement action is Create new case, a Link with a Ticket button appears. Click it to open the Create A Case Set wizard and create a Case Set.

-
Configure Action assets: By default, an action operates on assets resolved from the previous node. You can modify the Action to run on other assets as needed.
- If this Action runs on All Assets and follows an Action Condition node, by default, it only runs on assets that match the latest condition. This can be optionally disabled. Learn more about this option.
Testing an Action Node
Test an Action node to validate field configuration and confirm the action executes correctly. See Testing a Workflow Node-by-Node to learn more about testing workflows.
Testing an Action node verifies that:
- All required fields have valid values.
- Dynamic value statements resolve correctly.
- The action executes successfully on the test asset.
- Artifacts or side effects are created correctly.
Prerequisites
Before testing an Action node:
- The upstream node must have been tested first so data flows to this action.
- Configure all required action fields.
- Resolve any field validation errors (shown in red).
- When all required fields are valid, the View Test Panel button is enabled.
Running the Test
To test an Action node:
-
Click View Test Panel. The Test Panel opens. Before the first run, the Test Panel is empty.
-
The system automatically selects an asset from an upstream node:
- The asset resolved from your upstream node (from the previous test).
- For events: the asset the event resolved.
- For queries: one of the query results.
- For actions: the asset the action operated on.
-
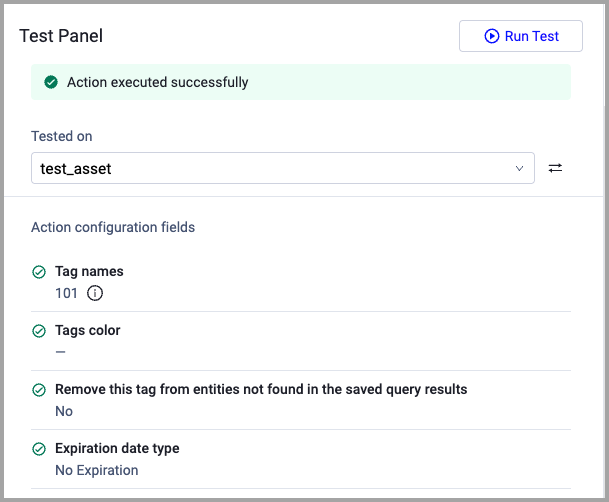
Click Run Test. The action executes on the test asset. When the test is complete, the results are displayed in the Test Panel.
-
Review the test results:
- Success/Failure Status - Action completed or failed.
- Node Output - What the action did (e.g., "User disabled successfully").
- Assets Affected - Individual result per asset.
- Artifact Data - Files, records, or side effects created.
- Errors - Error message if action failed.
Understanding Test Outcomes
- Success - Action executed without errors on the test asset. Field values were valid, and the action completed as configured.
- Field Validation Error - One or more fields have invalid values or type mismatches. Go back to the configuration and fix the issue.
- Action Failed - Action executed, but the target system returned an error. Review the error message if displayed—it may indicate that the test asset's state is incompatible with the action or that the credentials are incorrect.
- Missing Data - A dynamic field couldn't resolve data from upstream. Verify the upstream node produces the required data.
Next Steps After Successful Test
After the Action node test succeeds:
- Add downstream nodes - Attach conditions, more actions, or delays.
- Test those nodes - Build incrementally, testing each additional node.
- Run full workflow test - When the workflow is complete, test end-to-end on a randomly selected asset.
Common Issues
- "Field validation failed" - A required field is missing or has the wrong type. Return to configuration.
- "Dynamic value not found" - A field references upstream node data that doesn't exist. Verify the upstream node was tested.
- "Connection failed" - Action couldn't connect to the target system. Check credentials and system availability.
- "Asset state incompatible" - Action requires a specific asset state (e.g., active user) that the test asset doesn't have. Choose a different test asset or verify the asset state.
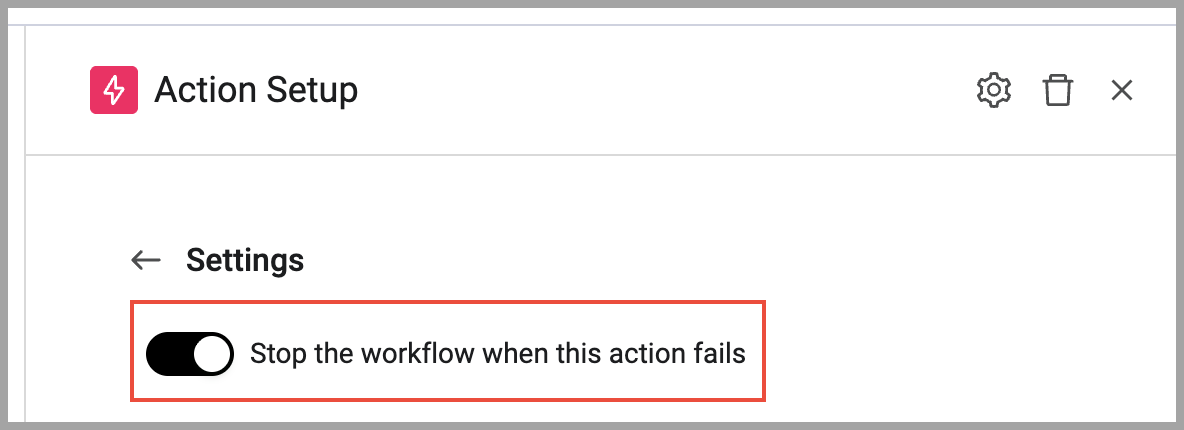
Stopping a Workflow when an Action Fails
You can configure Action nodes to stop a workflow from further processing when the action fails.
In the Action settings, enable Stop the workflow when this action fails. When the action fails, the workflow is exited immediately.
Modifying the Assets on which an Action Runs
By default, an action is set to run on the asset resolved by the node directly preceding it:
- An Action following an Event node runs on the asset resolved by that Event.
- An Action following another Action node runs on the single or all assets resolved from that previous Action node.
- If an action that runs on All Assets follows an Action Condition node (anywhere above it in the Workflow path), it defaults to running only on resolved assets that match the latest Action Condition.
You can change this default behavior to run the action on:
- Assets resolved by any previous node in the Workflow (either the first or all assets).
- The results of a new query (either the first or all assets).
- The default asset (reverting to the previous node's asset).
- Resolved assets that do not match the latest condition when following an Action Condition (anywhere above it in the Workflow path).
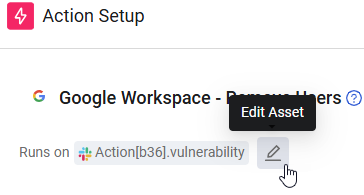
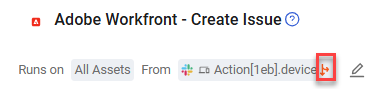
To modify the asset that the Action runs on
-
Next to the Runs on action (see above screen), click the Edit Asset pencil icon

-
Choose one of the following options for the action asset:
-
Click Apply.
- If subsequent nodes exist, a warning message appears, stating that the asset change will propagate to all subsequent actions in the same path.
- Click Change Asset to confirm.
- The name of the new asset is preceded by 'Custom'.
Running the Action on Resolved Assets from Previous Nodes
Workflow data, including resolved assets, is stored in the Workflow Data repository. Resolved assets are identified as:
- Action[node UUI]. (for actions)
- Event[node UUI]. (for events)
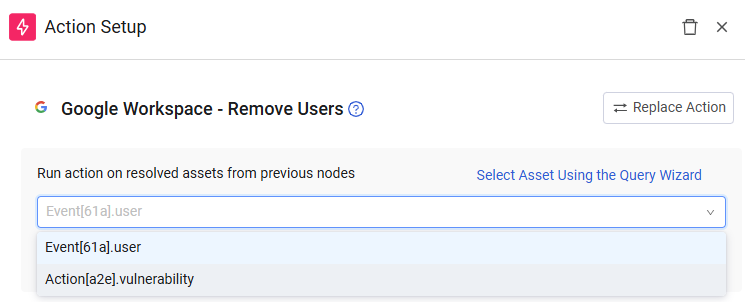
To select resolved assets from a previous node
- From the Run action on resolved assets from previous nodes dropdown (open by default; if not, click Select Resolved Assets From Previous Nodes), select a resolved asset.
- Example: You can choose to run the action on User assets from a previous Event node or Vulnerability assets from a previous Action node.
- Example: You can choose to run the action on User assets from a previous Event node or Vulnerability assets from a previous Action node.
Note
You can expand the Workflow Data repository and view resolved assets per Event node and Action node. However, you can only choose a resolved asset from the dropdown in the Action Setup drawer; direct pasting from the Workflow Data repository is not supported.
Data from bulk action nodes is not available in the Workflow Data repository.
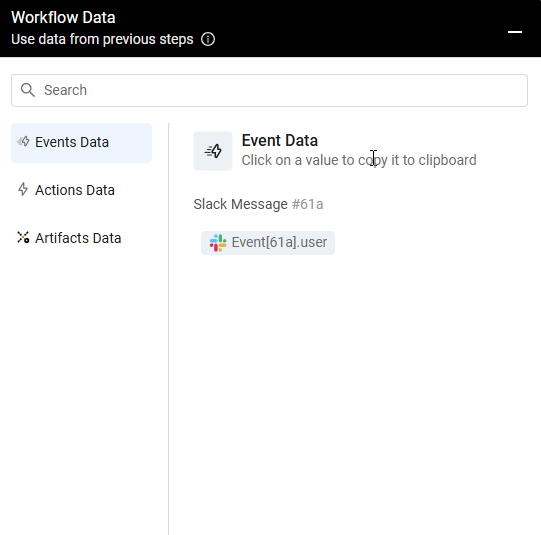
In the screen below, you can see in Event Data the User asset resolved from the Slack Message event.
When an Action running on All Assets follows an Action Condition node (anywhere above it in the workflow path), you can disable the default option so that it also runs on resolved assets that do not match the Action Condition. See Running the Action on Assets Matching Latest Condition.
Running the Action on Assets Matching Latest Condition
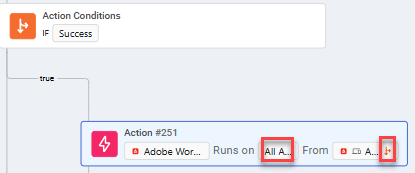
When an Action node running on All Assets follows a Condition node, its configuration includes the Only assets that match the latest condition option, which is enabled by default.
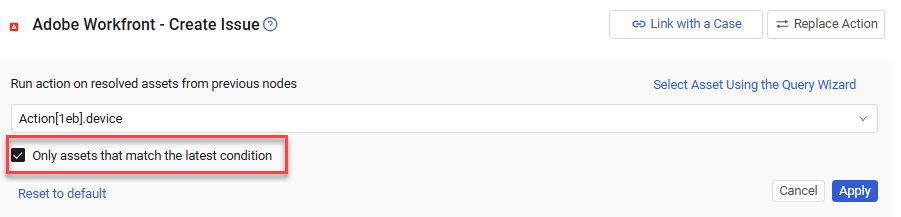
An orange icon  indicates this in both:
-
The Action Setup pane, above the Action Configuration.
-
The Action node following the Action Conditions node in the Workflow.
This option is only available if previous Action nodes (above this Action node) following this Action Condition node also have this option enabled.
- If you add an Action node above or below a filtered Action node, it is filtered by default.
- If you remove filtering from an Action node following a Condition node, filtering is removed from all its child nodes.
- You can't add filtering to an Action node if it follows an Action node without filtering.
- If you add filtering to an Action node following a Condition node, filtering is added to the Action nodes that follow it. Similarly, if an Action below an Action Condition does not have filtering enabled, filtering is not available for nested Action Conditions.
Clear the checkbox to disable this option. In this case, the action runs on all resolved assets, even those that do not match the latest condition. All nodes in the same path following this Action node will have this checkbox disabled automatically.
Running Action on First or All Assets Resulting From a Query
You can configure the action to run on different assets by using the Query Wizard and selecting a new or existing query.
You can choose whether to run the action on either:
- First Asset (default): The first asset that the query returns at the time that it runs (a split run). The Workflow runs once per asset, and then proceeds to the next node after it runs on this single asset.
- All Assets: All assets returned from the query at the time it runs (a bulk run). In this case, the Workflow proceeds to the next node only after it runs on all assets returned from the query.
Bulk runs enable automating tasks that require processing multiple assets, supporting a wider range of scenarios and use cases. They allow you to run actions across all assets in a query.
- Condition-Based Segmentation - You can dynamically filter assets based on conditions, allowing for split paths in Workflows.
- Group by segmentation (Dynamic Values) - Aggregate assets based on a field.
Note
- Triggering actions can only run on the first asset returned from a query.
- Events cannot follow Bulk actions; they can only follow Actions set to run on a first asset.
- Bulk action data is unavailable in the Workflow Data repository.
The Bulk run feature supports the following use cases:
- IDM (joiner/mover/leaver) - For example, In an offboarding workflow, you could run a disable action on all service accounts owned by a user.
- Disabling service accounts in an offboarding workflow.
- Sending one user a list of assets from a query.
- Sending one Slack channel a list of 100 users.
- Case management - Ability to unify to a single Workflow.
- Unifying multiple Enforcement Actions - Running multiple Enforcement Actions on different queries in a single Workflow.
When an Action Condition node follows a bulk Action node, the assets list is split based on the defined criteria. Each child node in each of the paths (True and After) runs on every asset returned from the inherited query.
To select assets using the Query Wizard
- Open Query Wizard: Click Select Asset Using the Query Wizard.
- Under Run action on assets that match the query, from the Module dropdown, select an asset type.
- Configure query: In the Query Wizard that opens,configure your desired query using the Query Wizard. In the Field Value box, you can type a value or copy a field value from the Workflow Data dialog.
- Set Asset count: In the Additional Settings section, under Number of Assets, set how many assets the action runs on:
- First Asset (default) - The first asset that the query returns when it runs. The Workflow runs once per asset.
- All Assets - All assets that the query returns when it runs. In this case, the Workflow proceeds to the next node only after it runs on all assets returned from the query.
Resetting an Action to Run on Default Assets
Click Reset to default from either tab to reset an action that was configured to run on resolved assets from any previous node or on query results. This will revert it to run on its default assets (those resolved in the previous node).
This reset applies to the current node and all subsequent nodes in the same path.
Updated 2 months ago