
Manage Custom Enrichment - Enrich Assets with CSV File
The Manage Custom Enrichment - Enrich assets with CSV file Enforcement Action enables the addition or removal of Custom Enrichment data contained in an external CSV file or SQL Server table to or from assets, utilizing the Custom Enrichment feature.
This action runs the Enrichment Statement on assets that are the result of the selected query or on assets selected on the relevant assets page.
Note
To enrich all assets, use a query that returns all assets for each asset module. For example, for the Device module, use the All Devices query, and for the User module, use the All Users query.
See Creating Enforcement Sets to learn more about adding Enforcement Actions to Enforcement Sets.
Note
- Not all asset types are supported for all Enforcement Actions.
- See Actions supported for Activity Logs, Adapters Fetch History, and Asset Investigation modules.
- See Actions supported for Aggregated Security Findings.
- See Actions supported for Software.
Run History and Affected Assets
In the Run History of this Enforcement Action, results are categorized under Affected Assets:
- Successful - The number of assets that the Custom Enrichment rule matched and therefore removed/added the Custom Enrichment data from/to those assets. For Remove Custom Enrichment, it also includes those assets that are the result of the selected query but do not have Custom Enrichment even before running the action.
- Failed or Additional- The number of assets that resulted from the selected query but did not match the Custom Enrichment rule and therefore did not remove/add the Custom Enrichment data from/to those assets.
- Failed - When the Show assets that did not meet the criteria under 'additional' instead of 'failed' option is disabled (the default).
- Additional- When the option is enabled.
Refer to Viewing Enforcement Set Run History to learn more about run results.
Required Fields
These fields must be configured to run the Enforcement Set.
- Action name - The name of this Enforcement Action. The system sets a default name. You can change the name.
- Configure Dynamic Values (optional) - Toggle on to enter a Dynamic Value statement. See Creating Enforcement Action Dynamic Value Statements to learn more about Dynamic Value statement syntax.
-
Action type - Select whether to Add or Remove a custom enrichment to or from assets.
- When Remove is selected, the custom enrichments are removed from all assets returned by the selected query. To ensure that the enrichment is removed from all assets, select a query that returns all assets for each asset module.
-
Select file input method (default: Upload file) - Select one of the following methods to either upload a file or use a file saved in a storage system:
- Upload file - Upload from your system a CSV file in the Custom Enrichment CSV File format only.
- Under Select file input, click Upload file to browse for and upload a CSV file in Custom Enrichment CSV File format.
- Select CSV adapter connection - To use a CSV file from a CSV adapter connection.
- From the Select adapter connection dropdown, select the connection that contains the CSV file you want to use.
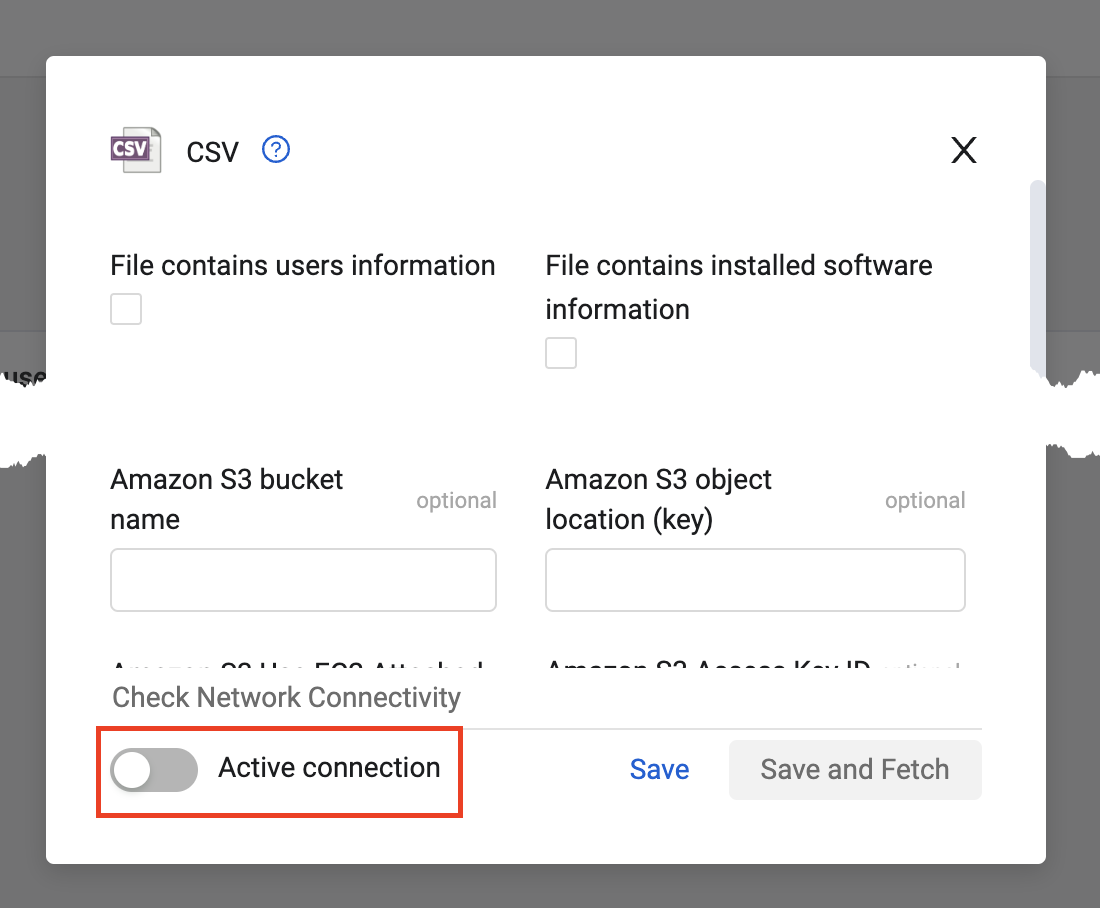
- Prerequisite: Make sure you have configured the relevant CSV file using a CSV adapter connection. Give a name to the connection (connection label) so that you can identify it in the dropdown list. Configure the file name, location, and credentials required to access the file using the CSV adapter. These can be SMB, Azure, blob, Amazon S3 bucket, etc.
Note
If you are uploading a file from an online storage location and want to use it only for custom enrichment, you must disable the Active connection setting on the CSV adapter connection. In this case, the CSV adapter connection will not fetch new assets.
- Select SQL Server adapter connection - To use an SQL Server table from an SQL Server adapter connection.
- From the Select adapter connection dropdown, select the connection that contains the SQL Server table to be used.
- Prerequisite: Make sure you have configured the relevant SQL Server table using an SQL Server adapter connection. Give a name to the connection (connection label) so that you can identify it in the dropdown list. Configure the file name, location, and credentials required to access the file using the SQL Server adapter. These include SQL Server Host, SQL Server Port, SQL Server Database Name, SQL Server Table Name, and Database Type. Is Users Table must be disabled so that Axonius considers the data fetched from the specified table as device data. A table with Software vulnerabilities data must contain a CVE ID field. Note that if you make any schema changes to the source table, you need to save the connection again.
- Upload file - Upload from your system a CSV file in the Custom Enrichment CSV File format only.
Note
If you are uploading a file from an online storage location and want to use it only for custom enrichment, you must disable the Active connection setting on the SQL Server adapter connection (as shown in the CSV adapter connection screen above). In this case, the SQL Server adapter connection will not fetch new assets.
- Statement - Refer to the Custom Enrichment Statement below on how to enter this statement and how it is validated.
Custom Enrichment Statement
Use the Statement box to define the Custom Enrichment statement that defines how the data from the external source (CSV/SQL) is mapped and applied to the target Axonius assets.
- Learn about the components and structure of the Custom Enrichment statement necessary for defining the logic.
- You can use the Custom Enrichment Wizard or the Syntax Helper to help you write the statement easily and accurately.
- You can also incorporate custom fields within your Custom Enrichment statements.
Using the Custom Enrichment Wizard
The Custom Enrichment Wizard simplifies the configuration of the Enrichment Statement. Its interface guides you through selecting the correct fields and logic needed to map external data to your Axonius assets, reducing the likelihood of configuration errors.
- The Wizard button is only enabled after you have successfully uploaded a valid CSV file.
- The system continuously validates the statement, even within the Wizard. If you change or remove the source file while configuring the Wizard, or there is no match between the selected CSV columns and the ones in the CSV file, the validation fails, and the Save and Run button becomes disabled. The button becomes enabled when all required fields are filled and valid.
- You can switch from the Wizard to Syntax view, provided the Wizard statement is fully configured.
- You can switch from the Syntax to Wizard view only if the existing statement is valid and supported by the Wizard. For example, if the text of the Syntax statement contains complex logic, such as two or more levels of nested "AND" / "OR" logic, it is not possible to switch to the Wizard, and the Wizard button is disabled.
When you complete the configuration of the statement in the Wizard, the system generates the underlying statement syntax.
To define the Custom Enrichment statement using the Wizard
- In the Statement section, click the Wizard button. Note that the Wizard button is only enabled when a valid file is loaded.
- Define the criteria to identify the Axonius assets for enrichment (WHERE clause):
- From the adapter and Select Adapter Field dropdowns, choose the adapter and the Adapter field that you want to match. The selectable adapter fields are of the Asset Type selected in the Enforcement Set query. If you did not select an Asset Type, the Adapter Field dropdown is disabled, and a notification tells you to do so.
- From the operator dropdown, select the relationship between the fields. Available operators include:
- = (Equal to)
- == (Exactly equal to)
- contains
- in
- in_net (used for IP address network matching)
- From the Select CSV field dropdown, choose the corresponding field from your external source CSV file. If the CSV file is not uploaded or synced, this dropdown is disabled.
- If you want to reverse the order of the Adapter Field and External CSV Field in the comparison, hover over the condition row and click the Swap Adapter and CSV field icon that appears next to the Select CSV field dropdown.
- Click the Plus (+) icon to add additional matching conditions. Then, from the dropdown select AND or OR logic, and proceed from the beginning of this step to define the new condition.
- To remove an additional condition (at least one must remain), hover over the condition row, and click the Remove Row (x) icon that appears.
- Define the Enrichment Fields: Under Enrich the query's assets with the selected CSV fields, click the Select CSV fields dropdown, and select one or more columns (e.g., Description, Tags) from your external file that contain the data you want to apply to the Axonius assets. Click Select All to select all fields or Clear All to clear all fields.
Using the Syntax Helper
The Syntax Helper tool helps you write error-free Custom Enrichment statements by providing the correct system names for Asset field names and Relationship field names.
To select and copy a field into the Statement
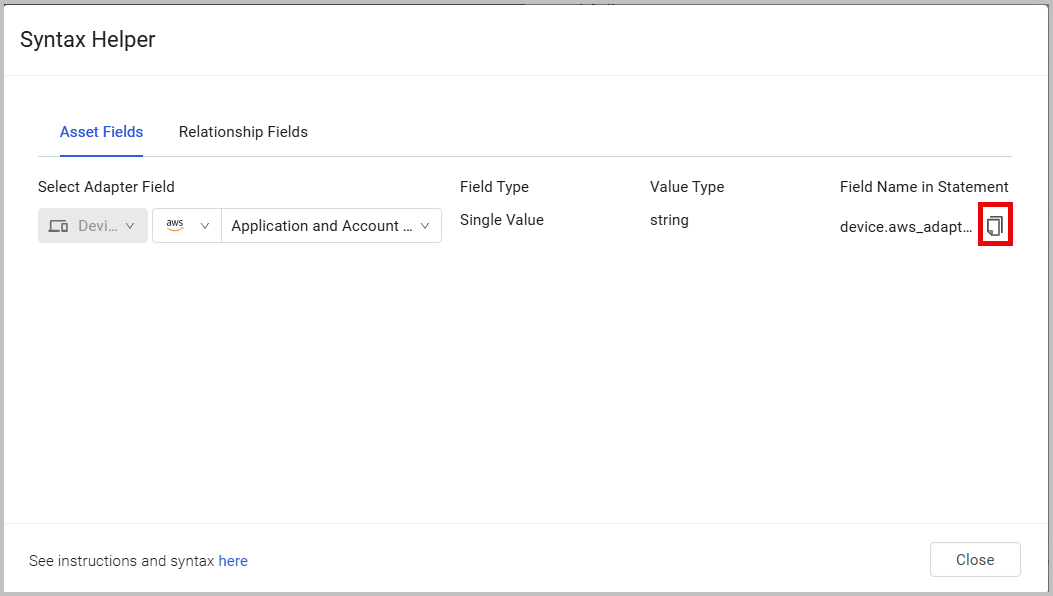
- Above the Statement box, click Syntax Helper. The Syntax Helper window opens with two tabs: Asset Fields and Relationship Fields.
- Look up the required field, click the Copy icon to copy the system field name, and then paste it into the Statement box.
- To add an Asset field - Open the Asset Fields tab, and select the field. (This process is identical to adding an Asset field to a Dynamic Value statement.
- To add a Relationship field - Open the Relationship Fields tab, and select the field. (This process is identical to adding a Relationship field to a Dynamic Value statement.
Complex fields are NOT supported in any rule types.
Statement Validation
As you type your statement in the Syntax tab or fill fields in the Wizard, it is automatically validated against a set of rules. This ensures your statement is correctly formatted and compatible with the uploaded CSV file.
The validation process checks for the following:
- It verifies that the necessary columns exist for a given operation. For example, the in_net operator requires a subnet column with content in every row.
- It ensures a consistent number of columns across all rows in the file.
- It checks for invalid characters (e.g., tabs, spaces) in columns that have strict formatting rules, such as the subnet column.
- It confirms that only commas (,) are used as delimiters.
- It verifies that all columns referenced in your statement (assuming it is already written) exist in the uploaded CSV file.
.png)
In the Syntax tab, the Validating loading icon appears as you type, indicating that the system is checking your statement and the uploaded CSV file for errors. The icon disappears once the validation is complete.
The validation can have one of two outcomes:
- Success - When validation is successful, a green notification appears under the Statement box: Statement was validated successfully.
- Error - If validation fails, a red notification appears under the Statement box. The message provides the location of the error and a description of the issue (e.g., Statement validation failed at [location] [error]). You must correct the error for the statement to be validated again.
- If the error is related to the CSV file itself, the error message specifies the location of the problem within the file to help you troubleshoot it.
- If you write your statement before uploading the CSV file, it must be validated again after the file is uploaded to ensure the columns match.
The Save and Run button only becomes active when:
- Your statement is successfully validated.
- Your uploaded CSV file is error-free.
- All required fields of the Enforcement Action are filled.
You can't save or run an action with an invalid statement or an issue in your uploaded CSV file.
Additional Fields
These fields are optional.
- Write enriched values based on aggregated or custom data fields into EC artifacts adapter enrichment field (default: disabled) -
-
Enable this option to write enriched values, based on aggregated or custom data fields, into Enrichment: field name under the EC Artifacts adapter. If a field with that name already exists (before enabling this option), this option will work only after you delete the existing field.
This option is useful when you want the results of Custom Enrichment to be treated like any other adapter, meaning that the enriched field values in the EC Artifacts adapter are added as values to aggregated fields of the same name. This means that Queries running on aggregated fields treat the enriched value like any other aggregated field value. -
When this option is disabled, enrichment values, based on aggregated or custom data fields, are written to new enrichment fields on the asset in the format Common Enrichment: field name.
-
- Show assets that did not meet the criteria under 'additional' instead of 'failed' (default: disabled) - Use this option to determine in what category assets that match the Enforcement Set query but do not match the enrichment criteria are displayed in the Run History under Affected Assets:
- Additional - When this option is enabled.
- Failed - When this option is disabled.
- Interpret a value with semicolons as a list of values (default: disabled) -
- Enable this option to interpret a field in the CSV file with embedded semicolons as a multiple-value list field with semicolon delimiters.
- When this option is disabled, semicolons embedded in the field value are considered as characters in the string.
For more details about other enforcement actions available, see Action Library.
Updated 4 months ago