BMC Helix Client Management
Helix Client Management is an automated endpoint management solution to inventory and track hardware and software endpoints; manage software licensing, patching, and event management; and remotely manage users' devices for updates or troubleshooting.
Note
Axonius considers the results imported from this server as if these were received from a CSV file. This means the imported data must include at least one column of required data as specified in the CSV adapter - Which fields will be imported with a devices file?
Types of Assets Fetched
This adapter fetches the following types of assets:
- Devices
- Users
Parameters
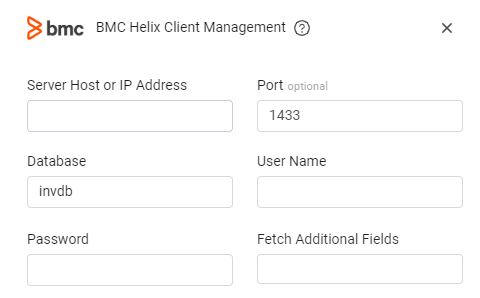
- ** Server Host or IP address** (required) - The hostname / domain of the BMC Helix client Management SQL server.
For MSSQL:
- To use a specific named instance, the value supplied should be in the following format:
{server_host}\{instance_name}. - If no instance is supplied, the default instance will be used.
- To use a specific named instance, the value supplied should be in the following format:
- SQL Server Port (required) - The port of the SQL server.
For MSSQL the required ports are:
- Microsoft SQL Server discovery port - 1433.
- User Name (required) - The credentials for a user account that has the required permissions to fetch assets.
Note
The best practice is to create a dedicated SQL local user for Axonius usage. For details on creating an Axonius user for Microsoft SQL Server, see Creating a Local Read-Only User for Microsoft SQL Server.
If you are using a domain user, specify the domain and the user name in the following format: domain\username.
-
Database (required) - The database to connect to, default 'invdb'.
-
User Name (required) - The user name to connect to the database.
-
Password (required) - The user's password. The password must not include ";".
-
Fetch Additional Fields
-
For details on the common adapter connection parameters and buttons, see Adding a New Adapter Connection.

Advanced Settings
Note
Advanced settings can either apply for all connections for this adapter, or you can set different advanced settings and/or different scheduling for a specific connection, refer to Advanced Configuration for Adapters
- SQL pagination (required, default: 1000) - Set the number of results per page received for a given SQL query, to gain better control of the performance of all connections for this adapter.
Note
For details on general advanced settings under the Adapter Configuration tab, see Adapter Advanced Settings.
Required Ports
Port 1433
API
Axonius uses SQL for Marimba
Permissions
Read permissions are required in order to fetch assets.
Creating a Local Read-Only User for Microsoft SQL Server
To connect to the Microsoft SQL Server to create a Local Read-Only User, you can use Microsoft SQL Server Management Studio. If you don't have it on your local machine, you can probably find it on the machine the Microsoft SQL Server is installed on.
After connecting to the server, you should do the following:
-
If you don't have the name of your database, expand the Databases folder which shows all the databases in this server. Your database should appear here, starting with "CM_".
-
Navigate to the Security folder and expand it. Right-click the Logins folder and click New Login.
.png)
-
Create a user using the "SQL Server Authentication" option. Fill in the details and select your database from the Default Database List.
.png)
-
Navigate to the User Mapping page, and check the check box for the database that your login can access. In the Database role membership list, leave the default option public selected, and select the db_datareader check box.
.png)
-
Click OK and create the user.
-
Reconnect with the new user to validate that it was indeed created (File -> Connect Object Explorer).
.png)
Troubleshooting
- "Login failed" - If you are using a domain user, in the User Name field, specify the domain and the user name in the following format: domain\username.
Updated 4 months ago
