
Tanium Interact
The Tanium Interact adapter lets you ask questions to gather live endpoint data in order to create an up-to-date inventory of hardware and software assets.
Asset Types Fetched
- Devices, Aggregated Security Findings, Users, Software, SaaS Applications
Before You Begin
Required Ports
- TCP port 443: REST API
Authentication Methods
- User Name/Password
- API Token ID/API Token
- Client-side Certificate Authentication (Mutual TLS)
Required Permissions
Tanium Cloud requires the "Token-Use" permission assigned to the persona. For both Tanium 7.4 and 7.5, the following permissions are required:
Module Permissions
A Module Role named Interact Read-Only User exists that provides these Module Permissions:
- Show Interact
- Interact Module Read
Required Computer Group Permissions
Access must be granted to the Computer Groups targeted by each value supplied in Names of Saved Questions to fetch (comma separated).
Required Advanced Permissions
You must Create an Advanced Role since none exists that grants these Advanced Permissions:
- Ask Dynamic Questions
- Read Sensor - with content sets granted for the assigned content sets of the sensors being used in each value supplied in Names of Saved Questions to fetch (comma separated).
- Read Saved Question - with content sets granted for the assigned content set of each value in Names of Saved Questions to fetch (comma separated).
Create an Advanced Role
These are the steps to create a role that grants the Required Advanced Permissions:
- Log in to the value supplied in Hostname or IP Address with an account that has the permissions necessary to edit roles.
- In the navigation menu:
- Go to the Permissions
>Roles page.
- Go to the Permissions
- In the Permissions Page:
- Click New Role.
- Select Grant Advanced Role.
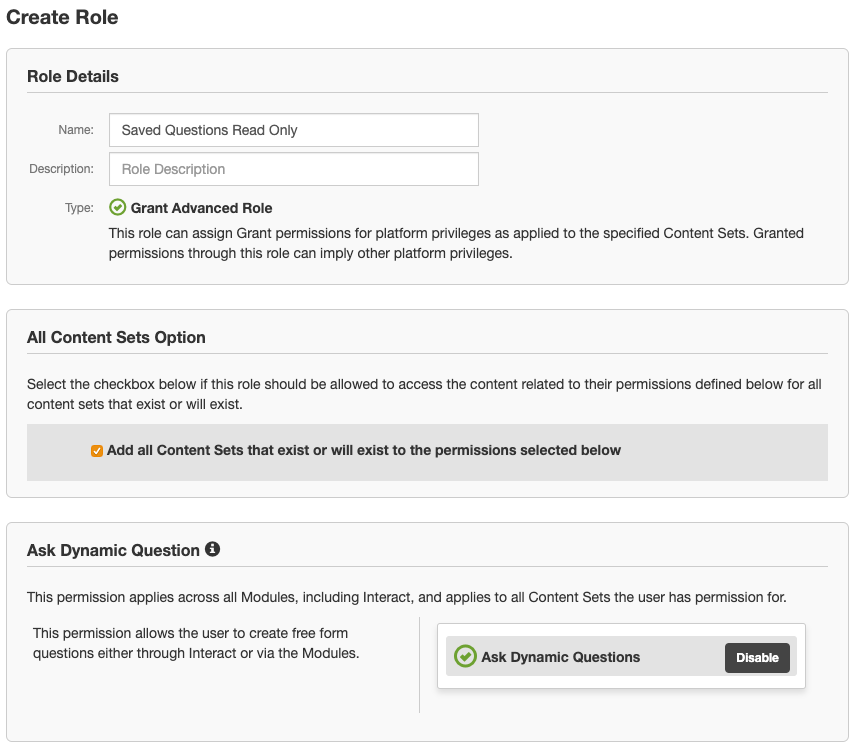
- In the Create Role page in the Role Details section:
- Fill in the Name field. (for example: Saved Questions Read Only)
- In the Create Role page in the All Content Sets Option section:
- Click the checkbox for Add all Content Sets that exist or will exist to the permissions selected below.
- Alternatively, you can add specific content sets that allow access to each value supplied in Names of Saved Questions to fetch (comma separated) and the sensors defined in those Saved Questions.
- In the Create Role page in the Ask Dynamic Question section:
- Click the plus sign next to Ask Dynamic Questions.
- The top of the Create Role page should look like:
-
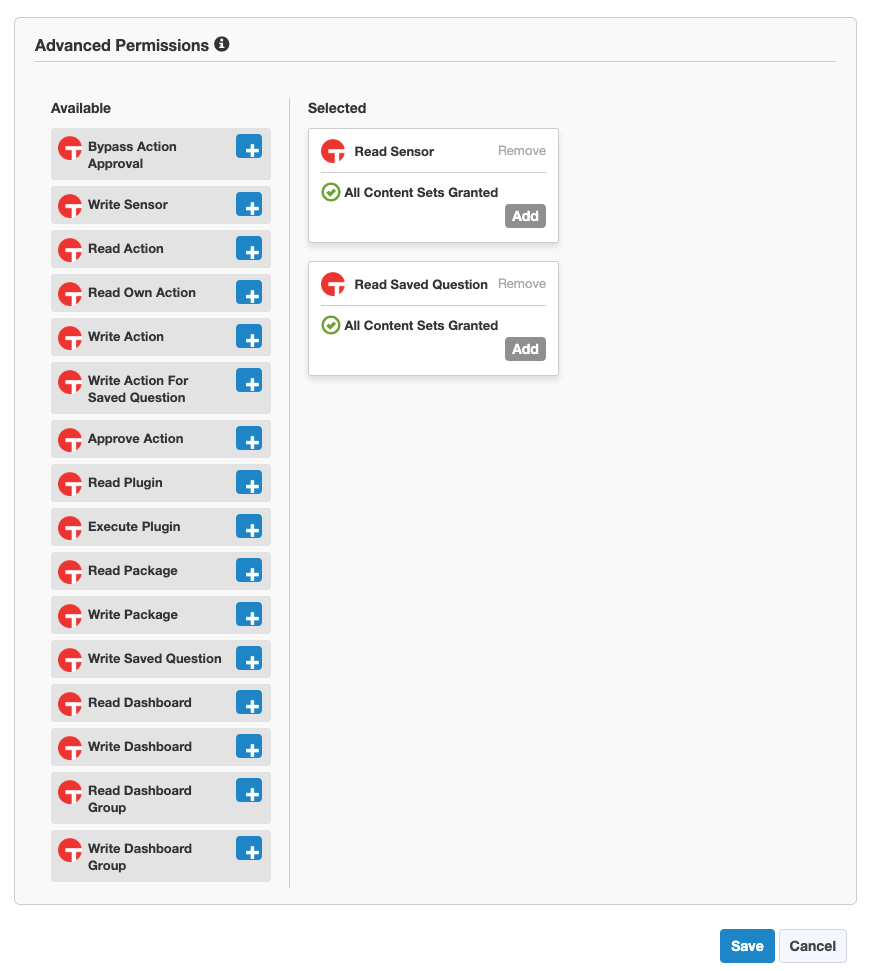
In the Create Role page In the Advanced Permissions section click the plus sign next to the following permissions:
- Read Sensor
- Read Saved Question
-
The bottom of the Create Role Page should look like:
-
At the bottom of the Create Role page:
- Click Save.
-
In the Notice dialog window:
- Click Continue.
Assign Required Permissions
These are the steps to assign the Required Permissions to the value supplied in User Name:
- Log in to the value supplied in Hostname or IP Address with an account that has the permissions necessary to edit users.
- In the navigation menu:
- Go to the Administration
>Users page.
- Go to the Administration
- In the Users Page:
- Select the value supplied in User Name from the list of users.
- Click View User.
- In the User Administration page in the Computer Groups section:
- Click Manage Computer Groups:
- In the Assign Computer Groups page in the Manage Computer Groups section:
- Section click Edit.
- In the Edit Computer Group Assignments dialog window:
- De-select the No Computers value .
- Select the All Computers value.
- Alternatively, you can select specific Computer Groups targeted by each value supplied in Names of Saved Questions to fetch (comma separated).
- Click Save.
- At the bottom of the Assign Computer Groups page:
- Click Show Preview to Continue.
- At the bottom of the Assign Computer Groups page:
- Click Save.
- In the User Administration page in the Roles and Effective Permissions section:
- Click Edit Roles.
- In the Assign Roles page in the Role Management
>Grant Roles section:- Click Edit:
- In the Edit Grant Roles dialog window:
- Select the role created in Create Advanced Role.
- Select the role named Interact Read-Only User.
- Click Save.
- At the bottom of the Assign Roles page:
- Click Show Preview to Continue.
- At the bottom of the Assign Roles page:
- Click Save.
- In the Notice dialog window:
- Click Continue.
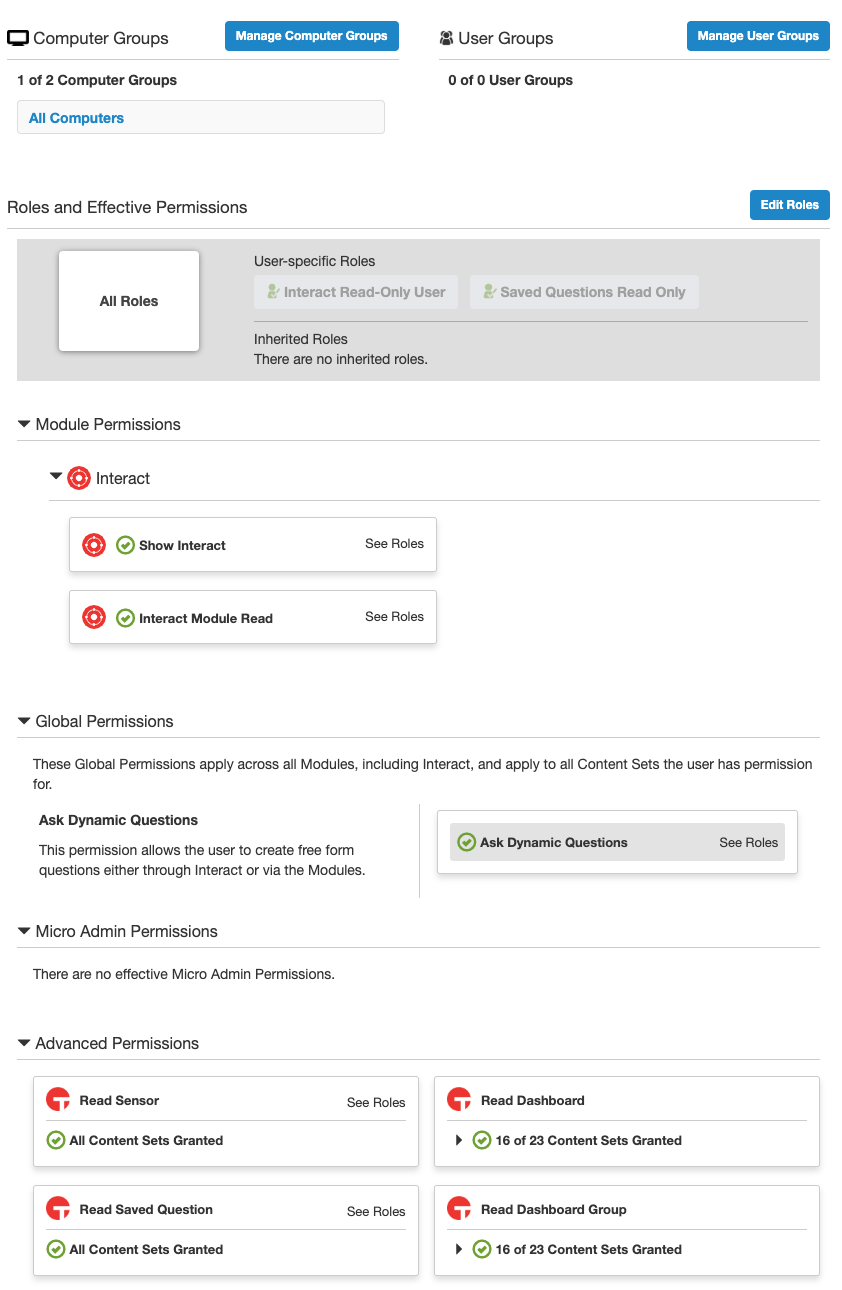
- The User Administration page should look like this:
- Continue to Verifying Permissions.
Verify Permissions
- Log in to the value supplied in Hostname or IP Address with the values supplied in User Name and Password.
- In the navigation menu:
- Go to the Content
>Saved Questions page.
- Go to the Content
- In the Content
>Saved Questions page:- For each of the values supplied in Names of Saved Questions to fetch (comma separated):
- Select the value from the list of Saved Questions.
- Click Load.
- For each of the values supplied in Names of Saved Questions to fetch (comma separated):
Create a Saved Question
- Log in to the value supplied in Hostname or IP Address using an account that has the privileges necessary to create Saved Questions.
- In the Home page:
- Fill in the Ask a Question field with the question that you want to create as a Saved Question in. You can find example questions here.
- Click Search.
- Select the query that matches the question you want to ask.
- In the Question Results page:
- Click Save this question
- In the New Saved Question page in the Details section:
- Fill in the Name field. This value will be one of the values that you enter into Names of Saved Questions to fetch (comma separated).
- In the New Saved Question page in the Preferences & Tags section:
- Filling in this section is optional! Instead of filling in this section, you can use the Re-ask connection parameters to control the recurrence.
- Select Reissue this question every.
- Enter the recurrence values you want.
- At the bottom of the New Saved Question page:
- Click Create Saved Question.
Example Questions
- Includes just the sensors in the requirements for Saved Questions:
- Get Computer ID and Computer Name and Network Adapters and Computer Serial Number from all machines
- Includes just the sensors in the requirements for Saved Questions and targets a specific group of computers instead of all machines:
- Get Computer ID and Computer Name and Network Adapters and Computer Serial Number from all machines with Operating System contains Windows
- Includes the sensors in the requirements for Saved Questions and includes sensors that are not defined by field mappings but will have Adapter Specific fields dynamically created for their results:
- Get Computer ID and Computer Name and Network Adapters and Computer Serial Number and USB Device Details and CPU by Process from all machines
- Includes the sensors in the requirements for Saved Questions and includes all of the sensors in field mappings that will map to Aggregated fields in Axonius:
- Get Computer ID and Computer Name and Network Adapters and Computer Serial Number and AD Organizational Unit and Applicable Patches and BIOS Version and Chassis Type and CPU Details and Custom Tags and Domain Member and Installed Applications and Is Virtual and Last Logged In User and Manufacturer and Model and Motherboard Manufacturer and Motherboard Version and Open Ports and Open Share Details and Operating System Build Number and Operating System Install Date and Operating System and OS Platform and RAM and Running Processes and Service Details and Service Pack and Tanium Client Version and Time Zone and Total Memory and Uptime from all machines
Additional Information
Version Matrix
This adapter has only been tested with the versions marked as supported, but may work with other versions. Please contact Axonius Support if you have a version that is not listed and it is not functioning as expected.
| Version | Supported | Notes |
|---|---|---|
| Tanium versions prior to 7.3.314.3424 | No | This adapter utilizes the REST API, which was added in Tanium 7.3.314.3424 |
| Tanium 7.3.314.3424 | Yes | |
| Tanium 7.3.314.3668 | Yes | |
| Tanium 7.3.314.4147 | Yes | |
| Tanium 7.3.314.4250 | Yes | |
| Tanium Cloud | Yes |
Interact Module Versions
Modules within Tanium have their own version which is separate from the platform version.
| Version | Supported | Notes |
|---|---|---|
| Interact Module 2.0.3.0012 | Yes |
Updated 3 months ago