Google Workspace (G Suite)
Google Workspace (formerly G Suite) is a collection of cloud computing, productivity, collaboration, device, user, and data management tools developed by Google. These include Google Drive, Docs, Mail and more.
| Attributes | Axonius Cyber Assets | Axonius SaaS Applications |
|---|---|---|
| Service Account Required? | Yes | Yes |
| Service Account Permissions | Custom Role (Read-only Admin) or Super Admin | Custom Role (Read-only Admin) or Super Admin |
| Required Adapter Fields | Email of an admin account to impersonate, JSON Key pair for the service account | Email of an admin account to impersonate, JSON Key pair for the service account, Account Profile Name, 2FA Secret Key, Username, Password |
About the Adapter
Types of Assets Fetched
This adapter fetches the following types of assets:
- Devices
- Users
- Software
- All Application Extensions
- Roles
- Groups
- Licenses
- Application Settings
- All Application Extension Instances
- Activities
- SaaS Applications
- Accounts/Tenants
- Application Resources
- Permissions
- Admin Managed Extensions
- Application Addons
- User Initiated Extensions
- Admin Managed Extension Instances
- Application Addon Instances
- Application Keys
- User Initiated Extension Instances
- Rules
Optimize an Existing Adapter Configuration to Fetch SaaS Data
If the adapter has already been setup and you want to configure it to fetch SaaS data, you will need to complete the following steps:
Note
Some of the initial configurations on the Google Workspace need to be performed by a user with administrator level privileges.
- Create an SSO-excluded organizational unit
- Create a user account
- Enable or exclude 2-step verification
- Enable the Advanced Settings for Axonius SaaS Applications
- Enable Cloud API - Add APIs needed for the Advanced Settings you enabled.
- Configure the OAuth scopes - Add scopes listed for Axonius SaaS Applications.
- Create a custom role and add it to the principal
- Connect the adapter
The following Advanced Settings, Scopes, and Cloud APIs are required for fetching the following SaaS Assets with this adapter.
Filter the display by 'Asset Type'.
Asset Type | Connection Parameters | Advanced Config | Scope | Cloud API |
|---|---|---|---|---|
Application | No specific parameter required | Fetch Applications | No specific scope required | No specific API required |
Accounts | No specific parameter required | No specific setting required | https://www.googleapis.com/auth/admin.directory.domain.readonly, https://www.googleapis.com/auth/admin.directory.customer.readonly | No specific API required |
Roles | No specific parameter required | No specific setting required | https://www.googleapis.com/auth/admin.directory.rolemanagement.readonly | No specific API required |
User and Application Extensions | No specific parameter required | Fetch Extensions | https://www.googleapis.com/auth/admin.directory.user.security | No specific API required |
Licenses | Username, | Fetch Licenses | Enterprise License Manager API | |
Application Settings (Policies) | Username, | Fetch Settings (Policies) | Group Settings API | |
Audit Logs | No specific parameter required | Fetch User Audit Logs | https://www.googleapis.com/auth/admin.reports.audit.readonly | No specific API required |
Setting Up the Integration
Note
These steps can only be performed by a user with administrator level privileges.
To successfully connect this adapter, you need to complete the following steps. Accounts with Axonius Cyber Assets:
Accounts with Axonius SaaS Applications:
- Create an SSO-excluded organizational unit
- Create a user account
- Enable or exclude 2-step verification
- Enable Cloud API
- Create a service account
- Configure the OAuth scopes
- Create a custom role and add it to the principal
- Connect the adapter
Create an SSO-Excluded Organizational Unit
Before you create a Google user to connect Axonius with Google Workspace, you'll need to create an OU that's excluded from the SSO as a container for the user.
Note:
This step is only needed for retrieving SaaS data.
- In the Google Workspace Admin Console, from the navigation menu, navigate to Directory
>Organizational Unit. - Click Create new organizational unit.
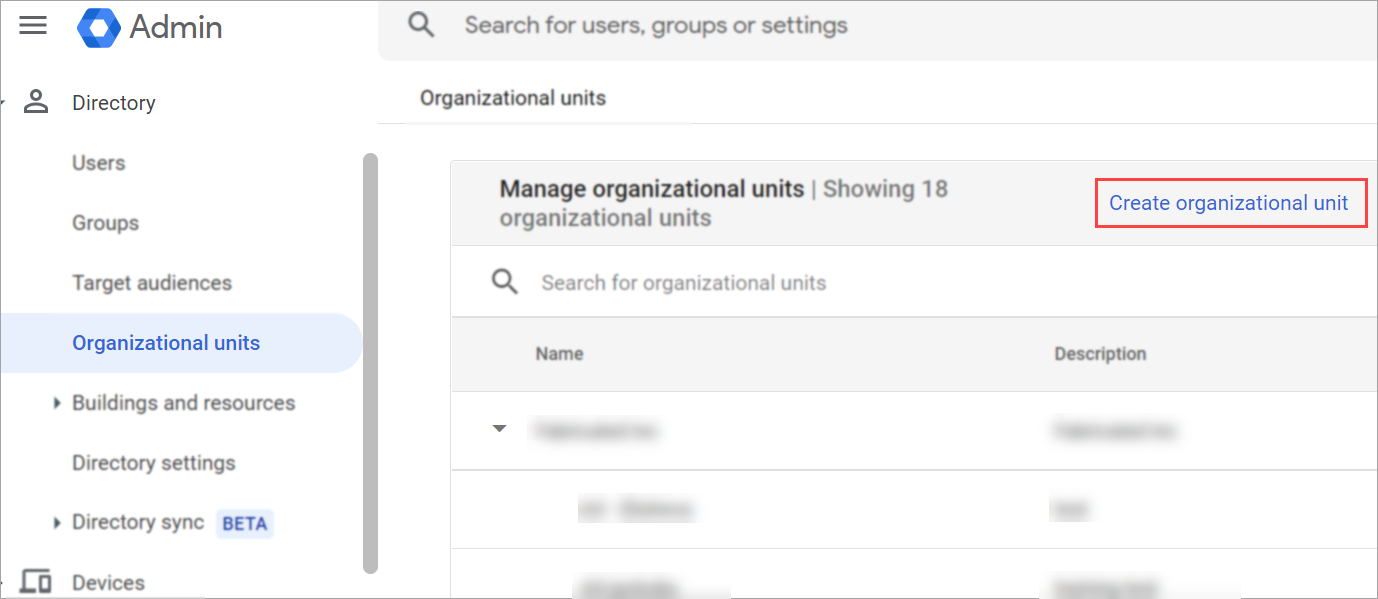
- Enter a Name for the Organization unit (for example, Axonius SaaS Applications).
- Click Create.
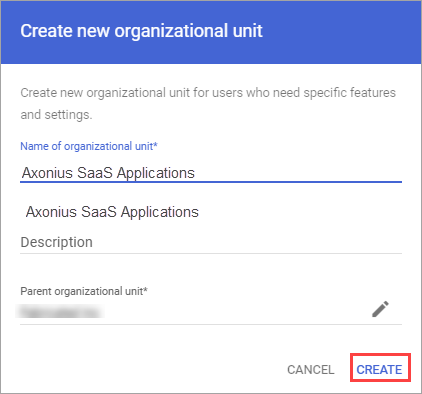
- From the left navigation menu, navigate to Security
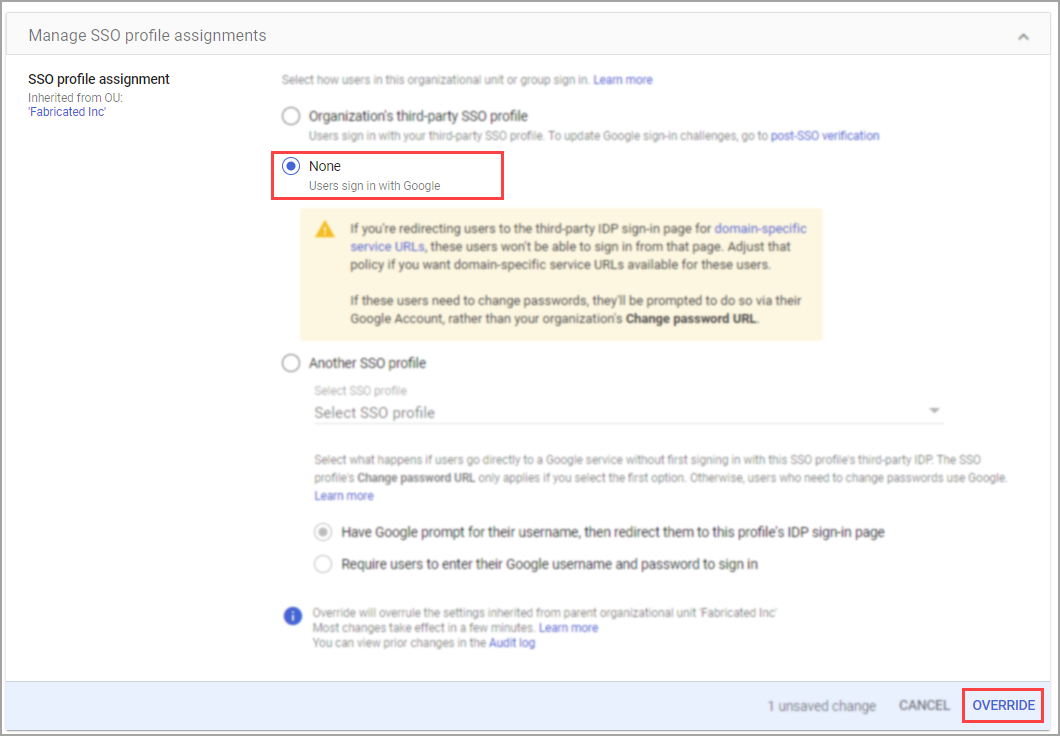
>Authentication>SSO with third party IdP. - In the Manage SSO profile assignments section, click Get Started or Manage.
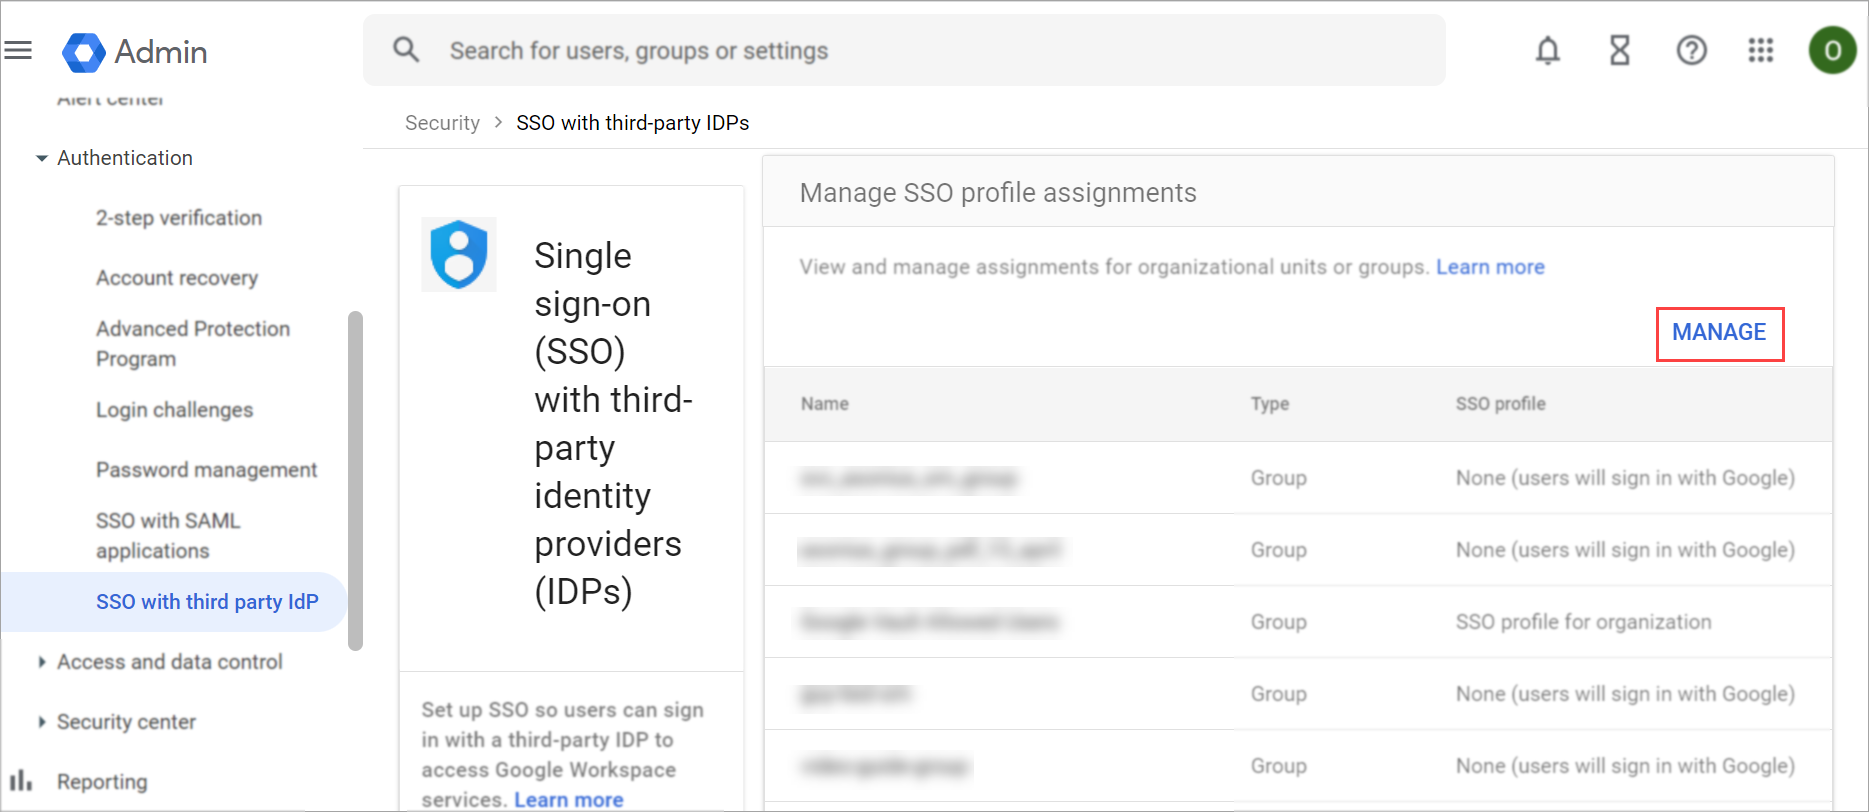
- In the Manage SSO profile assignments page, on the left pane, expand the Organizational units section and select the organizational unit you just created.
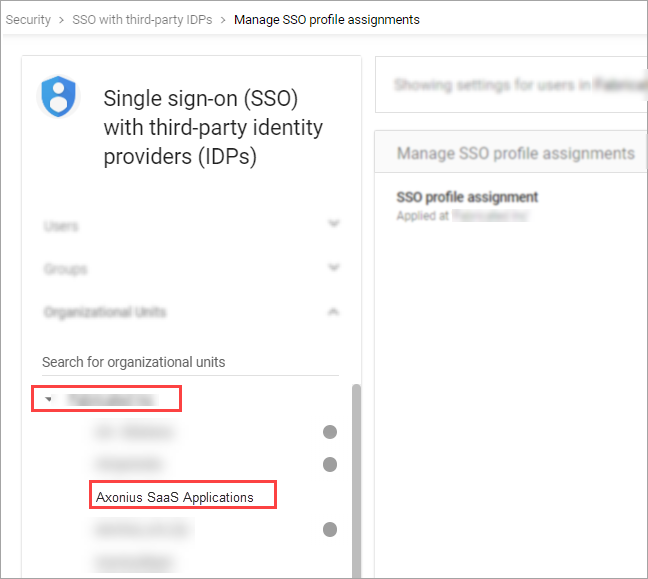
- Under SSO profile assignment, select None.
- Click Override to save changes.
Create a User Account
Note:
This step is only needed for retrieving SaaS data.
-
Set the user name:
- In the Google Workspace Admin Console, from the navigation menu, navigate to Directory
>Users. - Click Add new user.
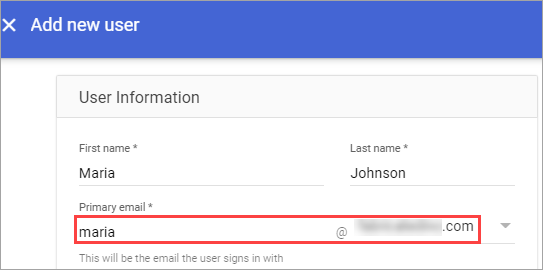
- Enter a first name, last name, and primary email address in their corresponding fields.
- Copy the primary email that you entered.
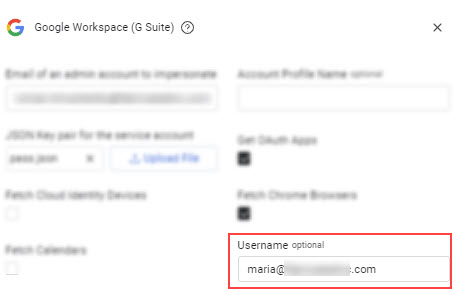
- Back in Axonius, in the Username field, enter the user name and domain name using the format 'username@domainname'. For example:[email protected]
- In the Google Workspace Admin Console, from the navigation menu, navigate to Directory
Set the user's password:
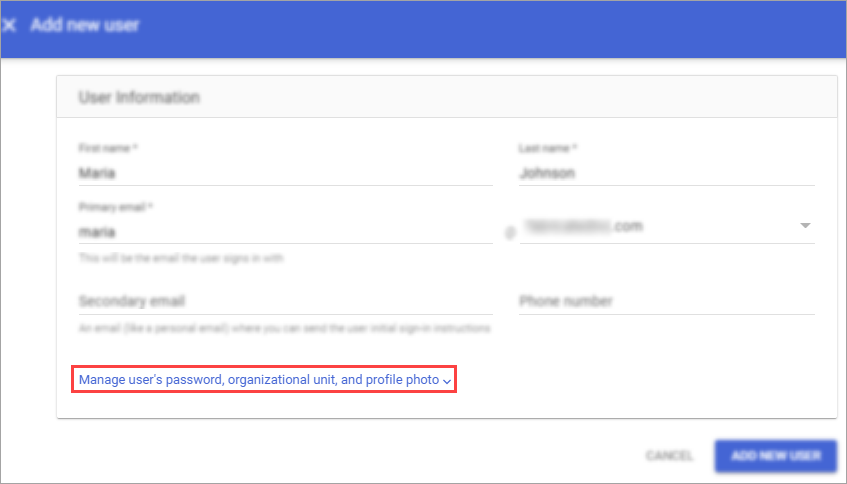
- Click Manage user's password, organizational unit, and profile photo.
- In the Organizational unit field, click the Edit icon
 .
. - Select the newly created organizational unit and click Done.
- Select Create password.
- Enter a strong password. Note: It's best practice for the password to contain 32 characters.
Clear the Ask user to change their password when they sign in checkbox.
Click Add New User. 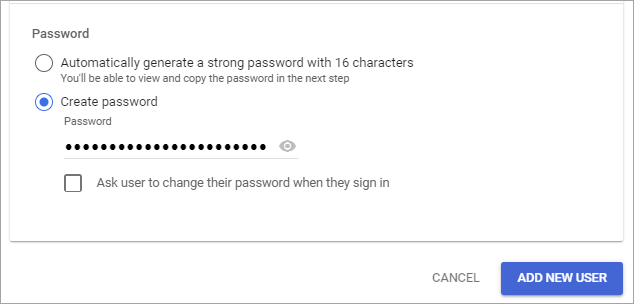
Click Copy Password.
Click Done. 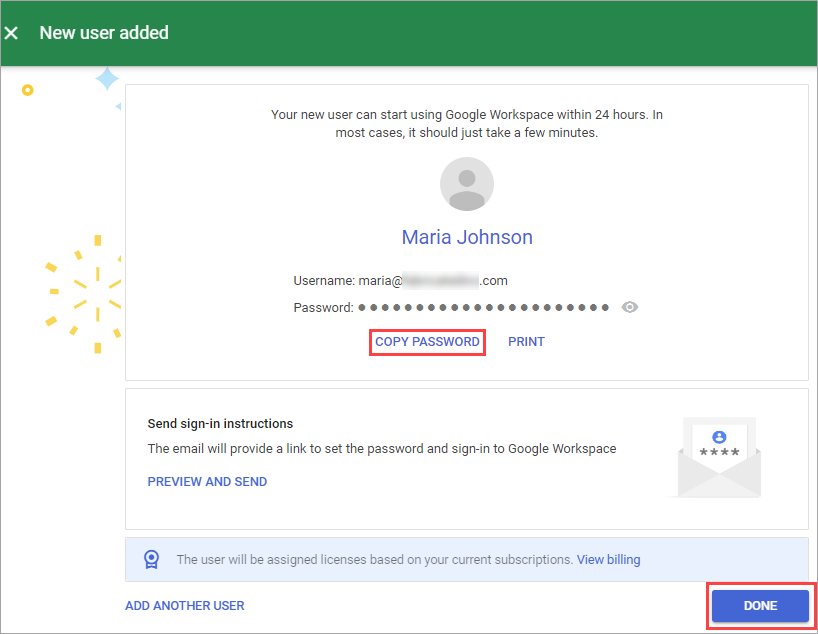
In Axonius, paste the value into the Password field. 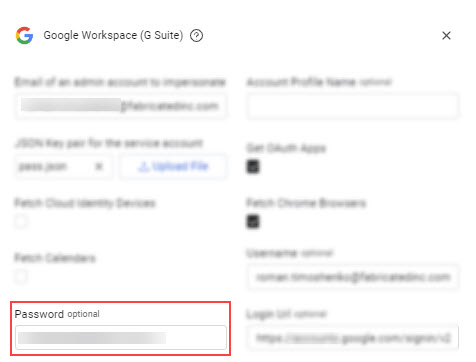
Back in Google Workspace, refresh the page.
Set the permission level:
- Locate and click the user you just created to open their user record.
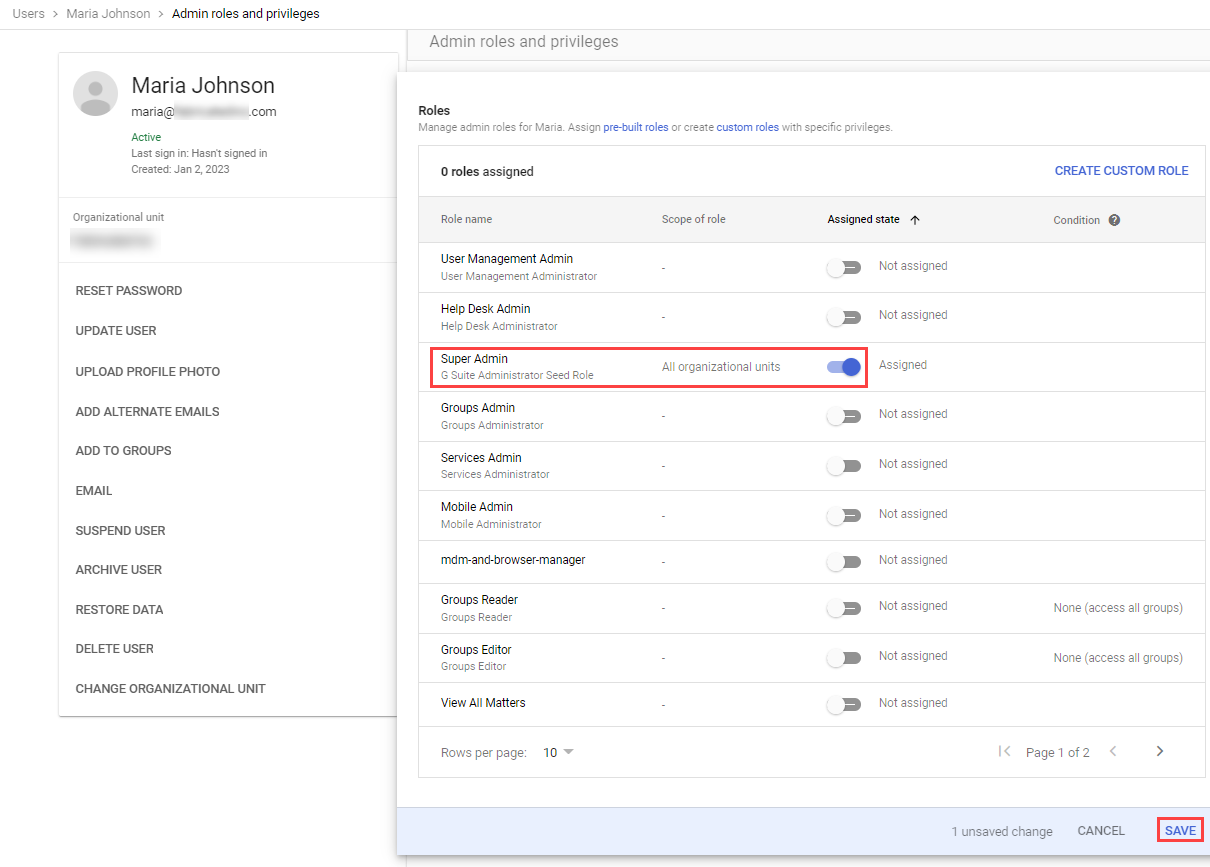
- Under the Admin roles and privileges section, click Assign Roles.
- Click the Super Admin toggle to set it to Assigned. Note: If your organization's security policy does not allow for providing Axonius Super Admin access to your Google environment, you can follow these instructions to set up a Least-Privileged role instead.
- Click Save.
Enable or Exclude 2-Step Verification
Depending on your organization's security policies, you can either enable 2-step verification for the user you just created or exclude the user from the 2-step verification policy.
Note
You should perform only one of the processes in this section.
This step is only needed for retrieving SaaS data.
Setting Up Multi-Factor Authentication
Axonius enables you to use Multi-factor Authentication in several ways: You can use your organization’s SSO according to its policy, Google’s authenticator, or the Axonius built-in Multi-factor authentication.
To set up Multi-factor authentication:
-
Log into Google Accounts with the user account you just created.
-
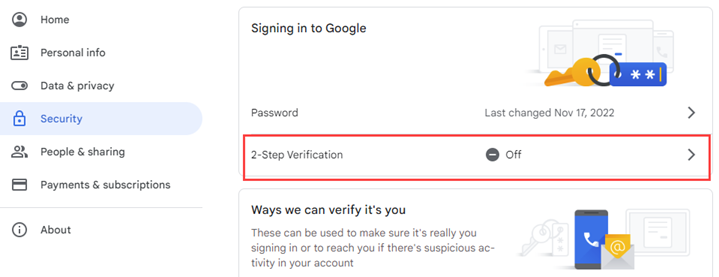
From the menu, select Security.
-
In the Signing into Google section, click 2-Step verification.
-
Click Get Started.
-
If prompted, enter the password.
-
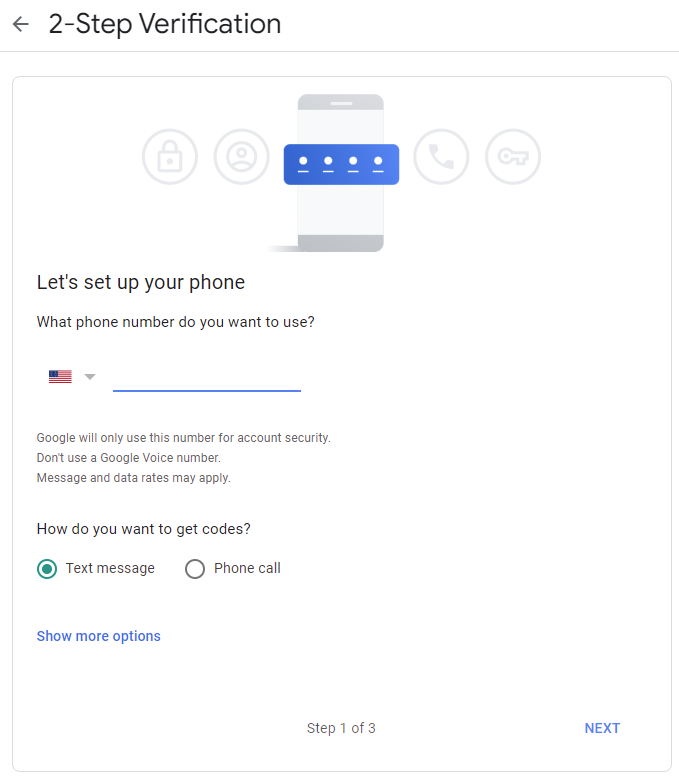
Enter your phone number (you can remove it later) to receive a text message.
-
Click Next
-
Enter the code you received from Google and click Next.
-
Click Turn on.
-
To generate the secret key:
- In the 2-Step Verification stage, in the ‘Add More Second Steps to Verify It's You’ section, click Authenticator app.
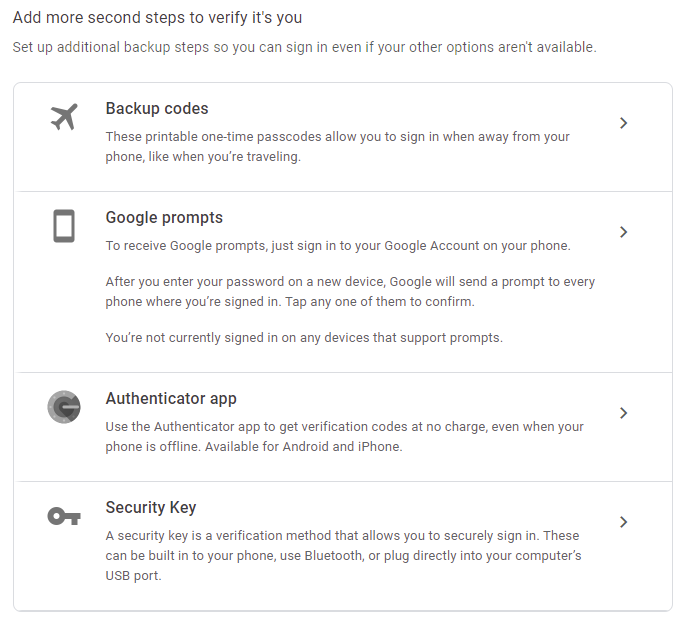
- Use the Axonius Built-In Multi-Factor Authenticator, install Google Authenticator on your phone, or add a Chrome extension.
- In the 2-Step Verification stage, in the ‘Add More Second Steps to Verify It's You’ section, click Authenticator app.
Axonius Built-In Multi-Factor Authentication
- Select Set up authenticator.
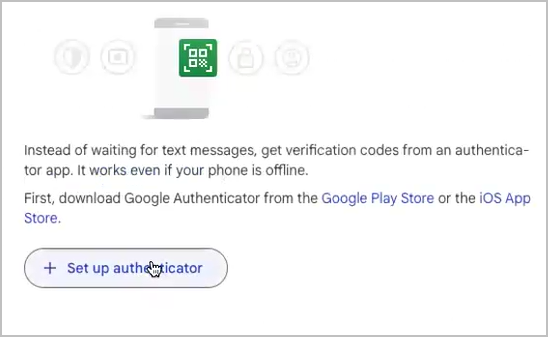
- Set up authenticator app opens:
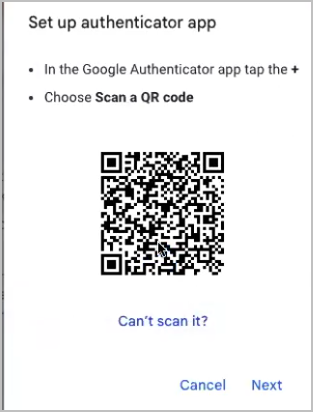
- In ‘Set up authenticator app’, select Can’t scan it.
- The next screen opens and gives a one-time secret key. Copy this key to a safe place (your password vault is recommended if you use one) for later use.
- On the adapter Configuration screen, click the Generate Secret Key icon
 . The Set 2FA Secret Key screen opens.
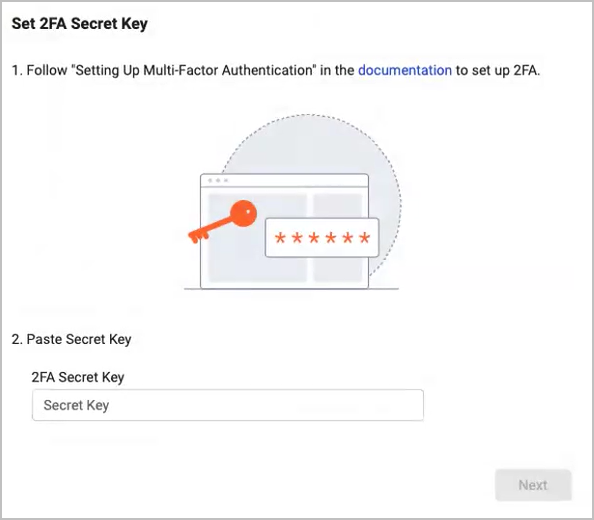
- Enter the copied secret key into the 2FA Secret Key field and click Next.
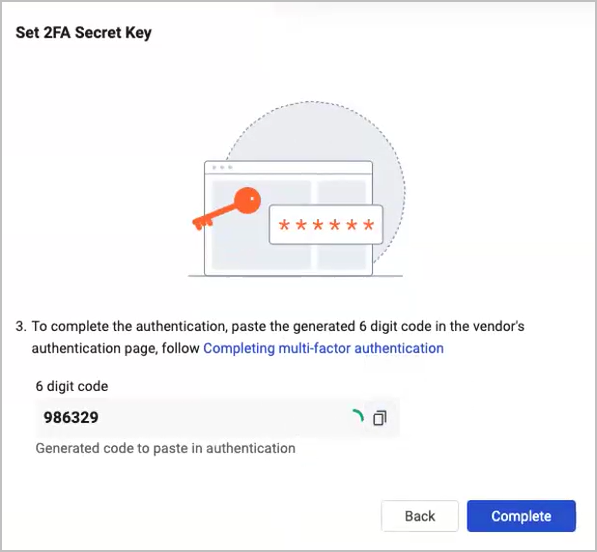
The system displays a 6 digit code, click the Copy icon to copy the code.
Completing Multi-factor Authentication
- Paste the code into the ‘Set up authenticator app’ dialog in Google, in the field where it requests the 6 digit code.
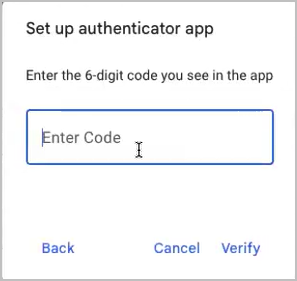
- Click Verify.
- Back in Axonius click Complete on the Set 2FA Secret Field dialog.
- Click Save.
Setting Up the Google Authenticator
Note:
Use this option if you do not want to use the Axonius built-in authenticator.
-
Click Set up authenticator.
-
Click Can't scan it?.
-
Copy the Secret key.
.png)
-
Back in Axonius, paste the copied secret key in the 2FA Secret Key field.
-
Generate the verification code:
- Back in the Google, click Scan QR Code to display the QR Code again.
- Open the Google Authenticator on your device and click +.
- Scan the QR code. Google Authenticator displays a verification code.
- In Google, click Next and enter the verification code.
Click Verify.
Note:
This verification is a one-time process.
Under Methods, select Any.
Exclude the User Account from 2-Step Verification
If your organization's security policy allows it, you can simplify your setup by just excluding the user you created from 2-step verification, instead of enabling it.
- From the Google Workspace Admin Console, navigate to Directory
>Users. - Locate and click the newly created user account.
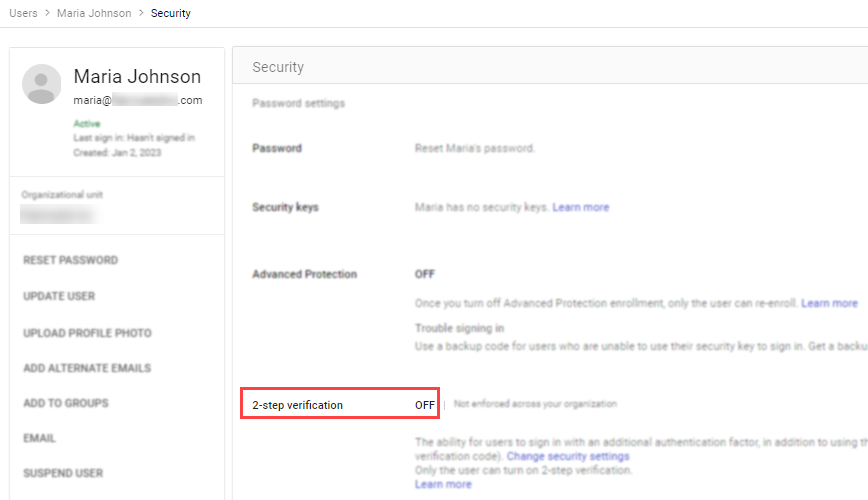
- Click the Security section, ensure that 2-step verification is set to OFF.
Enable Cloud APIs
This process allows you to enable the APIs allow the adapter to access Google data relevant for your SaaS environment.
NOTE
You can decide if you want to add the API access to an existing project or create a new project for this purpose.
-
Log into the Google Cloud Console as an administrator.
-
From the menu, navigate to APIs & Services.
-
Select any existing project.
-
(Optional) Create a new project to include the API access:
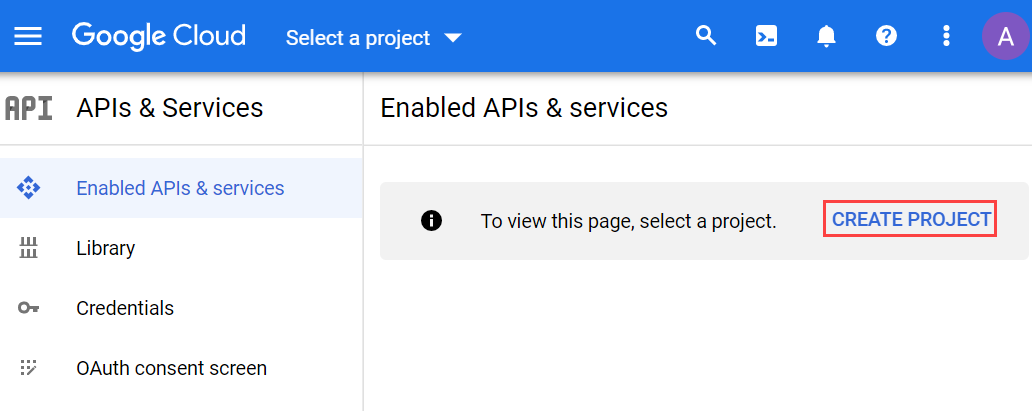
- Click Create Project.
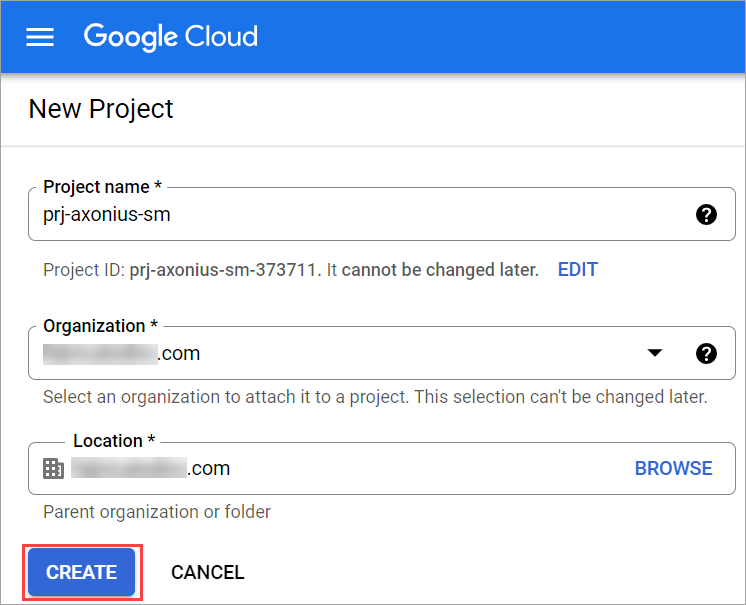
- Enter a name for the project (for example, prj-axonius-sm).
- Click Create.
- Click Create Project.
Click Enable APIs and Services.
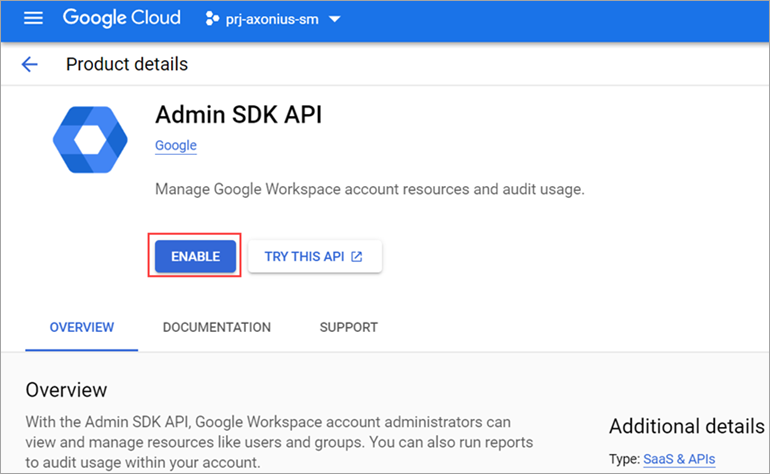
Confirm that the following APIs are listed and enabled. If any of them are not enabled, click the API and click Enable:
- Admin SDK API
- Cloud Identity API
- Enterprise License Manager API
- Chrome Management API (for Enrich Browser Extensions advanced settings)
- Google Calendar
- Service Usage API
- Group Settings API
Create a Service Account
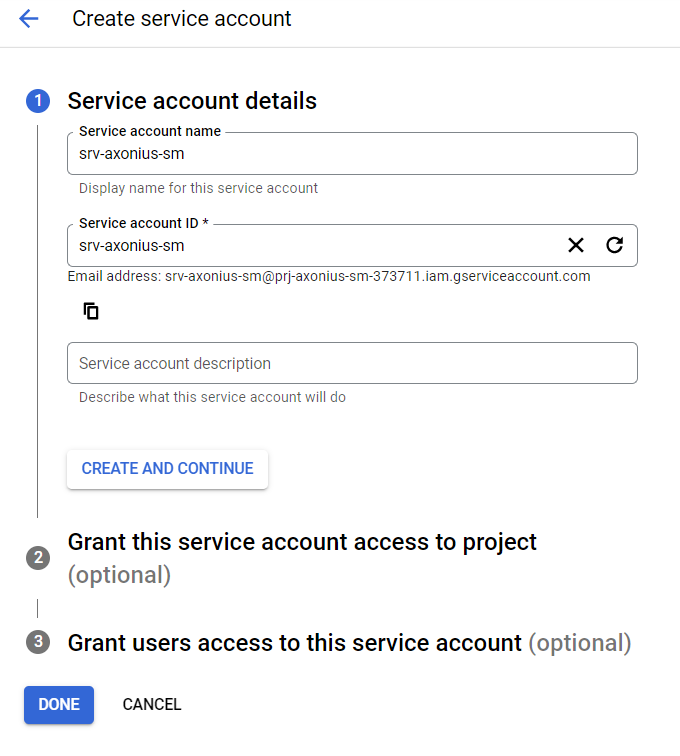
Creating a service account in the Google Cloud Console allows you to generate Principle value along with a JSON file containing other parameters, all of which are needed for connecting the Google adapter with Axonius.
-
Log into the Google Cloud Console as an administrator. From the menu, navigate to IAM & admin
>Service Accounts. -
Create the service account:
- Click Create Service Account.

- Enter a Service Account name (for example, srv-axonius-sm).
- Click Create and Continue.
- Click Continue and then click Done.
- Click Create Service Account.
Generate the Admin Account (principle) value:
- Locate and click the service account you just created.
- From the Permissions tab, copy the Principal value (email address).
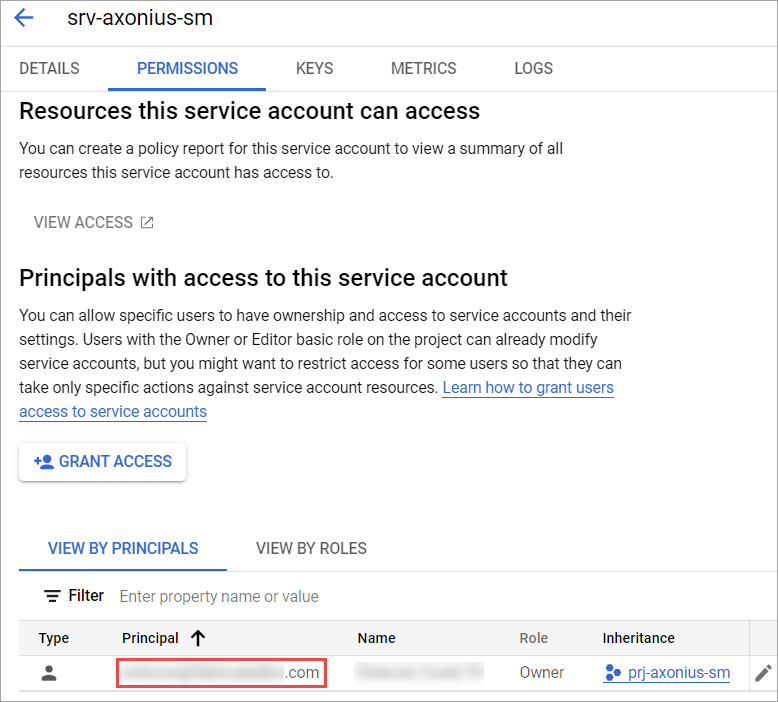
- In Axonius, paste the copied value in the Admin account (Principle) field.
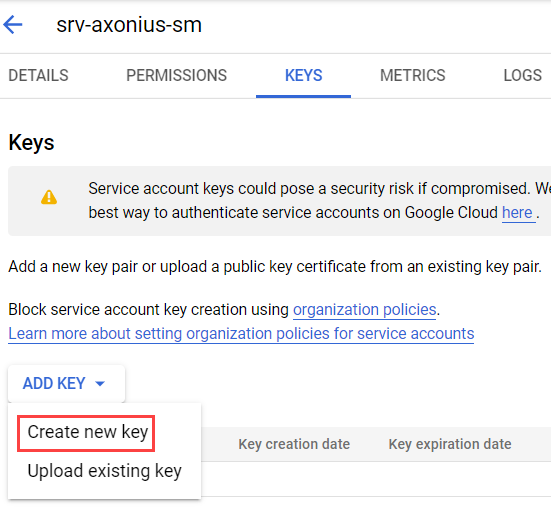
Configure the service account key
- Open the Keys tab.
- Click Add Key.
- Select Create new key.
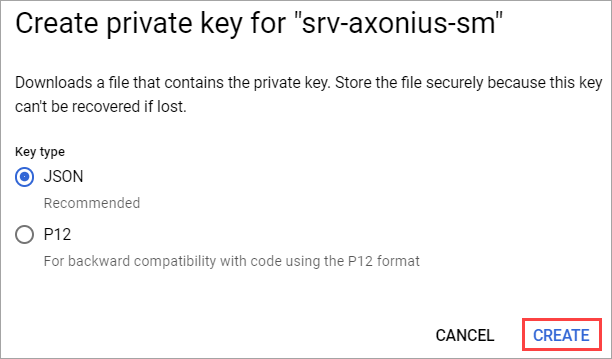
- Select JSON and then click Create. The JSON key will automatically be downloaded to your machine.
- Back in Axonius, click Upload File to upload the downloaded JSON file.
Configure the OAuth Scopes
-
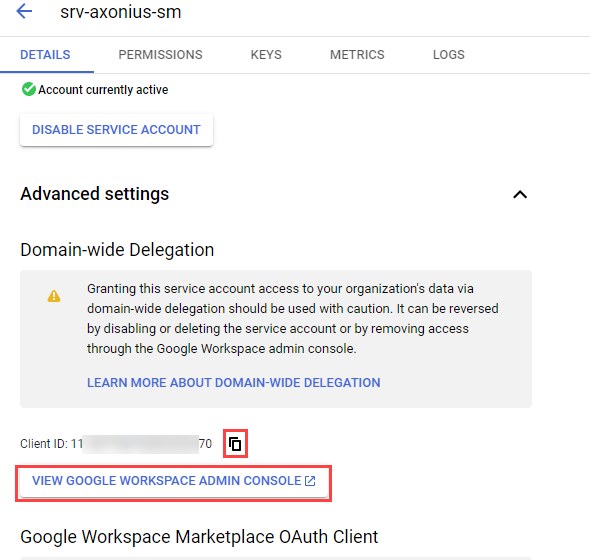
From the Details tab, click Advanced settings.
-
Click
.png) to copy the the Client ID.
to copy the the Client ID. -
Click View Google Workspace Admin Console.
-
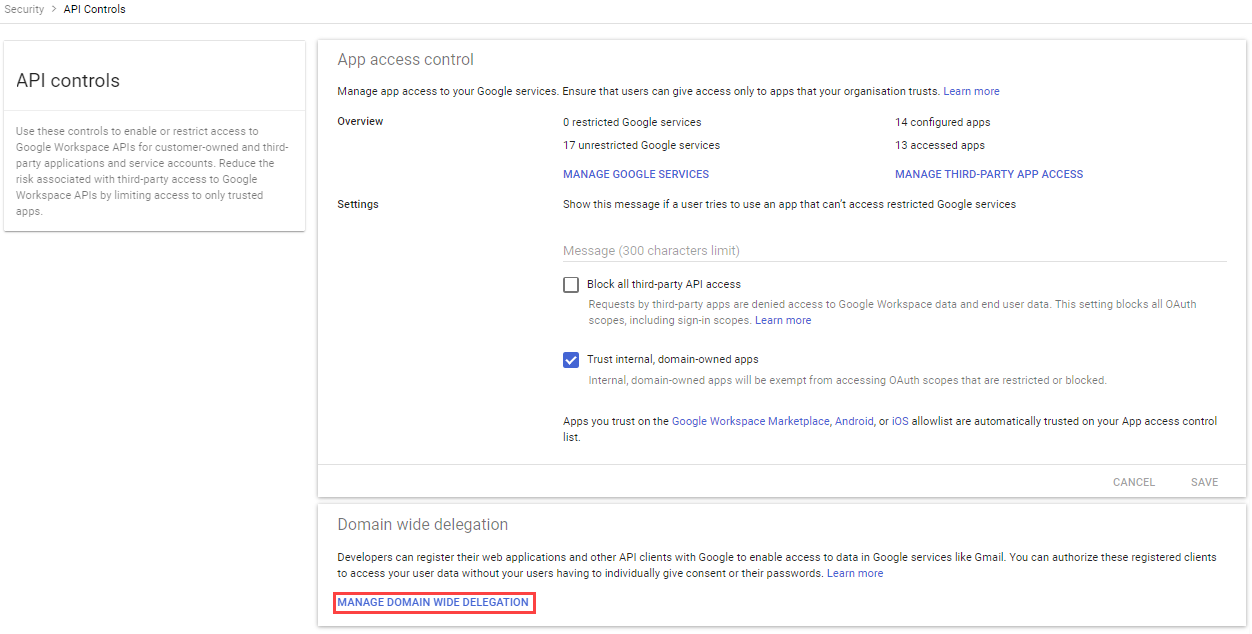
Navigate to Security
>Access and data control>API Controls. -
Click Manage Domain Wide Delegation.
-
Access the Scopes field:
- If you have previously set up this adapter, paste the copied client ID into the ‘Add a Filter’ area, and select the Client ID filter.
.png) Then hover over the API Client in the list, and click Edit.
Then hover over the API Client in the list, and click Edit. 
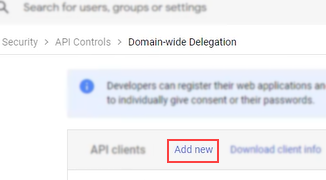
- If this is the first time connecting the adapter, or there are no results for the Client ID filter, Click Add New. In the Client ID field, paste the copied Client ID.
- If you have previously set up this adapter, paste the copied client ID into the ‘Add a Filter’ area, and select the Client ID filter.
In the OAuth scopes (comma-delimited) field, paste the following OAuth scopes (comma-separated):
NOTE
Ensure that the corresponding options are selected in Parameters and Advanced Settings. If you are adding to existing scopes, ensure that you add the scopes AFTER the scopes that are already there and do not replace them.
-
Required scopes for this adapter:
https://www.googleapis.com/auth/admin.directory.user.readonly,https://www.googleapis.com/auth/admin.directory.device.chromeos.readonly,https://www.googleapis.com/auth/admin.directory.device.mobile.readonly -
For fetching Chrome browsers:
https://www.googleapis.com/auth/admin.directory.device.chromebrowsers.readonly -
For fetching tokens for applications and for deleting extensions via the Enforcement Center:
https://www.googleapis.com/auth/admin.directory.user.security -
For fetching Cloud Identity devices:
https://www.googleapis.com/auth/cloud-identity.devices.readonly -
For fetching user groups:
https://www.googleapis.com/auth/admin.directory.group.readonly -
For fetching Disk Usage - displays values in the Disk Quota field
https://www.googleapis.com/auth/admin.reports.usage.readonly -
For fetching data from Google Calendar:
https://www.googleapis.com/auth/calendarThe following scopes are only for Axonius accounts with Axonius SaaS Applications: Important While to access SaaS data you need to grant roles and/or scopes that include write capabilities, the adapter only actually reads data from the application. -
For fetching Audit Logs:
https://www.googleapis.com/auth/admin.reports.audit.readonly -
For fetching User Roles Scope (required):
https://www.googleapis.com/auth/admin.directory.rolemanagement.readonly -
For fetching Settings (Policies):
https://www.googleapis.com/auth/apps.groups.settings -
For fetching Accounts:
https://www.googleapis.com/auth/admin.directory.domain.readonly, https://www.googleapis.com/auth/admin.directory.customer.readonly -
For fetching User License Associations:
https://www.googleapis.com/auth/apps.licensing -
For enriching Browser Extensions: `
-
https://www.googleapis.com/auth/chrome.management.reports.readonly`
-
For Google Workspace Enforcement Center Actions:
-
Google Workspace - Activate User -
https://www.googleapis.com/auth/admin.directory.userhttps://www.googleapis.com/auth/admin.directory.user.securityhttps://www.googleapis.com/auth/cloud-identity.devices.readonlyhttps://www.googleapis.com/auth/admin.directory.device.chromebrowsers.readonlyhttps://www.googleapis.com/auth/calendar
-
https://www.googleapis.com/auth/admin.directory.userhttps://www.googleapis.com/auth/admin.directory.user.securityhttps://www.googleapis.com/auth/cloud-identity.devices.readonlyhttps://www.googleapis.com/auth/admin.directory.device.chromebrowsers.readonlyhttps://www.googleapis.com/auth/calendar
Google Workspace - Add Users to Group - https://www.googleapis.com/auth/admin.directory.group
Google Workspace - Change Users OU - https://www.googleapis.com/auth/admin.directory.user
Google Workspace - Delete Extensions - https://www.googleapis.com/auth/admin.directory.user.security
Google Workspace - Remove Users - https://www.googleapis.com/auth/admin.directory.user
Google Workspace - Remove Users From Group - https://www.googleapis.com/auth/admin.directory.group
Google Workspace - Reset Users Logon Cookies - https://www.googleapis.com/auth/admin.directory.user.security
Google Workspace - Role Assignment Actions - https://www.googleapis.com/auth/admin.directory.rolemanagement
Google Workspace - Send Messages - https://www.googleapis.com/auth/chat.messages.create
Google Workspace - Suspend User -
https://www.googleapis.com/auth/admin.directory.userhttps://www.googleapis.com/auth/admin.directory.user.securityhttps://www.googleapis.com/auth/cloud-identity.devices.readonlyhttps://www.googleapis.com/auth/admin.directory.device.chromebrowsers.readonlyhttps://www.googleapis.com/auth/calendar
Note In addition to the scopes listed above, each action requires the relevant Google permission to perform that action. For example the Suspend User action requires the permission to deactivate a user in Google.
Click Authorize. 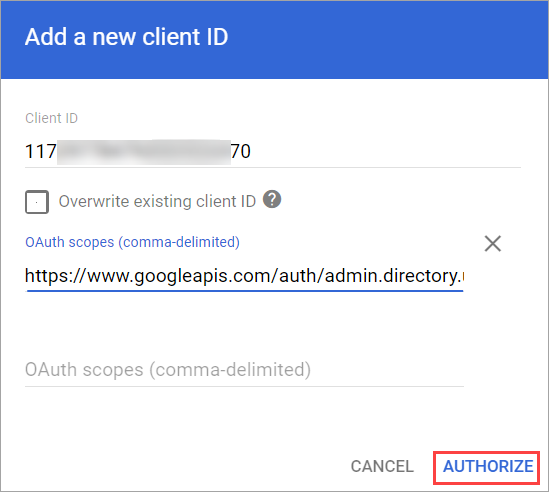
Create a Custom Role and Add to Principal
Note
This step is only needed for retrieving SaaS data.
-
Log into the Google Cloud Console as an administrator.
-
Create a custom role:
- From the menu, navigate to IAM & admin
>Roles. - Click Create Role.
.png)
- Enter a Title (for example, "srv-axonius-sm-role").
- Click Add Permissions.
.png)
- Next to the filter search row, search for 'resourcemanager.projects.get'.
.png)
- Select the permission and click Add.
- Click Create.
.png)
- From the menu, navigate to IAM & admin
Add the role to the principle:
- Navigate to IAM & admin
>IAM. - From the Principals list, select the principal you associated with the service account.
- Click the Edit icon corresponding to the selected principal.
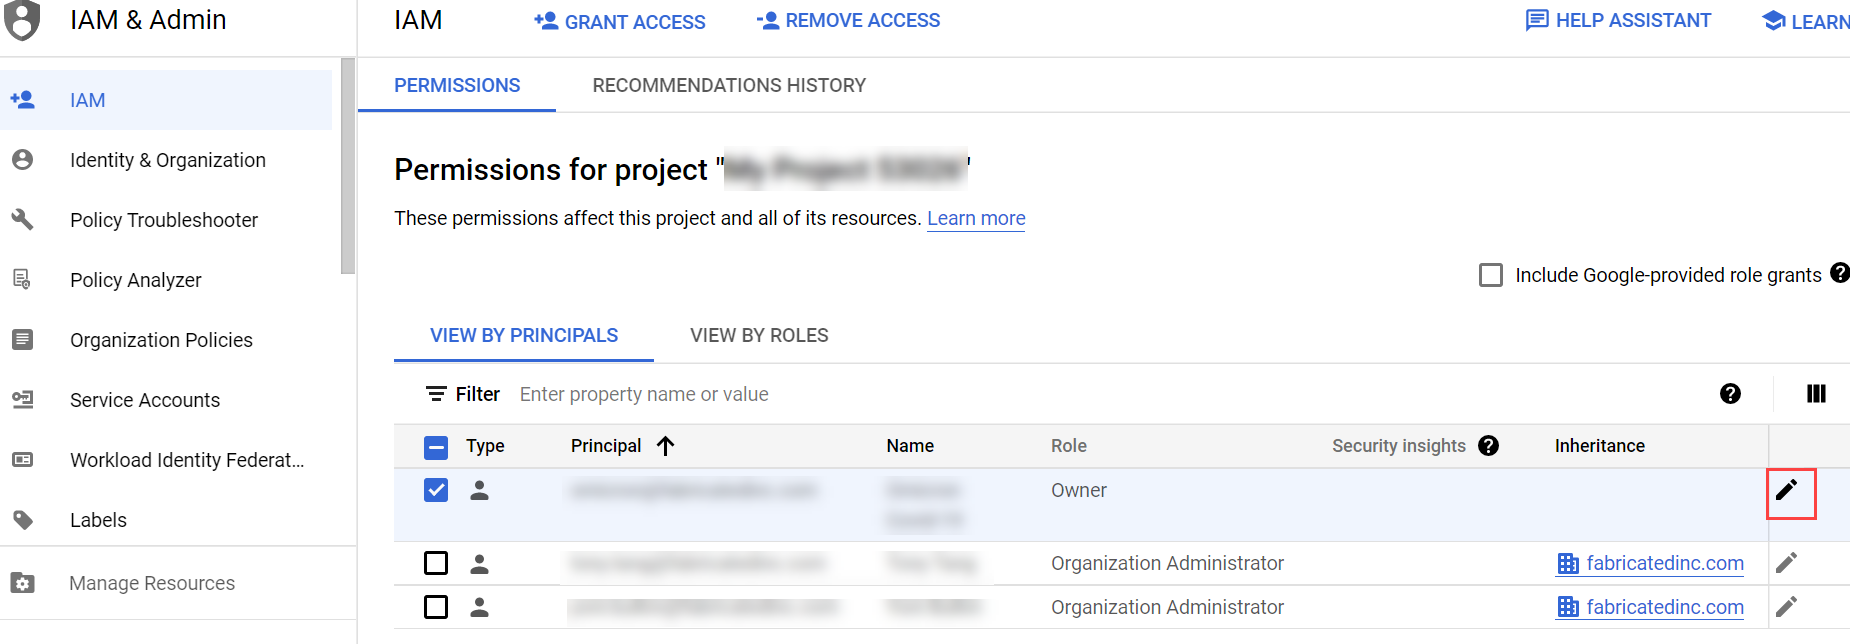
- In the Edit Permissions window, click Add Another Role.
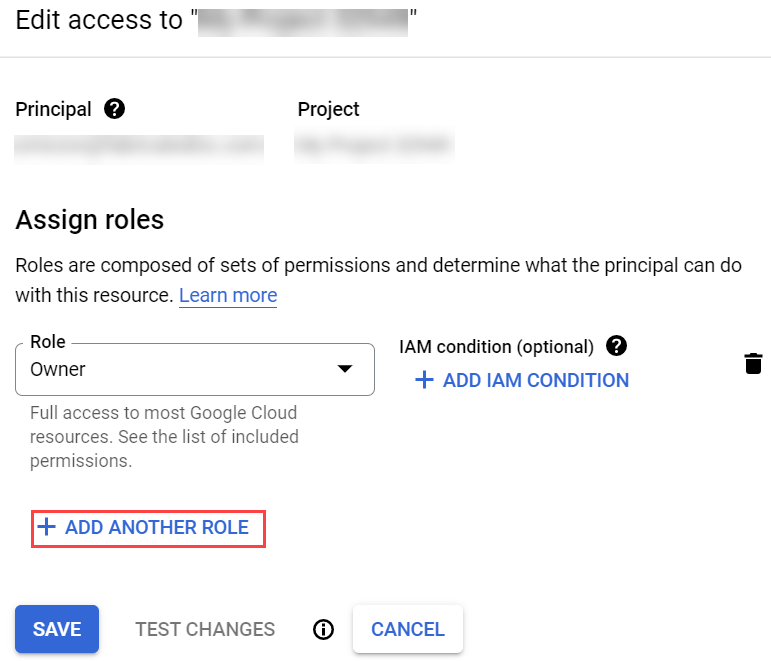
- Locate and add the custom role you created.
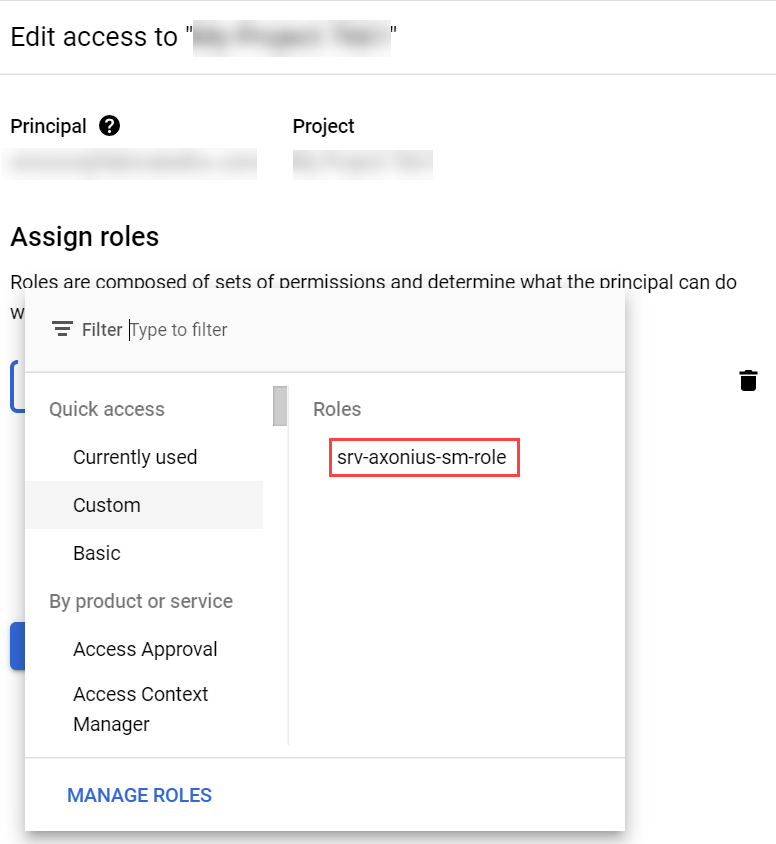
- Click Save.
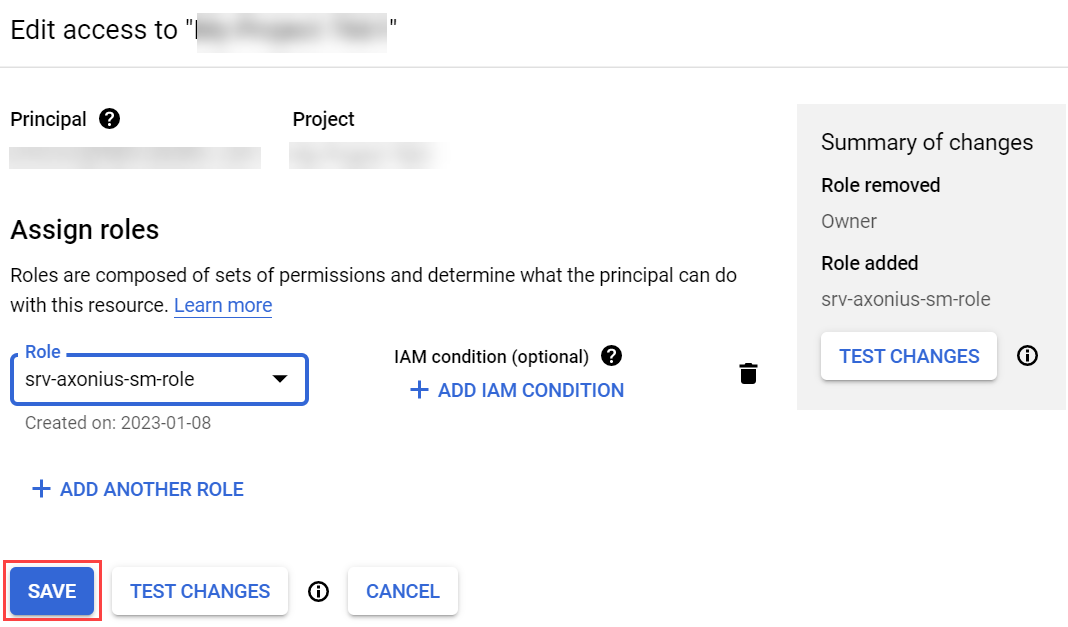
- If prompted, click Continue.
Go to the following URL (add the project ID located in the JSON file that you generated earlier): https://console.developers.google.com/apis/api/admin.googleapis.com/overview?project=<project_id>
Click to enable the Admin SDK API.
Connect Adapter
- We recommend logging into Google with the user you created to ensure that the user was properly configured.
- Back in Axonius, in the Google Workspace adapter setup window, click Save, before you select Save and Fetch to verify the status of the adapter.
Optional: Create a Least-Privileged Role (For Axonius SaaS Applications)
If your Axonius account includes Axonius SaaS Applications, and you organization's security policy does not allow for providing Axonius Super Admin access to your Google environment when you set up the user account, you can follow these instructions at the end of this guide to set up a Least-Privileged role instead.
Once this process is complete, continue setting up the adapter connection with Enable or exclude 2-step verification.
-
Log into the Google Workspace Admin Console as an administrator.
-
From the home page, scroll down and navigate to Account>Admin roles.
-
Click Create new role.
-
Enter the name and description for the new role (for example, "svc_axonius_sm_role"), and click Continue.
-
In the Admin Console Privileges**** section, select the following permissions:
-
Organizational Units
>Read -
Users
>Read -
Security
- User Security Management
>Read - Security Settings
>Read
- User Security Management
-
Domain Settings
>Read -
Reports
>Read
-
-
Expand the Services section and select the following permissions:
- Directory settings
>Settings - Looker Studio
>Manage Data Studio Settings - Sites
>Manage Google Sites - Google Vault
>View All Matters - Calendar
>All Settings>Settings - Data Security
>Access Level Management - Data Security
>Rule Management - Classroom
>Settings - Google Chat
>Settings (Read and Modify) - Directory Sync
>Manage Directory Sync Settings>Read Directory Sync Settings - Google Hangouts
>Settings - YouTube
>Manage YouTube Settings - Google Meet
>Manage Meet Settings - Pinpoint
>Admin settings for Pinpoint - Contacts
>Contacts Settings Message>Delegates Read - Currents
>Settings - Gmail
>Settings - Groups for Business
>Settings - Cloud Search
>Settings - Shared device settings
>Parent privilege for Managing all common device configurations>Manage all common device configurations - Mobile Device Management
>Manage Devices and Settings - Drive and Docs
>Settings - Google Workspace Marketplace
>Manage access to allowlisted apps - Alert Center
>Full access>View access - Jamboard
>Manage Jamboard Settings - Chrome Management
>Settings>Manage User Settings - Chrome Management
>Settings>Managed Browsers>Read - Chrome Management
>Settings>Manage Printers - Chrome Management
>Settings>Manage Chrome OS Devices>Manage Chrome OS Devices (read only) - Chrome Management
>Settings>Manage Chrome OS Device Settings - App Maker
>Settings - Google Cloud Print
>Cloud Print Manager
- Directory settings
-
Expand the Services
>Security Center section:-
Ensure that the user has full administrative rights for VirusTotal
>View Report. -
Ensure that the user has full administrative rights for the following Investigation Tool related permissions:
- Gmail
>View Metadata and Attributes - Drive
>View Metadata and Attributes - Device
>View Metadata and Attributes - User
>View Metadata and Attributes - OAuth
>View Metadata and Attributes - Rule
>View Metadata and Attributes - Chrome
>View Metadata and Attributes - Meet
>View Metadata and Attributes - Groups
>View Metadata and Attributes - Voice
>View Metadata and Attributes - Calendar
>View Metadata and Attributes - Admin
>View Metadata and Attributes - Activity Rules
>View
- Gmail
-
In the Admin API Privileges section, select the following permissions:
- Organization Units
>Read - Users
>Read - Groups
>Read - User Security Management
- Schema Management
>Schema Read - License Management
>License Read - Billing Management
>Billing Read - Domain Management
- Domain Allowlist Management
>Domain Allowlist Read
Click Continue.
Click Create Role.
Click the corresponding toggle to enable the custom role you created.
Click Save.
Parameters
The parameters that you need to fill out will differ based on the capabilities in your Axonius platform. 'General' pertains to users with Axonius Cyber Assets and/or Axonius SaaS Applications.
To learn more about common adapter connection parameters and buttons, see Adding a New Adapter Connection.
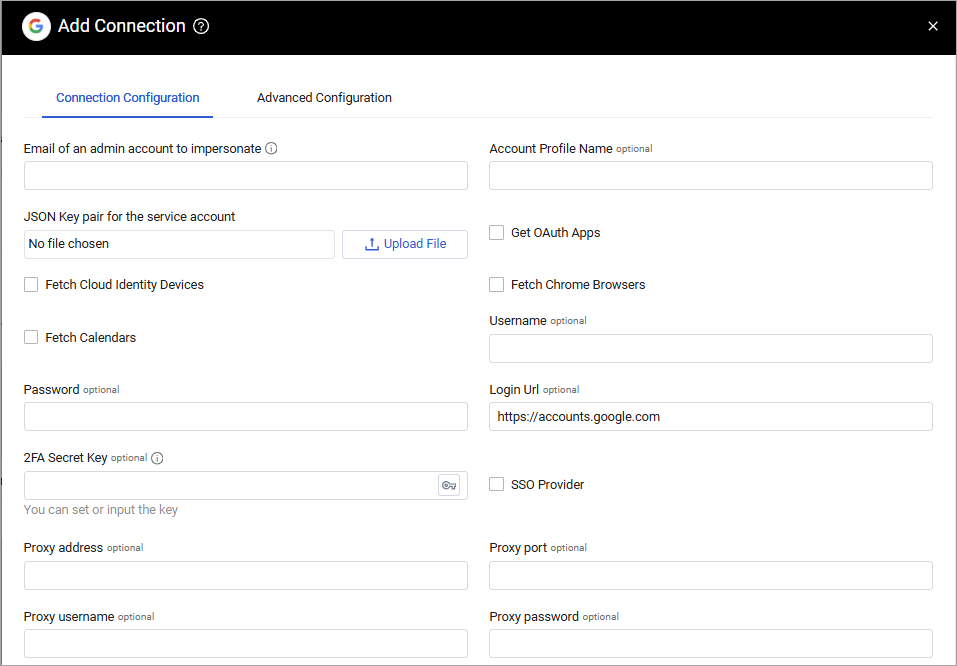
General
- Email of an admin account to impersonate (required) - The email of your Google Workspace (G Suite) admin.
- JSON Key pair for the service account (required) - Upload the JSON file you have created for your service account. For more details, see the sections below.
- Get OAuth Apps - Select to fetch the OAuth applications used by each user. Note This data requires an additional scope to your Google Workspace (G Suite) admin account: https://www.googleapis.com/auth/admin.directory.user.security For more information, see Configure the OAuth Scopes.
- Fetch Cloud Identity Devices
-Select whether to fetch Cloud Identity devices. Note Fetching Cloud Identity devices requires: Adding the following scope to your Google Workspace (G Suite) admin account: https://www.googleapis.com/auth/cloud-identity.devices.readonly It also requires enabling the Cloud Identity API. For more information, see Enable Cloud API and Configure the OAuth Scopes. - Fetch Chrome Browsers
-Select this option to fetch Chrome browsers information. Note Fetching Chrome browsers information requires an additional privilege to your Google Workspace (G Suite) admin account: https://www.googleapis.com/auth/admin.directory.device.chromebrowsers.readonly For more information, see Configure the OAuth Scopes. - Fetch Calendars - Select this option to fetch users' calendars. Note Fetching calendar information requires an additional privilege to your Google Workspace (G Suite) admin account: https://www.googleapis.com/auth/calendar It also requires enabling the Cloud Identity API. For more information, see Enable Cloud API and Configure the OAuth Scopes.
- Login URL - The hostname or IP address of the Google server.
- Proxy address - Connect the adapter to a proxy instead of directly connecting it to the domain.
- Proxy port - The port for the proxy server.
- Proxy username - The user name to use when connecting to the value supplied in Host Name or IP Address via the value supplied in Proxy address.
- Proxy password - The password to use when connecting to the server using the Proxy.
Axonius SaaS Applications
- Account Profile Name - Google user name (https://admin.google.com/ac/accountsettings/profile).
- 2FA Secret Key - The secret generated in Google Workspace for setting up 2-factor authentication for the Google user created.
- Username - The value you enter in the User Name field in Google for the new user you created.
- Password - The password you set for the new user in Google.
- SSO provider - If your organization uses Google for SSO, you can set this select this check box (selected by default). For more information, see Connecting your SSO Solution Provider Adapter.
Advanced Settings
Note
Advanced settings can either apply for all connections for this adapter, or you can set different advanced settings and/or different scheduling for a specific connection, refer to Advanced Configuration for Adapters.
In Advanced Settings, at the top of the Advanced Configuration, you can choose asset types that are relevant to specific advanced configurations.
- From the dropdown, select one or more asset types.
-
.png)
- The relevant advanced configurations are displayed.
- Next to certain configurations, you can find a small
.png) icon. Hover over the icon to see more information.
icon. Hover over the icon to see more information. - The Advanced Configuration page is divided into sections, which can be collapsed to make it easier to navigate.
General
Data Enrichment
Settings that enrich existing data or fetch new types of assets from Google Workspace.
-
Fetch MDM devices (required, default: true) - Select this option to fetch Mobile devices and Chrome OS devices from Google Workspace. Note Fetching MDM devices requires adding the following scopes to your Google Workspace (G Suite) admin account: https://www.googleapis.com/auth/admin.directory.device.mobile.readonly https://www.googleapis.com/auth/admin.directory.device.chromeos.readonly For more information, see Configure the OAuth Scopes.
-
Fetch Applications - Select this option to fetch application information from Android devices as "Installed Software"
-
Fetch user groups - Select this option to fetch user group memberships for each user from Google Workspace. Note Fetching user groups requires adding the following scope to your Google Workspace (G Suite) admin account: https://www.googleapis.com/auth/admin.directory.group.readonly. It also requires enabling the Group Settings API. For more information, see Enable Cloud API and Configure the OAuth Scopes.
-
Enrich Groups Settings - Select this option to fetch group permissions (capabilities) as group dynamic fields. Note Enriching Groups Settings requires adding the following scope to your Google Workspace (G Suite) admin account: https://www.googleapis.com/auth/admin.directory.group.readonly. It also requires enabling the Group Settings API. For more information, see Enable Cloud API and Configure the OAuth Scopes.
-
Fetch User Roles - Select this option to fetch user roles for each user from Google Workspace. Note Fetching user roles requires adding the following scope to your Google Workspace (G Suite) admin account: https://www.googleapis.com/auth/admin.directory.rolemanagement.readonly For more information, see Configure the OAuth Scopes.
-
Do not fetch disabled User Accounts (optional) - Select this option to exclude disabled user accounts from the fetch.
-
Fetch Disk Usage - Select to fetch the amount of disk storage space used by each Google account. Note Fetching disk usage requires adding the following scope to your Google Workspace (G Suite) admin account: https://www.googleapis.com/auth/admin.reports.usage.readonly It also requires enabling the Service Usage API. For more information, see Enable Cloud API and Configure the OAuth Scopes.
-
Fetch extensions - Select to fetch instances of Google granting access permissions to other SaaS or native applications.
-
Fetch Licenses - Select to fetch Google licenses in your organization.
-
Fetch Settings (Policies) - Select to fetch settings configured for the Google accounts in your organization.
Note:
Fetching settings requires adding the following scopes to your Google Workspace (G Suite) admin account: https://www.googleapis.com/auth/apps.groups.settings For more information, see Configure the OAuth Scopes.
- Fetch User Audit Logs - Select to fetch Google audit logs from the past 90 days.
Note:
Fetching user audit logs requires adding the following scopes to your Google Workspace (G Suite) admin account: https://www.googleapis.com/auth/admin.reports.audit.readonly. For more information, see Configure the OAuth Scopes.
-
Fetch spaces - Select this option to fetch spaces (Google Chat conversations). (For Axonius Identities
Note: Fetching spaces requires adding the following scope to your Google Workspace (G Suite) administrator account: https://www.googleapis.com/auth/chat.admin.spaces for more information see Configure the Oauth Scopes.
-
Enrich Browser Extensions - Select this option to enrich Browser Extensions with risk assessments data.
Note: to use this setting the https://www.googleapis.com/auth/chrome.management.reports.readonly scope is required. To fetch the Extension risk assessment from Chrome management reports, you need to enable the “Chrome Management API“
Fetch and Parse
Configurations that define how data is fetched from Google Workspace
- Cloud Identity prefer device with recent last seen if duplicated asset name - Select this option to save the device with the most recent Last Seen date under that asset name, when multiple instances of the same asset name are fetched from Cloud Identify.
- Ignore Cloud Identity devices without serial - Select this option to ignore devices coming from Cloud Identity without Serial Numbers.
- When Possible - Use Annotation ID as Asset Name - Populate the asset name with the value of the Annotation ID (when the value exists) instead of using the value in the Name field.
- Use Hostname as Asset Name for Cloud Identity Devices - Select this option to use the host name as the asset name, when the host name exists.
Advanced Configuration
General adapter advanced configuration
- Enrich User Browser Policies from Groups - Select this option to fetch groups’ browser policies and to parse the data to the relevant users and groups. Note Fetching groups’ browser policies requires adding the following scope to your Google Workspace (G Suite) admin account: https://www.googleapis.com/auth/chrome.management.policy.readonly. It also requires enabling the Chrome Policy API. For more information, see Enable Cloud API and Configure the OAuth Scopes.
- Enrich Extensions last access days - Select this option to limit the amount of extensions that the adapter fetches and the amount of parallel requests performed by the adapter to fetch extensions.
- Fetch Extensions last access from the past X days - Enter the number of days to fetch extensions for. For example, if you enter ‘3’ the adapter fetches all extensions accessed in the past three days.
- Max workers to get audit logs - Enter the maximum number of parallel requests (workers) to allow for fetching extensions. Note Fetching extensions requires adding the following scope to your Google Workspace (G Suite) admin account: https://www.googleapis.com/auth/admin.directory.user.security For more information, see Configure the OAuth Scopes.
- Enrich users last activity from the selected events - Select the user events to be fetched for the ’Last Access’ field.
Note:
For details on general advanced settings under the Adapter Configuration tab, see Adapter Advanced Settings.
Axonius SaaS Applications Best Practices
To fetch Axonius SaaS Applications set the following:
- Enrich Groups settings
- Fetch user roles
- Fetch User Audit Logs
- The following will get partial data unless entering username/password :
- Fetch extensions
- Fetch Licenses
- Fetch Settings (Policies)
In addition, in the adapter connection - Get OAuth Apps should be turned on.
Related Enforcement Actions:
These actions can help when you want users to be added to GSuite or to a group, or when you want to remove users or delete extensions.
- GSuite - Add Users
- GSuite - Add Users to Group
- GSuite - Change Users OU
- GSuite - Delete Extension
- GSuite - Remove Users
- GSuite - Remove Users From Group
- GSuite - Reset Users Logon Cookies
- GSuite - Role Assignments Actions
- Google Workspace - Send Direct Message to a Space
- Google Workspace - Activate User
- Google Workspace - Suspend User
- Google Workspace - Update User
- Google Workspace - Create Role
- Google Workspace - Update Role
- Google Workspace - Delete Role
- Google Workspace - Delete / Wipe Identity Cloud Device
- Google Workspace - Create Group
- Google Workspace - Update Group
- Google Workspace - Delete Group
- Google Workspace - Reset User Password
- Google Workspace - Send Direct Message to a User
- Google Workspace - Change Browser OU
Updated 3 days ago
