
SAML-Based Login Settings
Use SAML-based login to enable login using your existing enterprise identity provider, such as Okta or Microsoft Active Directory (AD).
Configuring General SAML-Based Login Parameters
These parameters apply to all SAML integrations and only need to be entered once.
- Under the SAML-Based Login Settings section, toggle on Allow SAML-based Logins.
- Restrict to SAML login only - Enable this option to allow only SAML-based logins. Manual login is disabled.
- Logout from SAML provider on logout from Axonius (default: enabled) - Enable this option to log out from the SAML provider when the user logs out from Axonius.
- Axonius external URL - This is optional. Used to access Axonius from an external URL. If the communication to Axonius is being proxied, then this should be the external domain, i.e., the proxy domain.
- Ignore user name case when logging in - When selected, the case of the user name will be ignored. This prevents a new Axonius account being created when a user connects with the same user name but is cased differently. For example:
[email protected]and[email protected]. In this case, a new account will not be created.
Configuring a SAML Instance
To configure a SAML instance, use the configuration sections below. Not all configurations require all the sections to be configured. You can configure as many instances as necessary for your environment.
Creating a SAML Instance with a Metadata File
Using metadata files is the easiest and quickest way to configure a SAML instance with a provider. It contains all the URLs needed to create a SAML connection. When multiple SAML instances are being used, each instance has its own metadata file for download.
To create a SAML instance using the metadata file:
- Configure the following settings for each SAML instance. Learn about Using Multiple SAML Providers.
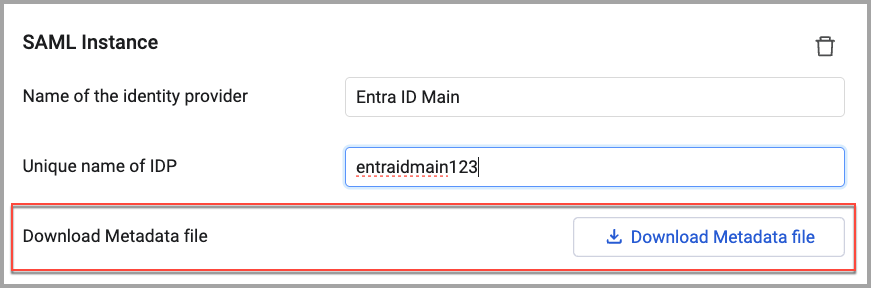
- Name of the identity provider (required) - If your identity provider supports metadata URL parsing, you can use the link to automatically fill in some details. If it doesn't, fill them manually in the Name of the identity provider field. Note that the name of the identity provider can be any string you like; It is used only to identify the identity provider within Axonius.
- Unique name of IdP (required) - A unique name for the identity provider that cannot be changed after it is saved. This name must be added to the SSO provider when creating the connection. The IDP name:
- Cannot contain spaces, hyphens, or a long word.
- Can be up to 10 characters and may contain numbers.
- Examples: AxSSO00001, AxLogin001, AxAzure001
IdP Note
After configuring this option and saving, the IdP field will become inactive and cannot be changed. The option will appear in the list of available identity providers for the user. The IdP must be added to paths.
- Click Save at the bottom of the page to save the instance.
- Click Download Metadata file. The file is downloaded to your local Downloads folder.
- On the provider portal, fill out any necessary fields and upload the metadata file you downloaded from Axonius.
- Next, copy the metadata URL from the provider and paste it into the Metadata URL field in Axonius.
- To customize the integration further, you may need to fill other options described below.
Configuring a SAML Instance without Using the Metadata File
Use the following steps to configure a SAML provider instance. This section is required for all SAML instances.
To configure a SAML instance without using the metadata File:
- Configure the following settings for each SAML provider. Learn about Using Multiple SAML Providers.
- Name of the identity provider (required) - If your identity provider supports metadata URL parsing, you can use the link to automatically fill in some details. If it doesn't, fill them manually in the Name of the identity provider field. Note that the name of the identity provider can be any string you like; It is used only to identify the identity provider within Axonius.
- Unique name of IdP (required) - A unique name for the identity provider that cannot be changed after it is saved. This name must be added to the SSO provider when creating the connection. The IdP name:
- Cannot contain spaces, hyphens, or a long word.
- Up to 10 characters and may contain numbers.
- Examples: AxSSO00001, AxLogin001, AxAzure001
IdP Note
After configuring this option and saving, the IdP field will become inactive and cannot be changed. The option will appear in the list of available identity providers for the user. The IdP must be added to paths.
- Automatically redirect all logins to the identity provider - Select whether to automatically redirect all users to the configured SAML identity provider.
- When this is enabled, any user who tries to log in to Axonius will be automatically redirected to the configured SAML identity provider.
- To access the Axonius login page without being redirected, use the following URL: https://[Axonius host name / IP address]/?redirect=false
- When this is disabled, any user who tries to log in to Axonius will need to manually click the 'Login with SAML' option to login with the configured SAML identity provider.
- When this is enabled, any user who tries to log in to Axonius will be automatically redirected to the configured SAML identity provider.
- Metadata URL (optional) - Paste the URL that some SSO providers offer that can be used in Axonius to fill in all the other details.
When not using the Metadata URL, the following fields must be filled in:
Single sign-on service URL - A URL that is needed for the SAML Authentication.
Entity ID - The ID of the Axonius entity in the identity provider.
Single logout service URL - A URL that is needed for the SAML Authentication.
Signing certificate (Base64 encoded) - Click Upload File to upload the base64-encoded signing certificate provided by your identity provider. Some environments require the certificate in PEM format. For information about viewing the certificate details, see Viewing the Signing Certificate Details.
These URLs are validated. When invalid, an error message is displayed at the bottom of the page.
- Do not send AuthnContextClassRef (Applies to: Microsoft Active Directory and Microsoft EntraID) - The SAML
AuthNRequestwill not include theAuthnContextClassRefSAML attribute:
\<saml:AuthnContextClassRef>urn:oasis:names:tc:SAML:2.0:ac:classes:PasswordProtectedTransport\<saml:AuthnContextClassRef> >
- In the identity provider console, define the credentials and SAML settings. These settings provide the values listed below and are used to enable SAML authentication in Axonius:
| Name | Value | Comment |
|---|---|---|
| Signing certificate (Base64 encoded) | `https://<axonius_hostname>/api/login/saml/metadata/ | A one-time URL for identity providers that support metadata URL parsing |
| Entity ID / Audience URI | https://<axonius_hostname>/api/login/saml/metadata/?idp=<unique name of idp> | |
| Reply URL / Single Sign on URL | https://<axonius_hostname>/api/login/saml/acs | Assertion Consumer Service URL |
| Sign on URL / Default Relay State | https://<axonius_hostname>/api/login/saml | Optional. This is useful only if you want to allow identity-provider initiated authentication |
Note
When creating an integration using the metadata files, these URLs are included in the metadata file and are filled in automatically in the provider portal.
Viewing the Certificate Details
After you have uploaded a certificate (such as a CA file, IdP Signing certificate, or Private Key), the Show certificate details button becomes available. Clicking it opens a read-only modal with the following information:
- Certificate Information - Displays the Certificate Name/Alias, Issuer (CA), Subject, and Serial Number.
- Validity Information - Shows the Issued Date, Expiration Date, and the total Validity Period.
- Technical Information - Includes the Public Key Algorithm, Key Size, Signature Algorithm, and the Certificate Fingerprint (SHA-256 hash).
- Certificate Status - Indicates the Revocation status and whether the certificate is Self-Signed.
- Metadata - Displays system-related information, including the Upload Date and the user who performed the upload.
Service Provider Signing Configuration
Configuring service provider signing is optional. You need a private key file and a certificate file saved on your system before performing this configuration.
To configure service provider signing:
- Click Enable Service Provider signing and fill in the following details:
- Enable AuthnRequestsSigned - When selected, the service provider will sign authentication requests that it sends to the IdP.
- Enable WantAssertionsSigned - When selected, the IdP wants the authentication requests it receives from the service provider to be signed.
- Signing Private Key (required) - Click Upload File to upload the private key file (
.key) that is required for SP signing. Click Show certificate details to verify the technical information of the uploaded file. - Signing Certificate (required) - Click Upload File to upload the signing certificate file (
.crt). Click Show certificate details to view the certificate issuer, validity status, and public key information.
Configuring SAML Session Reauthentication
Configuring reauthentication is optional. When configured, users will be required to reauthenticate according to the timeout.
To configure session reauthentication:
- Click Enable SAML session reauthentication and enter the Reauthentication timeout claim key as it is configured in IdP on the identity provider side, such as Okta or Azure. When the timeout is reached, the Login box is displayed and the user must reauthenticate.
SAML User Parameters Mapping
When using SAML, Axonius uses your SAML parameters to identify users and assign roles to them.
Axonius requires the following attributes to be sent by the provider. You can map the terms your SAML uses to Axonius. If you do not map user parameters, Axonius will use the default parameters sent by your provider.
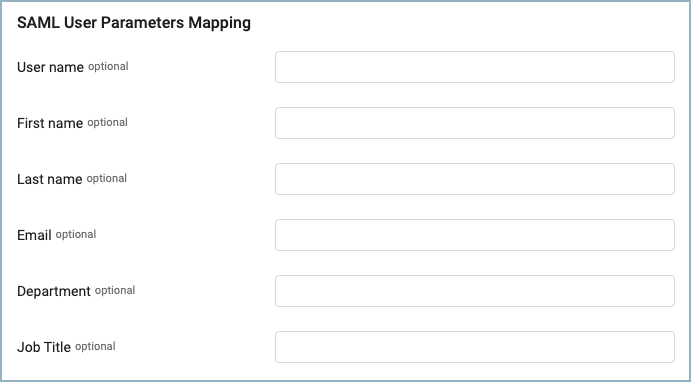
- User name - The ID of the user in that identity provider. For example, in Active Directory or Azure Active Directory, this is the user principal name. If you do not fill in a value, the system uses the default from the identity provider.
- First name - The given/first name of the user. If you do not fill in a value, the system uses the 'givenname' value.
- Last name - The surname of the user. If you do not fill in a value, the system uses the 'surname' value.
- Email - The email address of the user. If you do not fill in a value, the system uses the 'emailaddress' value.
- Department - The department of the user. If you do not fill in a value, the system uses the 'department' value.
- Job Title - The job title of the user. If you do not fill in a value, the system uses the 'title' value.
Passing User Group Membership from Okta to Axonius with SAML
By default, group membership is not passed from Okta to an Axonius instance with SAML login. Custom Group Attributes need to be set in Okta. in order to pass user role assignments. They enable values such as group assignments, email addresses, and other values to be passed.
For more information about passing a user's group membership with SAML, see How to pass a user's group membership in a SAML Assertion from Okta.
User Assignment Settings
There are two ways users are assigned roles when they log in with SAML:
- Default assignment - Use default assignments when a user does not match an existing rule.
- Rules - This is the preferred way to assign roles to users.
Configuring Default Assignment Settings
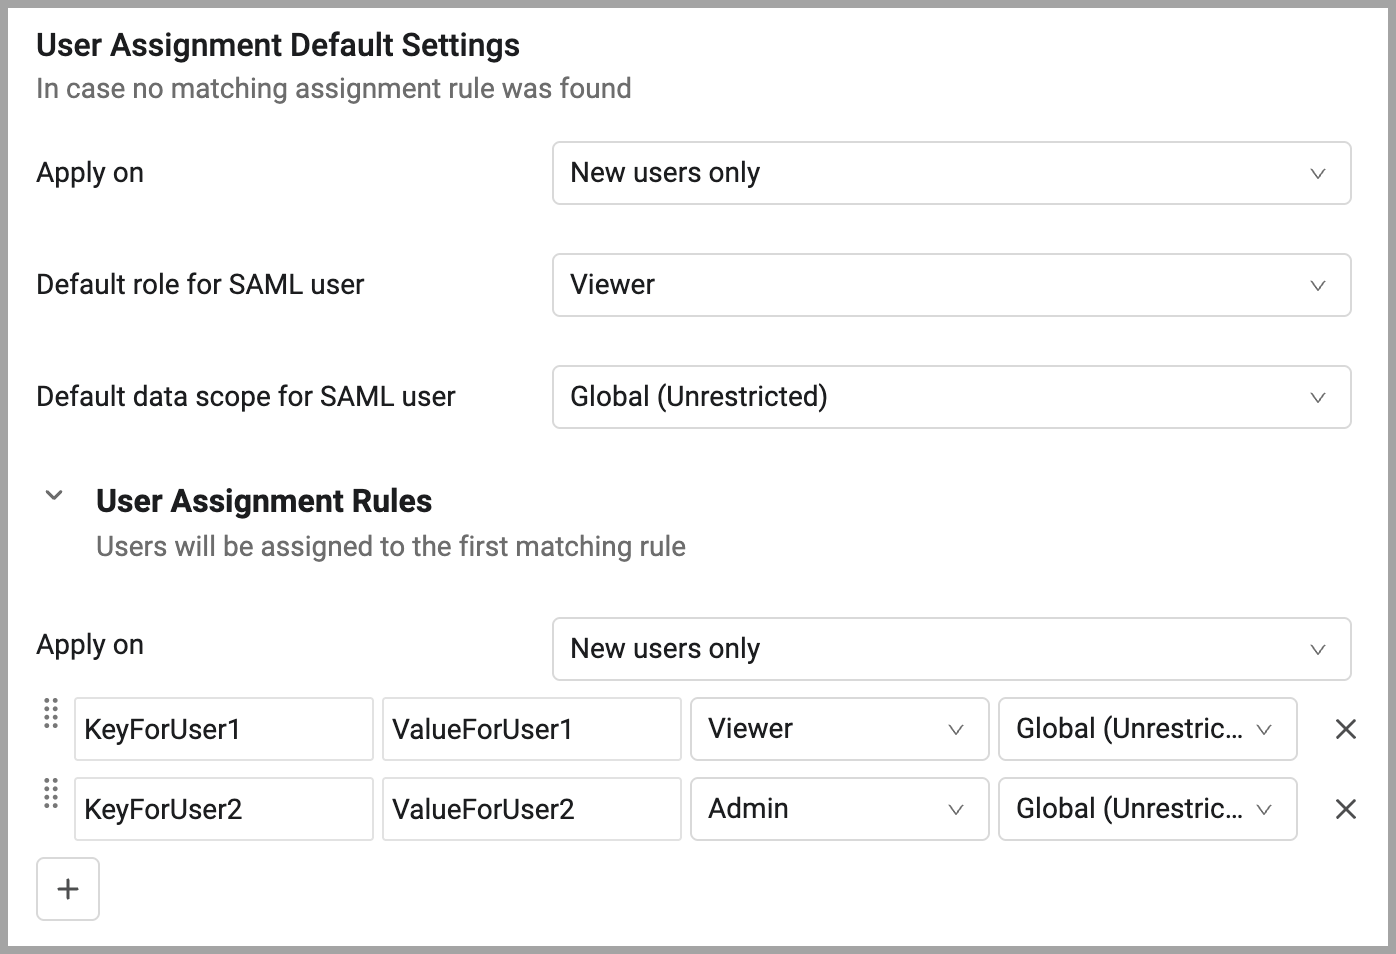
Use user assignment default settings to configure the access level assigned to users automatically when they don't match any of the configured assignment rules.
To configure default assignments:
-
Select which type of login the rule apply:
- New users only - Default role assignment is evaluated only for new users. The role for existing Axonius users will not be reevaluated and will remain as is. If an existing user logs in and does not match any of the configured rules, that user is assigned the same role assigned that last time they logged in.
- New and existing users - Default role assignment is evaluated for new users and also for existing users on every login.
-
In Default role for SAML user, select the default role assigned to assign. For details on managing user roles in Axonius, see Manage Roles.
Important
When a new user attempts to log in and does not match any of the existing role assignment rules, log in is refused and they are returned to the login page.
- Default data scope for SAML user - Select the data scope to assign. For details about data scopes, see Managing Data Scopes.
Configuring Rules for Assignment Settings
Use user assignment rules to determine what role and data scope a user is assigned when they log in. They are evaluated starting from the first rule in the list.
Note on Visiting Data Scopes
The Visiting Data Scopes field only appears when "Global Data scope" is selected as the main data scope. This allows users to be assigned multiple data scopes directly during SAML login.
To create user assignment rules:
-
Expand User Assignment Rules.
-
Select which type of login the rule apply:
- Apply on -
- New users only - Role assignment is evaluated only for new users. The role for existing Axonius users will not be reevaluated and will remain as is.
- New and existing users - Role assignment is evaluated for new users and also for existing users on every login.
- Apply on -
-
Configure the following fields for each rule:
- Key (case sensitive, exact match) - A key is one of the user attributes from the identity provider.
- Value (case sensitive, exact match) - The value, from the identity provider, of the attribute specified in Key.
- Role - The role to be assigned. For details on managing user roles in Axonius, see Manage Roles.
- Data Scope - The data scope to be assigned. For details about data scopes, see Managing Data Scopes.
- Visiting Data Scopes - Specifies additional data scopes this user can access via the "Move between data scopes" feature, in addition to the main data scope assigned above.
- Only visible when "Global Data Scope" is selected as the main data scope.
- Select one of the following:
- Empty (default) - User can access all data scopes.
- Specific data scopes - Select specific data scopes the user is authorized to access in addition to the main data scope.
- The user's role must have the "Move between data scopes" permission.
- For more information, see Allow visiting other Data Scopes.
-
Click
+to add as many rules as necessary. Click X to delete a rule.

When a user's attributes match the key/value pair, they are logged in and assigned the selected role and data scope in Axonius. To reorder the rules, click the handle to the left of the rule and drag and drop rules into the order you want. The user's assigned role is determined based on the Role Assignment Rules Logic.
Configuring Advanced SAML Mapping (Separate Role and Scope Assignment)
By default, SAML assignment rules use a combined approach where a single SAML key/value pair is matched to both a role and a data scope simultaneously. For organizations that pass role and data scope information through separate SAML claims, Axonius provides an Advanced Mapping mode that allows these to be configured independently using two separate tables.
Understanding Standard vs. Advanced Mapping
Standard Mapping (Default):
- Single table:
[SAML Key | SAML Value | Assigned Role | Assigned Data Scope] - A user must match a single row to receive both their role and their data scope.
Advanced Mapping:
- Two separate tables:
- Role Mapping Table:
[SAML Key | SAML Value | Assigned Role] - Scope Mapping Table:
[SAML Key | SAML Value | Assigned Data Scope| Visiting Data Scopes]
- Role Mapping Table:
- Users can match different rows in each table based on different SAML attributes.
- Example: A user might match the Role Mapping table based on a
groupsclaim and the Scope Mapping table based on adepartmentclaim.
Enabling Advanced Mapping
To enable Advanced Mapping:
- In the User Assignment Rules section, toggle on Enable Advanced Mapping (Separate Role/Scope).
- When enabled:
- The standard combined assignment rules table is hidden.
- Two new tables appear: Role Mapping and Scope Mapping.
- When disabled (default):
- The standard combined assignment rules table is displayed.
- Role and Scope Mapping tables are hidden.
Configuring Role and Scope Mapping Tables
To configure the Role Mapping table:
- Expand the Role Mapping table.
- Configure the following fields for each rule:
- Key (case sensitive, exact match) - A SAML attribute from the identity provider.
- Value (case sensitive, exact match) - The value of the SAML attribute.
- Role - The role to assign when this key/value pair matches.
To configure the Scope Mapping table:
- Expand the Scope Mapping table.
- Configure the following fields for each rule:
- Key (case sensitive, exact match) - A SAML attribute from the identity provider.
- Value (case sensitive, exact match) - The value of the SAML attribute.
- Data Scope - The data scope to assign when this key/value pair matches.
- Visiting Data Scopes - Specifies additional data scopes this user can access via the "Move between data scopes" feature, in addition to the main data scope assigned above.
How Advanced Mapping Works
When a user logs in with SAML:
- The system evaluates the Role Mapping table to determine which role to assign.
- The system evaluates the Scope Mapping table to determine which data scope to assign.
- If a user matches multiple rows in the same table, existing priority rules apply (first match wins).
- A user can be assigned a role and data scope from different mapping rules.
Example Scenario:
- User has SAML attribute:
groups=Engineeringanddepartment=North America. - Role Mapping table has:
groups=Engineering→ Assign "Engineer" role. - Scope Mapping table has:
department=North America→ Assign "North America Scope" data scope. - Result: User is assigned the "Engineer" role and "North America Scope" data scope.
SAML Advanced Settings
The following advanced settings are available:
Using ADFS Compatible URLs
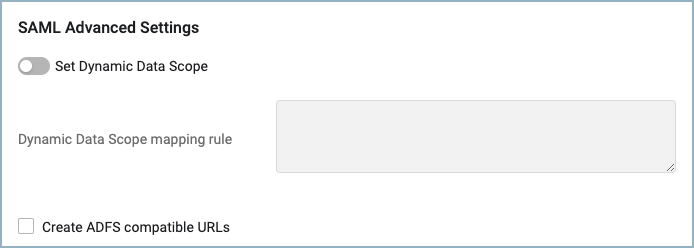
- Create ADFS compatible URLs - When using ADFS SAML authentication, select Create ADFS compatible URLs to have Axonius create and use ADFS compatible URLs.
Using SAML Credentials to Create Dynamic Data Scopes
Use Dynamic Data Scopes to allow users to log in without manually creating a Data Scope for each situation. When using an identity provider, Data Scopes can be assigned to users dynamically when they log in by mapping a Data Scope to their SAML login profile. This is done with JSON code.
To enable Dynamic Data Scope mapping
- In System Settings, on the LDAP & SAML page, scroll down to SAML Advanced Settings.
- Toggle on Set Dynamic Data Scope.
- In the Dynamic Data Scope mapping rule box, paste the JSON mapping rule code. See Creating the JSON Mapping Rule below on how to create the JSON code.
- Click Save to save the changes.
Creating a JSON Mapping Rule
Use the following template to create the JSON mapping code:
{
"": {
  "": {
   "": ""
  }
 }
}
For example, use the following JSON to dynamically create Data Scopes based on the viewer role permissions. The Asset Scope query will compare the defined Axonius field value with the value of the defined SAML field.
{
"viewer": {
  "devices": {
   "adapters_data.active_directory_adapter.name": "test"
  }
 }
}
To create JSON mapping code
-
On the Queries page, select the Asset Scope Query that creates the Data Scope.
-
In the query drawer, click Run Query. The results are displayed on the asset page.
-
In the query bar, select and copy the Axonius field name, as shown here:
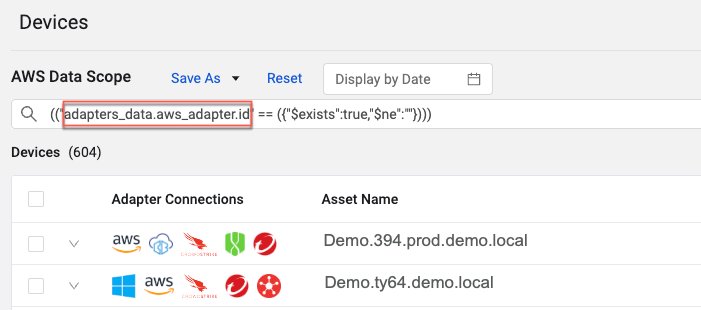
Note
Do not include the quotation marks in the selection.
- In the JSON template, enter the following values:
- For role name, enter the name of the role from which the auto-created roles will be copied. (Valid options are view or edit.)
- For module name, enter the name of the Axonius module. (Valid options are devices or users.)
- For axonius field, paste the name of the Axonius field copied above.
- For SAML field, enter the name of the SAML field to map to the axonius field field.
- Create the JSON code directly in the Dynamic Data Scope mapping rule text box or in any text editor and then paste it into the text box.
- Click Save.
Using Multiple SAML Providers
Configure multiple SAML providers to allow users with different identity providers to easily log in to Axonius.
To configure multiple SAML providers
- Enter the configuration details for the first SAML provider.
- Click Add New SAML.
- Fill in the configuration details for the provider according to the directions above. See Configuring a SAML Provider.
- Make sure to use a unique IdP.
- To delete a SAML configuration, click the trashcan icon next to the configuration you want to delete.
See Using Identity Providers for general information about using identity providers.
For information about LDAP-based login settings, see LDAP Login Settings.
Updated 26 days ago