
Windows Management Instrumentation (WMI)
Windows Management Instrumentation (WMI) is a set of specifications from Microsoft for consolidating the management of devices and applications in a Windows network. WMI provides users with information about the status of local or remote computer systems.
The WMI adapter executes Command Prompt commands and WMI queries using the DCOM (Distributed Component Object Model) protocol that interacts with the WMI service.
Types of Assets Fetched
This adapter fetches the following types of assets:
- Devices
The WMI scan retrieves important information about the device, including (but not limited to):
- Hostname
- Network Interfaces - including MAC addresses, IP addresses, and subnets
- Operating system, kernel version, and distribution
- List of installed software
- Users and admin users
- Hard drives and file systems
- CPUs and RAM
- Hardware details, including serial numbers'
Before You Begin
Setting WMI access
To perform these steps:
- You must have local administrator rights on the target machine.
- The user to which you want to grant access must have an account on the target machine (local or domain).
Enable WMI Service & Firewall Rules
- Run the following command:
Get-Service Winmgmt. If this doesn't work, runStart-Service Winmgmt. - To open Windows Firewall for WMI, run the following command:
Enable-NetFirewallRule -Group "Windows Management Instrumentation (WMI)".
This opens TCP 135 (RPC) and other dynamic RPC ports used by WMI.
Configure DCOM Permissions
- To configure DCOM permissions (for remote access), run
dcomcnfg(Start → Run →dcomcnfg). - Navigate to Component Services → Computers → My Computer.
- Right‑click on My Computer and select Properties.
- Navigate to the COM Security tab.
- Under Launch and Activation Permissions, select Edit Limits…
- Add your user (or group) and check Remote Launch and Remote Activation.
- Under Access Permissions, select Edit Limits…
- Add the same user (or group) and check Remote Access.
- Click OK to save.
Grant WMI Namespace Access
By default only admins can query WMI namespaces. To permit a non‑admin:
- Run
wmimgmt.msc(Start → Run →wmimgmt.msc). - Right‑click on WMI Control (Local) and select Properties.
- Select the Security tab and expand Root → CIMV2 .
- Click Security → Add… and add your user (or group).
- In the permissions list, check the following:
- Enable Account
- Remote Enable
- Optionally, if you run custom providers, check Execute Methods and Provider Write.
- Click OK.
Test Remote WMI Access
From another machine (PowerShell), run the following (ensure to enter real values for Target, UserName):
Get-CimInstance -ClassName Win32_OperatingSystem -ComputerName TARGET -Credential (Get-Credential DOMAIN\UserName) If the run succeeds, you’ll see the OS details returned.
If the run fails, check the firewall, DCOM, or namespace permissions.
Setting SMB Share
The WMI adapter must have an SMB share configured in the machine for it to work.
- To create the folder, run:
New-Item -Path "C:\Windows\axonius" -ItemType Directory -Force - To create the SMB share, run:
New-SmbShare -Name "axonius" -Path "C:\Windows\axonius" -FullAccess "DOMAIN\UserOrGroup"- Change DOMAIN\UserOrGroup to the name of the user or group that will access the share.
- SMB share permissions are separate from NTFS. To set NTFS permissions, grant access to the underlying folder by running:
$folder = "C:\Windows\axonius"
$identity = "CONTOSO\AxoniusSvc"  # Replace with your user/group
$acl = Get-Acl $folder
$rule = New-Object System.Security.AccessControl.FileSystemAccessRule(
    $identity, "FullControl", "ContainerInherit,ObjectInherit", "None", "Allow"
)
$acl.AddAccessRule($rule)
Set-Acl -Path $folder -AclObject $acl- To enable the Windows Firewall rules for file sharing, run
Enable-NetFirewallRule -DisplayGroup "File and Printer Sharing"
This opens the following ports:- TCP 445 – SMB over TCP (main)
- UDP 137/138, TCP 139 – used for legacy NetBIOS/SMB
- To double-check the open port, run:
Get-NetTCPConnection -LocalPort 445 - To test the share from another machine (PowerShell), run the following (enter the machine hostname for TargetComputer):
Test-Path "\\TargetComputer\axonius" - To copy the test file, run:
Copy-Item C:\test_file.txt \\TargetComputer\axonius\.
Required Ports
- 135 (RPC)
- 445 (SMB)
- Random port in the range 1024-65535 - see Setting Up a Fixed Port for WMI.
Required Permissions
-
The working directory for the files created via the WMI connection is 'ADMIN$\axonius'.
-
The value supplied in User Name and Password requires the following permissions:
- Either domain admin permissions or local admin permissions to the user/group that the user belongs to.
- Read/write access to the ADMIN$ share.
Parameters
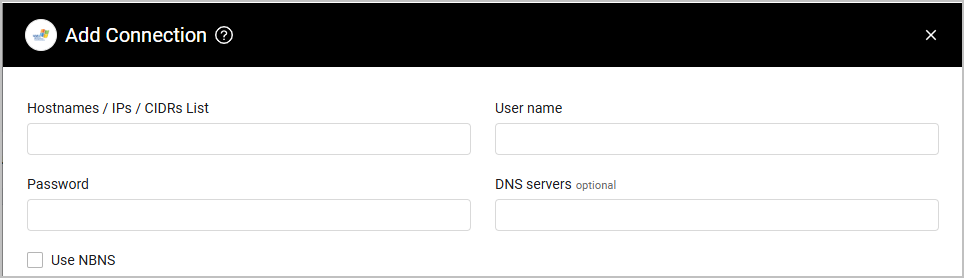
- Hostnames / IPs / CIDRs List (required) - Specify a comma-separated list of hostnames, IP addresses or CIDRs to be scanned.
- User Name and Password (required) - The credentials for a user account that has the permissions to run a WMI scan on the provided asset list specified in the Hostnames / IPs / CIDRs List field.
- DNS Servers (optional, default: empty) - Specify a comma-separated list of DNS servers to be used to resolve the hostnames specified in the Hostnames / IPs / CIDRs List field.
- If supplied, Axonius will use the specified DNS server to resolve the hostnames specified in the Hostnames / IPs / CIDRs List field. For each asset, the first response will be the one to be used.
- If not supplied or if no response has been received from any of the specified DNS servers, the default DNS server will be used.
- Use NBNS (optional) - Check to use the NetBIOS Name Service protocol.
For details on the common adapter connection parameters and buttons, see Adding a New Adapter Connection.
Advanced Settings
Note
Advanced settings can either apply for all connections for this adapter, or you can set different advanced settings and/or different scheduling for a specific connection, refer to Advanced Configuration for Adapters
- Number of parallel connections (required, default: 5) - Specify the number of connections to be opened to control the performance of the scan.
- Fetch software licenses information (default: false) - Select this option to fetch software licensing product information from each host. The results are presented in a list field called 'Software Licensing Product Information'.
- Fetch Remote Desktop client access licensing information (default: false) - Select this option to fetch information from the Remote Desktop Client Access Licensing Server. This setting only works for RDS Licensing Server hosts. Refer to Activate the Remote Desktop Services license server to learn how to activate this on a host.
- Fetch SQL Server License information - Set this option to search for Microsoft SQL Server license information on the machine’s registries and fetch it.
- Fetch installed software from Win32_Product class - Select this option to fetch data from the Win32_Product class.
- Registry keys to get key-value pairs - Enter Registry keys for which the system searches for the values on specific registries of the windows computer and stores them in a field called 'Validated Registry Keys - Existing Values' in the device.
Note
For details on general advanced settings under the Adapter Configuration tab, see Adapter Advanced Settings.