
Asset Actions
Once you have created queries and investigated assets and their adherence to policies, you can perform actions on a single selected asset or in bulk on assets that you select.
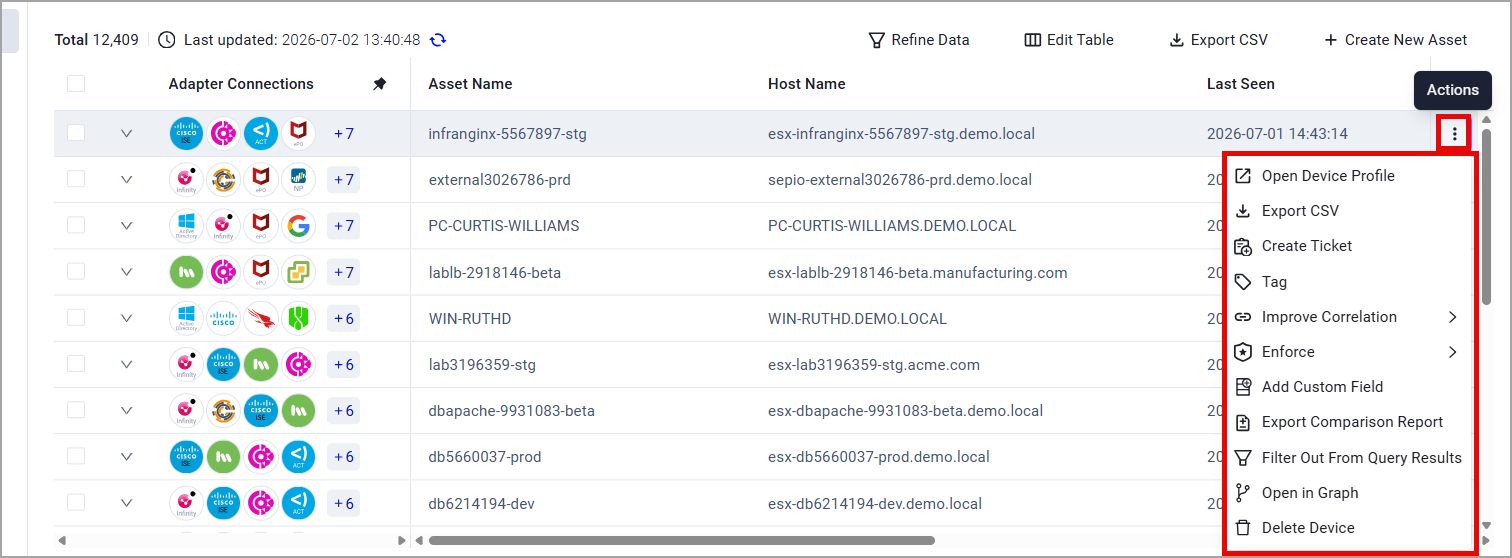
Actions are available from the Actions button at the right side of the row. Click this button to see all available actions. When you select one or more rows, some of the available actions are displayed at the top of the table, while the rest are accessible from the More Actions button.
Most of the actions described below are also available on the top of an individual Asset Profile page.
Selecting an action for a single asset:
Selecting an action for multiple assets:
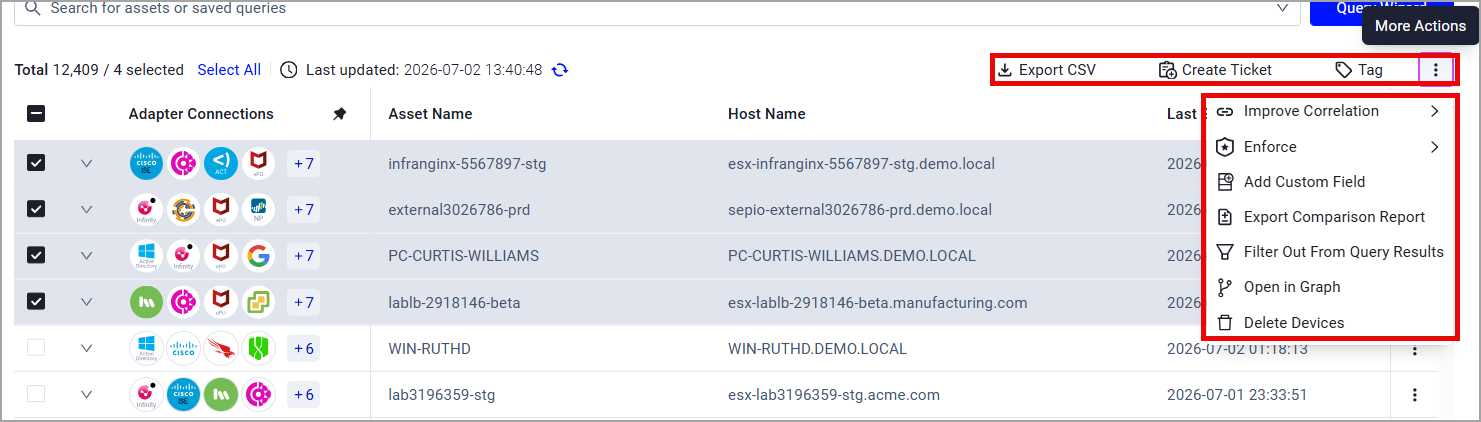
Axonius supports the following actions:
Open Asset Profile Page in New Tab
Click Open [Asset] Profile to open the relevant Asset Profile page in a separate tab.
Add Custom Field
Add a single custom field to one or more selected assets at the same time.
Learn how to work with custom data, including how to add an existing or newly created custom field to one or more assets.
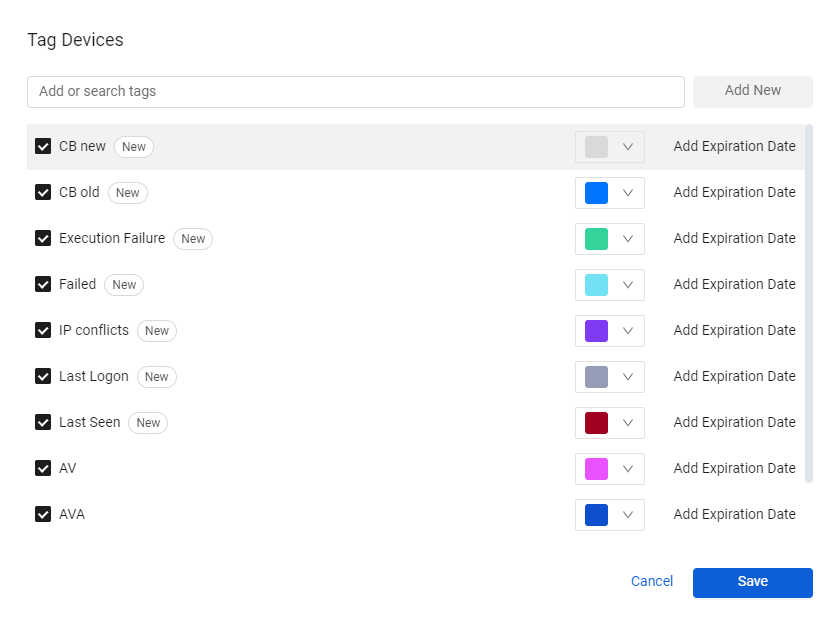
Tag
Use tags to assign context to your assets for granular filters and queries. Apply new or existing tags to the selected assets. The list of selected tags is applied to all selected assets. Therefore, tagging may result in the removal of existing tags from one or from several of the selected assets. Refer to Working with Tags to learn about working with Tags on assets.
Delete Assets
Click Delete [Asset] to delete the selected asset(s) from Axonius. Deleted assets may be added again to Axonius if they are discovered in any future discovery cycle.
Improve Correlation - Link Assets
Manually correlate at least two asset records and consolidate their details into a single asset.
Note
Manual linkage cannot be reverted. It will not be overridden by the next correlation. However, manually linking assets can be overridden if the Axonius correlation logic determines two linked assets should be distinct assets.
The action text is according to the Assets page. For example, Link Devices, Link Users, Link Tickets.
Improve Correlation - Unlink Assets
Undo the correlation on a single asset (with multiple adapter sources) into the constituent adapter sources of that asset. Each individual adapter previously used in that correlation will now present as a single-adapter source asset. For example, if an asset has been correlated from three different adapters, unlinking that asset will result in three different unlinked assets.
Note
Any manually unlinked devices/user may be relinked the next time a discovery cycle runs, or data fetch is triggered from a specific adapter connection, if the correlation logic determines the association.
The action text is according to the Assets page. For example, Unlink Devices, Unlink Users, Unlink Tickets.
Enforce - Create Enforcement
Create a new Enforcement Set from the Assets pages with a Main Action that runs on the entities that you selected ('custom selection'). When you select this option, the Create Enforcement Set drawer opens, which lets you configure the following:
- Enforcement set name.
- Main Action - Select an action from the Action Library, to be performed when the Enforcement Set is executed.
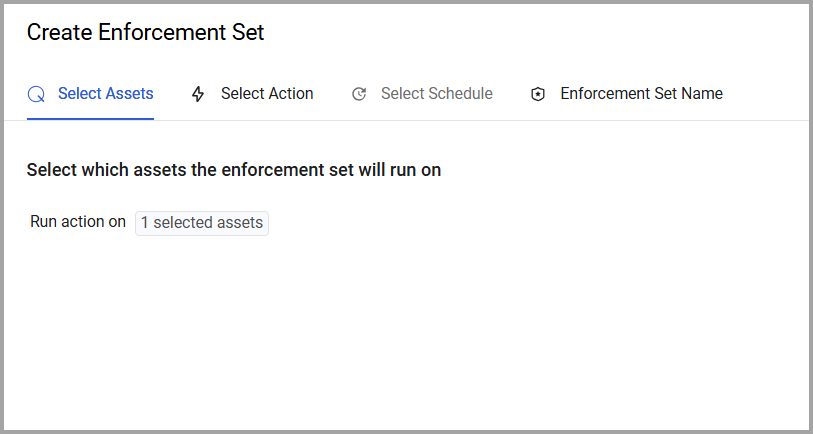
Once configured, click Save and Run to save the Enforcement Set and generate an enforcement task that will run on the entities you have selected.
For more details, see Creating Enforcement Sets.
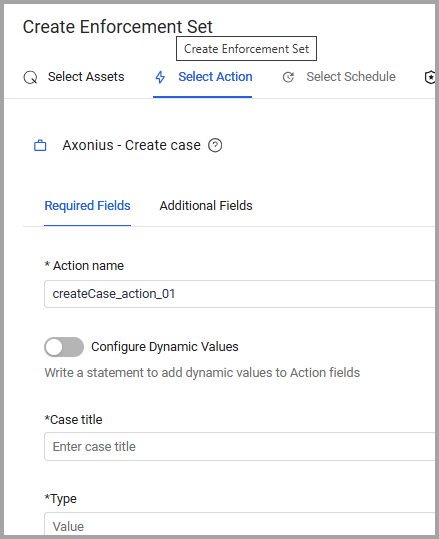
You can also use Enforce - Create Enforcement to create a new Case.
When the Create Enforcement Set drawer open from Select Action choose Axonius - create case
Enforce - Use Existing Enforcement
You can run a predefined Enforcement Set on one or more assets.
Note
The following procedure shows screens for selecting an existing Enforcement Set to run on devices. Similar screens appear when selecting an existing Enforcement Set to run on another type of asset (such as users).
To run an existing Enforcement Set on one or more assets
-
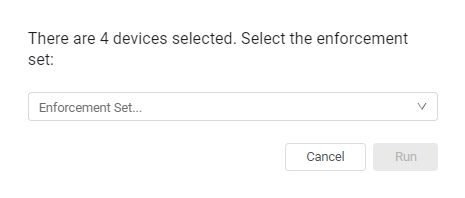
Select the relevant asset(s), click Actions/More Actions and select Enforce > Use Existing Enforcement. A dialog opens for selecting the Enforcement Set to run on the selected assets.
-
In the Enforcement Set... search box, type all or part of the Enforcement Set name, and then from the resulting list of Enforcement Sets containing the searched string, select the relevant Enforcement Set name.
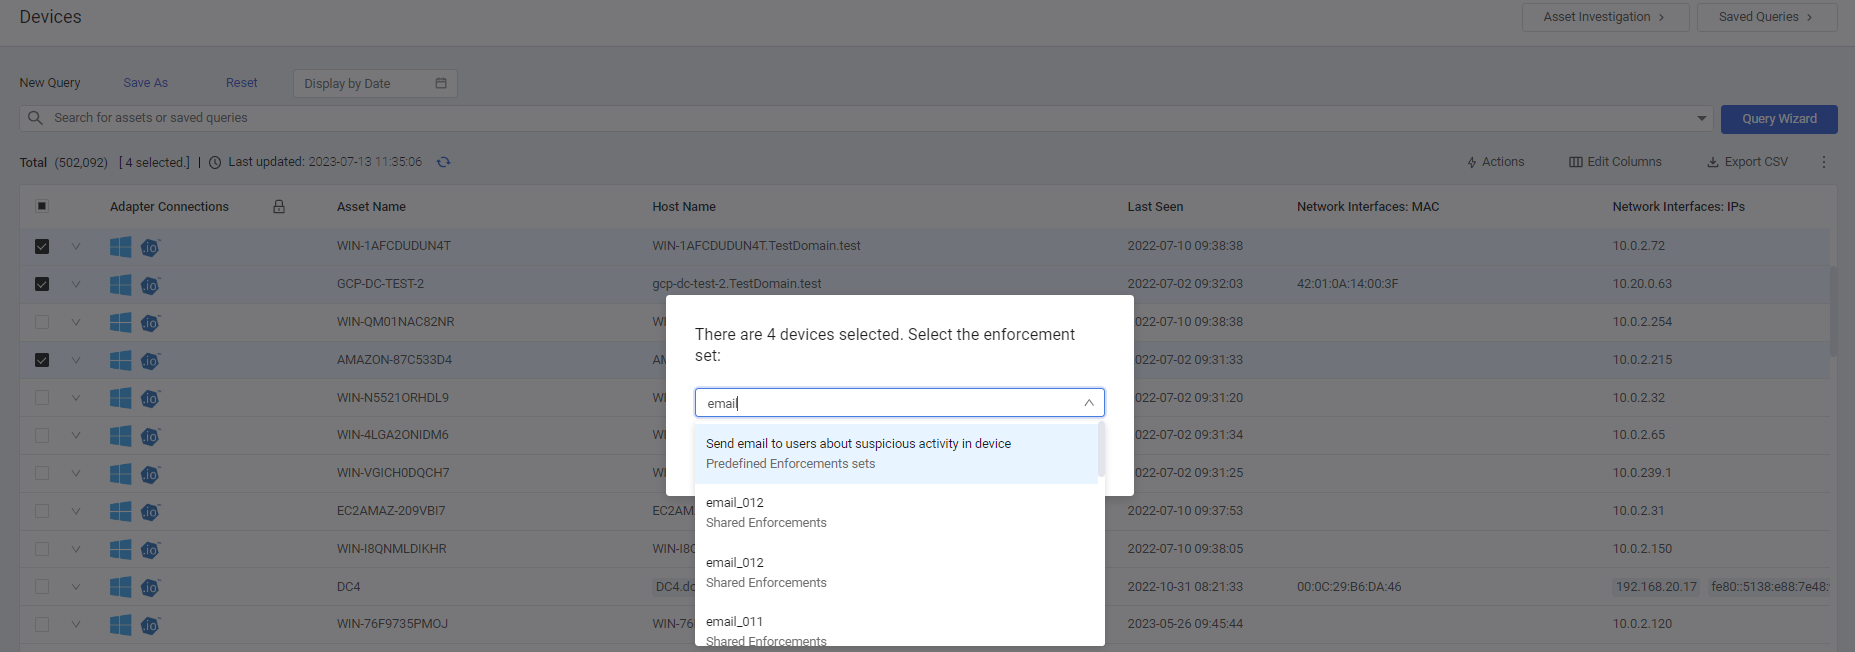
- Click Run. The Enforcement Set runs on the selected assets. To learn more, see Action Center Page.
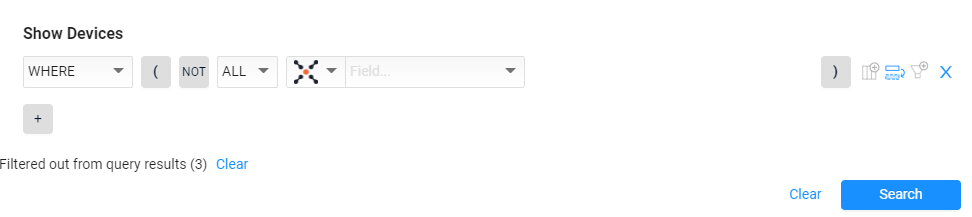
Filter Out from Query Results
Filter out the selected assets from the query results. Once filtered out, the Query Wizard adds a new Filtered out from query result line. Click Clear to restore the filtered out assets.
Export Comparison Report
Select one or more assets to create a comparison report. Refer to Comparison Report for Assets.
Note
A comparison report is active only after the system has been connected for a day.
Create Ticket
You can create a ticket/incident in a third-party ticketing system directly from an assets table. This shortcut enables you to create an Enforcement Set of the Create Incident or Ticket category for a single or several assets (of the same type) in one click using the Create Ticket action or icon without having to open it in the Action Center. Using this shortcut saves time and effort.
-
By default, the action connects to the third-party adapter using the adapter connection configured in the system for that adapter.
-
The Jira Service Management - Create Ticket per Asset, Jira Service Management - Update Tickets, and Jira Service Management - Create Ticket need to have a Jira server configured in System Settings
>External Integrations>Jira Settings. -
The Enforcement Set created using the Create Incident or Ticket Enforcement Action is automatically placed in the Action Center in the Quick Actions folder.
-
You can view the details of all tickets created in third-party ticketing systems and view their progress directly from the Asset Profile Tickets tab.
Note
You cannot reuse an Enforcement Set from the Quick Actions folder. You can only reuse it in one of the following ways:
Select a query for it.
Rerun it from the asset table Actions menu (Create Ticket option).
- For a full list of incidents and tickets, see Create Incident or Ticket.
- For Aggregated Security Findings, the actions listed in Using Aggregated Security Findings Queries in Enforcement Actions are supported.
To create a ticket/incident directly from an assets page
-
Select the relevant asset(s), click Actions/More Actions and select Create Ticket. The Create Incident or Ticket dialog opens.
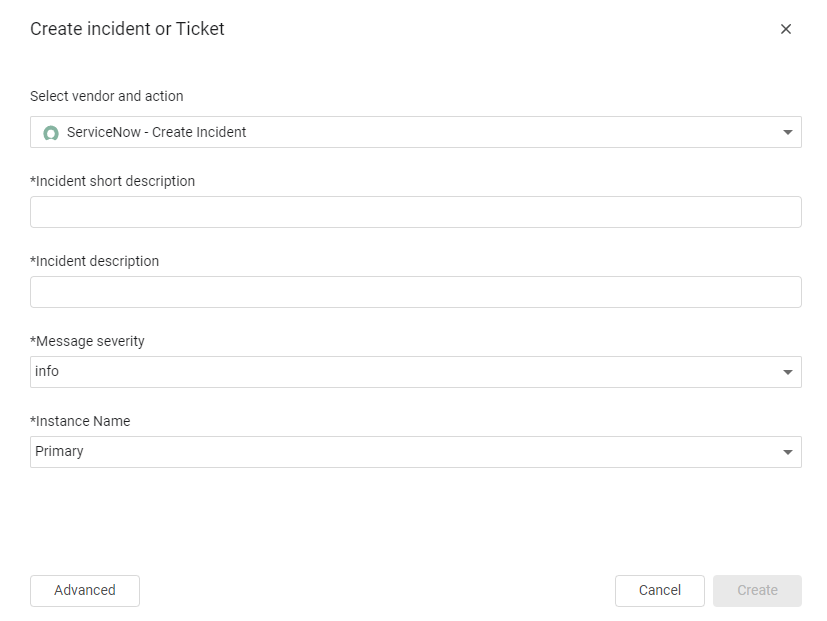
-
From the Select vendor and action dropdown, select a vendor that creates a ticket in a third-party vendor. The dialog displays only the required fields of the Enforcement Action that you selected.
-
Fill in the mandatory fields presented in the dialog (see Creating Enforcement Sets).
-
Proceed in one of the following two ways:
- In the dialog, click Create to create the ticket directly from the quick Create Incident or Ticket dialog. A message appears saying either that the ticket was created successfully or that it failed.
- In the dialog, click Advanced to open the selected Enforcement Action in the Action Center so that you can configure additional settings for the Enforcement Set. The Select Assets tab opens, displaying Run action on n selected assets, where n is the number of assets that you selected on the Assets page. When done configuring, click Save and Run. A notification opens with the message: Enforcement Set was triggered to run. Click Close.
Note
If you do not have an adapter connection configured, you must click Advanced and enter credentials.
Create User
Note
The Create User action is available only on the Users asset page.
You can create one or more selected users in a third-party vendor directly from the Users page using the Create User action, provided that the users exist in Axonius, either from another adapter or were created in Axonius. This shortcut enables you to create an Enforcement Set of the Create User category for a single or several users in one click using the Create User action without having to go to the Action Center to create it there.
- By default, the Enforcement Action connects to the third-party adapter using the adapter connection configured in the system for that adapter.
- The Jira Software - Create User action needs to have a Jira server configured in System Settings
>External Integrations>Jira Settings. - You can see information on each user created in the selected third-party vendor by expanding the Adapter Connections column in the User table to view the row of the newly added vendor adapter.
- The Enforcement Set created using the Create User action is automatically placed in the Action Center in the Quick Actions folder. The Enforcement Name begins with Quick Action - User.
Note
You cannot reuse an Enforcement Set from the Quick Actions folder. You can only reuse it in one of the following ways:
Select a query for it.
Rerun it from the asset table Actions menu (Create User action).
- For a description of the selected 'Create User' Enforcement Action, search the Enforcement Action Library.
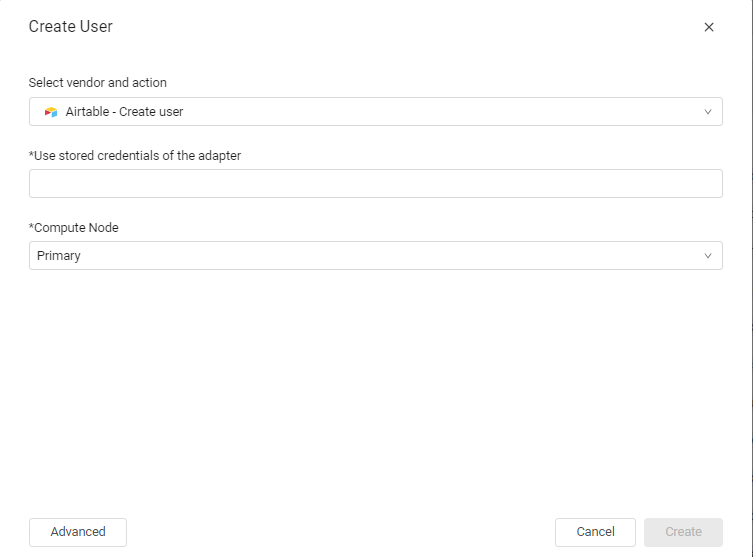
To create one or more users in a third-party vendor directly from the Users page
-
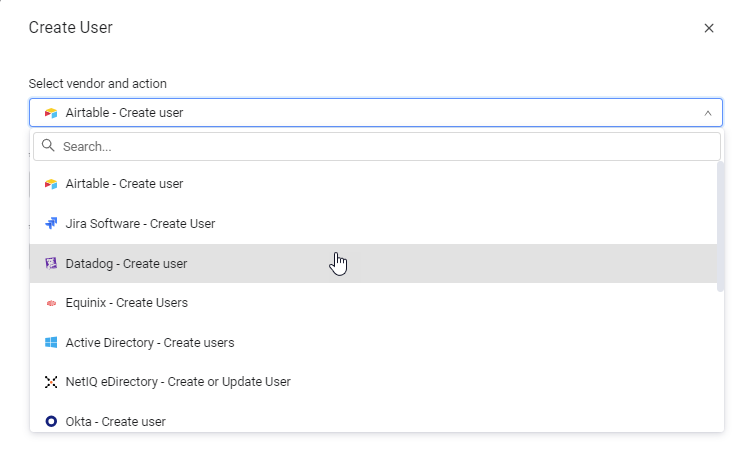
On the Users page, select one or more assets, and then from the Actions/More Actions menu, select Create User. The Create User dialog opens.
-
From the Select vendor and action dropdown, select an Enforcement Action that creates a user in a third-party vendor. The dialog displays only the required fields of the Enforcement Action that you selected.
-
Fill in the required fields presented in the dialog (see Creating Enforcement Sets).
-
Proceed in one of the following two ways:
- In the dialog, click Create to create the user directly from the quick Create User dialog. A message appears saying either that the user was created successfully or that it failed.
- In the dialog, click Advanced to open the selected Enforcement Action in the Enforcement Center so that you can configure additional settings for the Enforcement Set. The Select Assets tab opens displaying Run action on n selected assets, where n is the number of users that you selected on the Users page. When done configuring, click Save and Run. A notification opens with the message: Enforcement Set was triggered to run. Click Close.
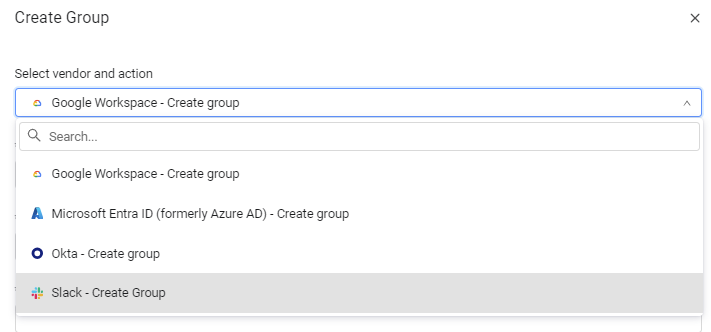
Create Group
Note
The Create Group action is available only on the Groups asset page.
You can create one or more selected groups in a third-party vendor directly from the Groups page using the Create Group action, provided that the groups exist in Axonius, either from another adapter or were created in Axonius. This shortcut enables you to create an Enforcement Set of the Create Group category for a single or several groups in one click using the Create Group action without having to go to the Enforcement Center to create it there.
- By default, the Enforcement Action connects to the third-party adapter using the adapter connection configured in the system for that adapter.
- You can see information on each group created in the selected third-party vendor by expanding the Adapter Connections column in the Group table to view the row of the newly added vendor adapter.
- The Enforcement Set created using the Create Group action is automatically placed in the Enforcement Center in the Quick Actions folder. The Enforcement Name begins with Quick Action - Group.
Note
You cannot reuse an Enforcement Set from the Quick Actions folder. You can only reuse it in one of the following ways:
Select a query for it.
Rerun it from the asset table Actions menu (Create Group action).
- For a description of the selected 'Create Group' Enforcement Action, search the Enforcement Action Library.
To create one or more groups in a third-party vendor directly from the Groups page
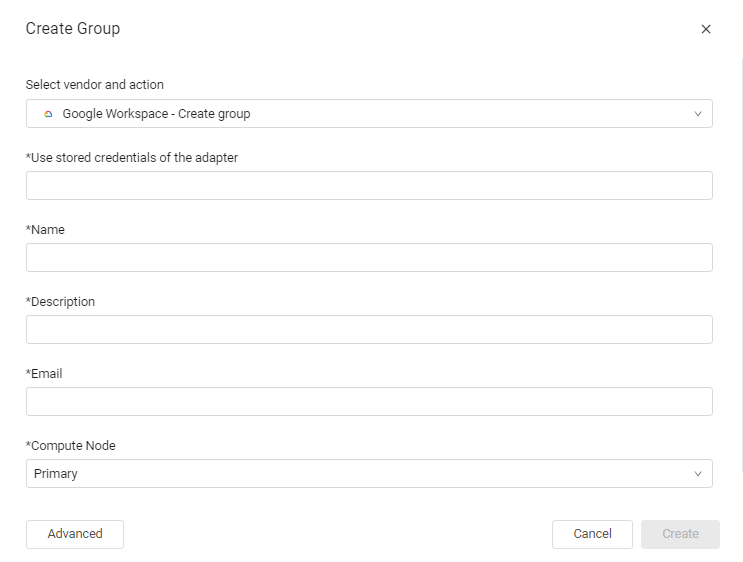
- On the Groups page, select one or more assets, and then from the Actions/More Actions menu select Create Group. The Create Group dialog opens.
-
From the Select vendor and action dropdown, select the Enforcement Action that creates a group in the third-party vendor of your choice. The dialog displays only the required fields of the Enforcement Action that you selected.
-
Fill in the required fields presented in the dialog (see Creating Enforcement Sets for an explanation of these fields).
-
Proceed in one of the following two ways:
- In the dialog, click Create to create the group directly from the quick Create Group dialog. A message appears saying either that the group was created successfully or that it failed.
- In the dialog, click Advanced to open the selected Enforcement Action in the Enforcement Center so that you can configure additional settings for the Enforcement Set. The Select Assets tab opens displaying Run action on n selected assets, where n is the number of groups that you selected on the Groups page. When done configuring, click Save and Run. A notification opens with the message: Enforcement Set was triggered to run. Click Close.
Open in Graph
Select an individual asset from the assets table and view it in the Asset Graph. This way you can start an investigation directly with known assets. This is one of three ways to open the Asset Graph. All actions are available as in any other entry into the Asset Graph. See Asset Graph for complete details about using the Asset Graph.
To select assets in an asset page and open them in the Asset Graph:
- Select the relevant asset, click Actions/More Actions and select Open in Graph.
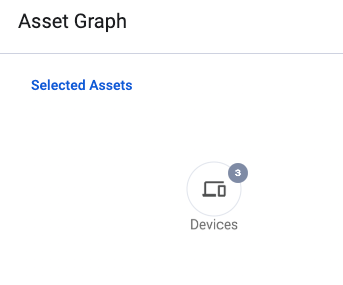
The first breadcrumb in this case is Selected Assets. Further filtering or other investigation steps will be listed afterwards.
Updated 26 days ago