
Cherwell IT Service Management
Cherwell IT Service Management is a service desk platform enabling automation for process workflows, supporting tasks, and related approvals.
Asset Types Fetched
- Devices
- Users
- Business Applications
- Tickets
Before You Begin
Ports
- TCP port 80/443
Authentication Method
- User Name/Password
- Client ID
Permissions
Consult with your vendor for the exact permissions to fetch the objects.
Connecting the Adapter in Axonius
To connect the adapter in Axonius, provide the following parameters:
Required Parameters
- Cherwell Domain - The hostname or IP address of the Cherwell server.
- User Name and Password - The user name and the password of a read-only user.
- Client ID - Enter the client ID created in the CSM Administrator. For details, see Cherwell - Obtaining API Client IDs.
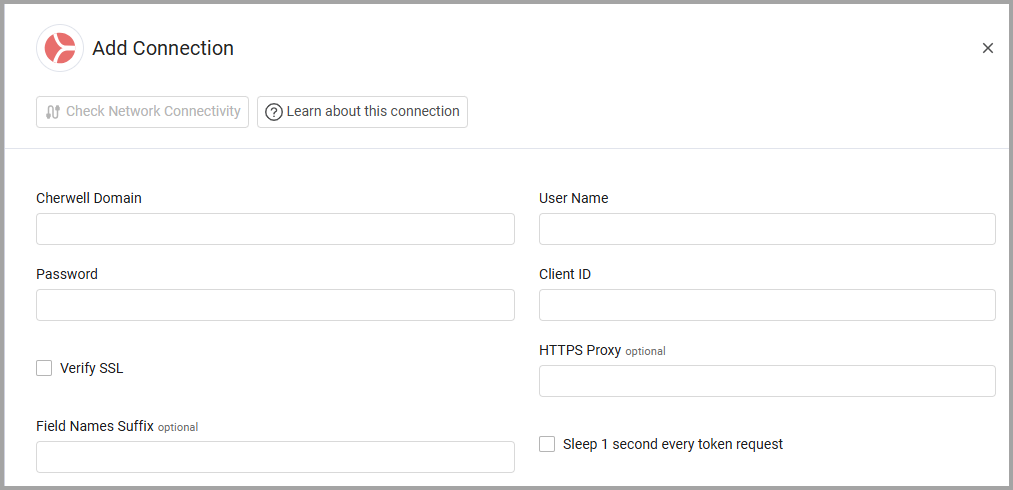
Optional Parameters
- Field Names Suffix - Specify a common suffix for the various Cherwell fields.
- If supplied, Axonius will omit the specified suffix when mapping the Cherwell fields to the Axonius device fields.
- If not supplied, Axonius will not omit the specified suffix when mapping the Cherwell fields to the Axonius device fields. It may impact the mapped fields.
- Sleep 1 second every token request - Select this option to wait before sending authentication tokens.
- Verify SSL - Select whether to verify the SSL certificate of the server against the CA database inside of Axonius. For more details, see SSL Trust & CA Settings.
- HTTPS Proxy - Connect the adapter to a proxy instead of directly connecting it to the domain.
To learn more about common adapter connection parameters and buttons, see Adding a New Adapter Connection.
Advanced Settings
Note
Advanced settings can either apply to all connections for this adapter, or to a specific connection. Refer to Advanced Configuration for Adapters.
- CI Type Name Include List (optional) - Specify a comma-separated list of CI types (Configuration Items, such as: computer or mobile device) in Cherwell.
- Parse Last Seen from Fields - Enter a comma-separated list of fields from the raw data that can represent the last seen. If more than one field is provided, the most recent one is parsed. (Most commonly used fields:
LastReconciledDate,LastModifiedDateTime,LastADLogon,LastConnectedToVPN) - Fetch Only Deployed Devices - Select this option to fetch only deployed devices.
- Fetch Applications Relationship ID - Enter a string to fetch application data related to the device according to the specified relationship ID.
- Fetch Business Applications - Select this option to fetch business applications.
- Status Include List - Only fetch devices with the following status. Enter a list of status separated by commas.
- Add Status To Retired Device Hostnames - Select to add the status as a suffix to host names, when the status is either 'Retired', 'Disposed', or 'Prepared for Disposal'. When the status is added, the hostname will appear 'Windows-PC[Retired]' (for example).
- Concatenate Hostname To Device Identifier (default, false) - When you select this option, if there is a change in the Cherwell record hostname field, then a new device is created. Note that for time configured in Delete devices that have not been returned from the source in the last X hours (default 48 hours), it may seem that the number of devices has doubled, but this is rectified after that time has passed.
- Parse Friendly Name as Device Name and Hostname - Select this option to extract the device name and hostname from the friendly name.
- Enable Custom Parsing - Enable this option to define how to parse specific fields from the raw data fetched. You can choose to parse the data into an already existing field, or create a new one. This adapter supports User Custom Parsing/ Device Custom Parsing. See Adapter Custom Parsing for more information.
- Fetch EC Action ticket updates - Select this to fetch ticket updates from the ticketing system, for tickets created by Axonius Enforcement Sets.
Note
To learn more about Adapter Configuration tab advanced settings, see Adapter Advanced Settings.
Showing JSON Fields in Basic View
You can configure fields that generally appear in JSON to appear in Basic view. Configure for Devices, Business Applications, Databases; and for Users and Tickets separately, as required. Use the plus sign to add an entry to each field.
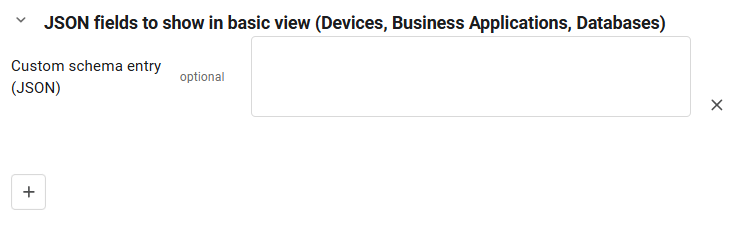
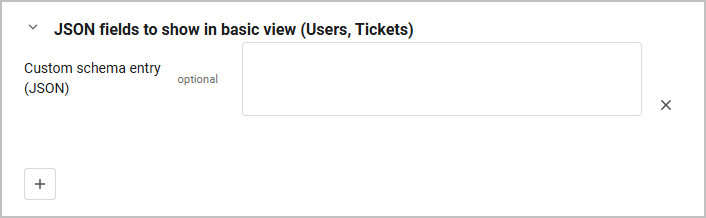
Enter fields in the following JSON format:
[
{
    "label":"My First Field",
    "raw_field": "field_a",
    "field_type": "str"
},
{
    "label":"My Second Field",
    "raw_field": "field_b",
    "field_type": "int"
},
{
    "label":"My third Field -  Application Name",
    "raw_field": "application/name",
    "field_type": "str"
},
{
    "label":"My third Field -  Application Number",
    "raw_field": "application/number",
    "field_type": "int"
}
]-
label - the name for the field you want to appear in the basic view
-
raw_field - the name of the field as it appears in JSON format on the Adapter Connections page of the Asset Profile (or Advanced view table)
-
field_type -the field type as it appears in JSON format. The following field types are supported. int, string, datetime, float, bool. You can write them in the following ways:
'int', 'string', 'str', 'date', 'datetime', 'float', 'bool', 'boolean'.
Related Enforcement Actions
Updated about 2 months ago