Managing Workflows
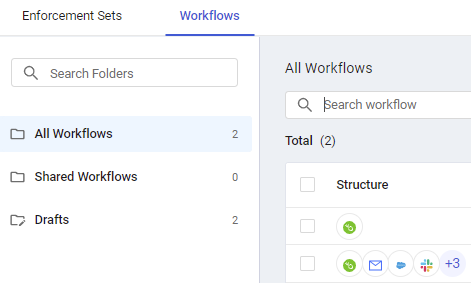
The folder pane on the left side of the Workflows page allows you to easily organize and manage your Workflows.

Organizing Workflows with Folders
The Folders pane allows you to create and name folders to organize your workflows, enabling you to quickly locate related workflows.
Use the Search Folders box at the top of the Folders pane to find specific folders.
System Folders Overview
The following default system folders are provided:
- All Workflows - Includes all Workflows in the system that you're authorized to view, including those in the Shared Workflows and Drafts folders.
- You cannot save Workflows directly to this folder; you must save them to a subfolder.
- Shared Workflows - Includes Workflows created from the Action Center - Workflows page (using the Create Workflow button) and those that you have access to.
- You can create new folders and subfolders within this folder.
- Workflows in a subfolder are also visible in its parent folder.
- Drafts - Stores Workflows that are not fully configured, such as:
- Workflows without a configured triggering Event or Action.
- Branches ending with a Condition node instead of an Action or Event node.
- One or more nodes with incomplete field configurations (missing values in fields).
System Folder Rules
The following rules apply to system folders:
- You can add and remove Workflows to/from the Shared Workflows and Drafts folders.
- You cannot delete or rename system folders (All Workflows, Shared Workflows, and Drafts).
- Under the Shared Workflows folder only, you can create up to five levels of subfolders.
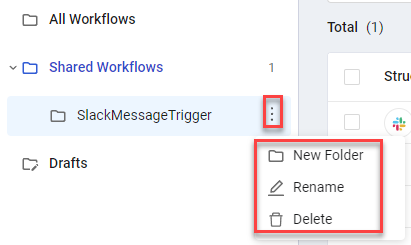
- When you hover over a Shared Workflows subfolder, the Folders menu appears, allowing you to create , rename, or delete subfolders.

Creating New Folders
You can create new subfolders (up to five levels) under the Shared Workflows folder.
To create a new folder
- Hover over the desired parent folder.
- Click the Folders menu. The Folders menu opens (see above screen).
- Select New Folder. A new folder named 'untitled folder' is created.
- Click the Folders menu again and select Rename to provide a meaningful name.
Renaming Folders
You can rename subfolders within the Shared Workflows folder.
To rename a folder
- Hover over the folder you want to rename.
- Click the Folders menu. The Folders menu opens (see above screen).
- Select Rename and enter a new name.
Moving Folders
You can move subfolders within the Shared Workflows folder.
To move a subfolder
- Click and drag the folder/subfolder to the desired destination folder.
Deleting Folders
You can delete any subfolder created within Shared Workflows. System folders cannot be deleted.
To delete a folder
- Hover over the folder you want to delete.
- Click the Folders menu. The Folders menu opens (see above screen).
- Select Delete.
IMPORTANT
Deleting a folder permanently removes all Workflows within it from the system. This cannot be undone. To retain the Workflows, move them to another folder before deleting the original folder.
Moving Workflows
You can move one or more Workflows from the Shared Workflows folder or its subfolders (or from the All Workflows folder) to another Shared Workflows subfolder. You cannot move Workflows from the Drafts folder.
Updated 4 months ago
