
Workday
Workday offers software solutions for financial management, human resources, and planning.
Asset Types Fetched
- Devices, Users, Roles, Application Extensions, Admin Managed Extensions, User Initiated Extensions, Application Add-Ons , Application Extension Instances, Admin Managed Extension Instances , User Initiated Extension Instances, Application Add-On Instances ,Application Keys , SaaS Applications
Resources Required by Asset Type
The following connection parameters, advanced settings, permissions, and configurations are required to fetch each asset type.
Search by Asset Type to find the resources required for your specific needs.
| Asset Type | Connection Parameters | Advanced Settings | Permissions | Additional Configuration |
|---|---|---|---|---|
| Devices |
| No specific setting required | Access to the following domains:
| Finding the Workday Domain |
| Users, Roles |
| No specific setting required | Access to the following domains:
| Finding the Workday Domain Creating an Integration System User |
| User Extensions |
| Fetch integration system users | Access to the following domain:
| Finding the Workday Domain Creating an Integration System User |
| Application Settings |
| Fetch Application Setting |
| Creating an Integration System User |
APIs
Axonius uses the Workday Human Resources SOAP API.
Before You Begin
Finding the Workday Domain
- Log into the Workday console.
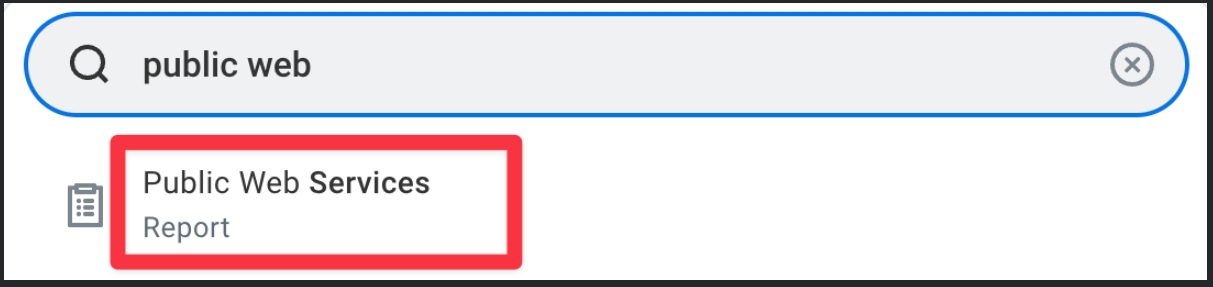
- Search for the Public Web Services report and open it.
- Hover over Human Resources and click the three dots to access the menu.
- Navigate to Web Services
>View WSDL. - On the bottom of the page, find the
locationparameter in thesoapbind:addresstag:
- Copy the parameter until (and not including)
/ccx, for examplehttps://wd5-services1.myworkday.com - Back in Axonius, paste the copied value in the Workday Domain connection field.
Creating an Integration System User
To fetch Users data, you need to create an Integration System User (ISU) with the required permissions. To create an ISU, follow the instructions in How to create an ISU user in Workday.
To fetch Application Settings data, create a dedicated workday user account (auditor group read-only).
Connecting the Adapter in Axonius
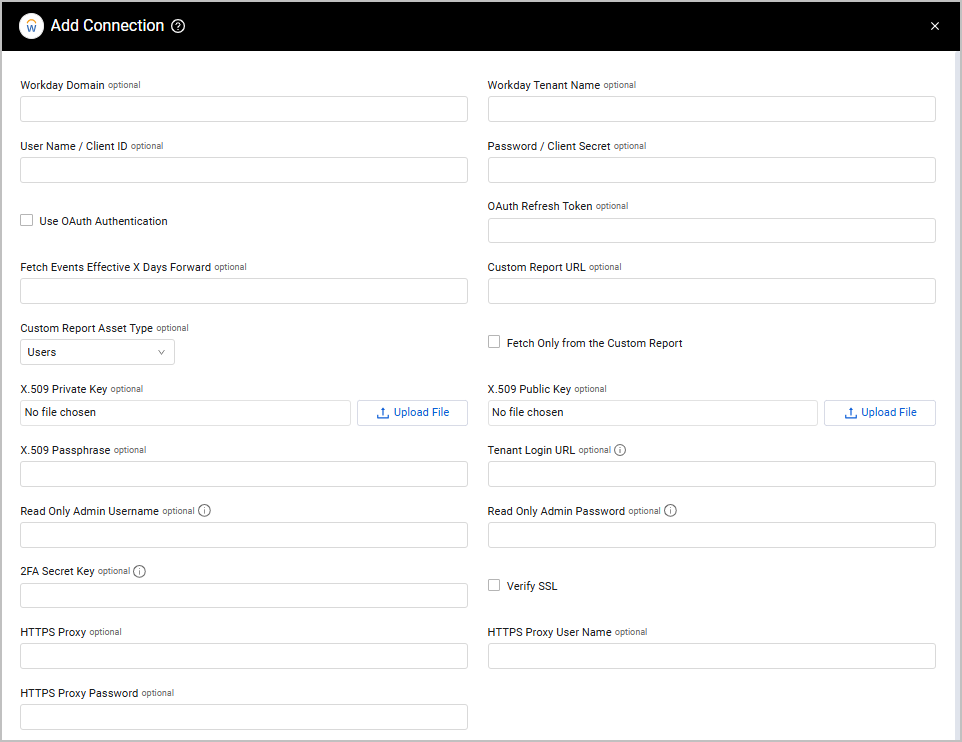
To connect the adapter in Axonius, provide the following parameters.
Required Parameters - Users and Devices
-
Workday Domain - The hostname of the Workday server. For more information, see Finding the Workday Domain.
-
Workday Tenant Name - The Tenant name as supplied by Workday.
-
User Name/Client ID and Password/Client Secret - The credentials for a user account that has the required permissions to fetch assets. You can either enter here a user name and a password, or a**** Client ID and a Client Secret. Learn how to get the Client ID and Client Secret. If you are using Client ID and Client Secret, provide the following additional parameters:
- Use OAuth Authentication - Select to enable OAuth 2 authentication for this adapter connection.
- OAuth Refresh Token - The token required to access the relevant API endpoints. Once this token expires, it needs to be updated. To get the refresh token, follow the instructions in the Workday documentation.
Custom Report URL - Enter a SOAP URL for a Workday Custom Report endpoint. This parameter is required to fetch Devices, and optional for fetching Users. SeeOptional Parametersfor more details on this parameter.
X.509 Certificate Authentication
You have the option to authenticate with an X.509 Certificate. If you are using this option, provide the User Nameparameter, as well as the following parameters:
- X.509 Private Key - Upload the private key file (required for X.509 authentication). This key is used only locally to decrypt responses from Workday**.**
- X.509 Public Key - Upload the X.509 certificate file issued by Workday.
- X.509 Passphrase - Enter your passphrase.
Required Parameters - Application Settings
- Tenant Login URL - Enter the login URL where admins sign in to their working environment.
- Read Only Admin Username and Read Only Admin Password - The credentials that are separate from the already existing username and password fields. These are needed in order to fetch application settings.
- 2FA Secret Key - The secret generated in the adapter for setting up 2-factor authentication for the adapter user created to fetch Application Settings.
Optional Parameters
- Fetch Events Effective X Days Forward (default: 30) - Specify a numerical value to set an effective future date to ensure that information about future hires is accurate. The value can be any integer.
- If a value is specified, this adapter will fetch information relating to future events up to the number of days set in the future.
- If this field is left empty, this adapter will fetch information relating to events up to 30 days in the future.
-
Custom Report URL (required for Devices, optional for Users) - Enter a SOAP URL for a Workday Custom Report endpoint. To get the URL from the custom report, on your Workday console, navigate to Related Actions
>Webservices>URLs to access a list of links. Click on the CSV link to generate the required URL, copy the URL path from your browser, and paste it into this field in the Adapter Connection page.- Do not include the main Workday domain base or the "?wsdl" portion of the URL. For example, if the custom report URL is
https://wd5-services1.myworkday.com/ccx/service/customreport1/example/custom_report?wdsl, the value you should enter here should just be ccx/service/customreport1/example/custom_report. - The Custom Report must also contain the
Employee_IDfield to match the corresponding worker, or theDevice_IDfield to match the corresponding device.
- Do not include the main Workday domain base or the "?wsdl" portion of the URL. For example, if the custom report URL is
-
Custom Report Asset Type (default: Users) - Select whether the custom report applies to Users or Devices.
-
Fetch Only from the Custom Report - Select this option to create users only from the custom report data.
Notes on Users Custom Report
Each entry should have the following field for uniqueness:
Employee_ID
Each entry should include the following fields for correlation:
username,first_name,last_nameThe following fields are parsed as mail:
Work_Email,When a report includes a complex field, only the contents of the Descriptor field are parsed. For example,
{Location: { Descriptor: "Main street" }}is parsed asLocation: Main street.
-
Verify SSL - Select whether to verify the SSL certificate of the server against the CA database inside of Axonius. For more details, see SSL Trust & CA Settings.
-
HTTPS Proxy - Connect the adapter to a proxy instead of directly connecting it to the domain.
-
HTTPS Proxy User Name - The user name to use when connecting to the value supplied in Host Name or IP Address via the value supplied in HTTPS Proxy.
-
HTTPS Proxy Password - The password to use when connecting to the server using the HTTPS Proxy.
To learn more about common adapter connection parameters and buttons, see Adding a New Adapter Connection.
Advanced Settings
Note:
Advanced settings can either apply to all connections for this adapter, or to a specific connection. Refer to Advanced Configuration for Adapters.
- Users Chunk Per Page (default: 200) - Enter the number of users per a single request.
- Preferred Email Domain (optional) - Enter the preferred domain for work email addresses (such as ThisEmailDomain.com) for each user. When the field is empty, Axonius uses the last email address within the list of addresses in the Mail field.
- Exclude Specified User Email (optional) - Enter an email address that you want to exclude from the fetch.
- Include Contingent Workers in Fetch - Select to include contingent workers in the fetch.
- Disable Management Chain Enrichment - Select this option to disable the Management Chain Enrichment process and thus not enrich the management workers list with additional information about each manager.
- Fetch only the most recent records for each worker - Select this option to fetch only the most recent records for each worker.
- Fetch integration system users - Enable to fetch integration system users and their corresponding extensions.
- Enrich users with Workday assets - User assets refer to fetching data from the Get_Assets Workday SOAP service. These are assets associated with a user. These assets populate an enrichment field called “Assets” on the Workday users. The assets can be almost any business asset that is tracked in Workday, for example, laptops, software licenses, company phones, etc. Workday describes business assets as follows: “In Workday, a business asset is anything you want to track, from tractors to software licenses.” For more information, see Operation: Get_Assets.
- Fetch workers by organization (optional) - Select this option to fetch workers filtered by organization to reduce the number of response results. This setting is recommended only for accounts with more than one million worker records. When this option is enabled, the adapter only fetches Active users.
- Include Custom Organization Data - Select this option to fetch custom organization data.
- Include Cost Center Organization Data - Select this option to fetch cost center data under organization data.
- Include Organization Support Role Data - Select this to fetch Organization Support Role Data. Note that this data is heavy and might increase fetch time.
- Enable real-time asset updates (Supported events: New hires, New terminations) - Select this option to trigger an event in a workflow. Enabling the option will both fetch users that have been hired or terminated in the last time interval and will trigger the respective event. All workflows configured with this event are then triggered.
- Fetch Application Settings - Select this option to enable fetch of Application Settings.
- Fetch Only Application Settings - Select this option to fetch only Application Settings. No other assets will be fetched.
- List of worker custom IDs to fetch - Add a list of custom IDs, located under
Identification_Data, to add as dynamic fields in the Users module. - Fetch custom report for each year in time range - Select this option when the connection configuration uses a Custom Report, which is filtered by the
TermDatesrange parameters. If the custom report includes a time range using theTermDatesrange parameters, Axonius will fetch the report for each year in the defined time range until the current year. Example:customreport.url?TermDateStart='2020-01-01'&TermDateEnd='2020-12-31'If 2025 is considered the current year, the adapter will call the custom report 5 times, one for each year from 2020 until 2025. - Custom Report User ID Field - The field in the custom report that contains the user ID. Only relevant if "Fetch Only from the Custom Report" is enabled on the Connection Configuration.
- Custom Report Device ID Field - The field in the custom report that contains the device ID. Only relevant if "Fetch Only from the Custom Report" is enabled on the Connection Configuration.
- Enable Custom Parsing - Enable this option to define how to parse specific fields from the raw data fetched. You can choose to parse the data into an already existing field, or create a new one. This adapter supports User Custom Parsing/ Device Custom Parsing. See Adapter Custom Parsing for more information.
Note:
To learn more about Adapter Configuration tab advanced settings, see Adapter Advanced Settings.
Related Enforcement Actions
Version Matrix
This adapter was only tested with the versions marked as supported, but may work with other versions. Contact Axonius Support if you have a version that is not listed, which is not functioning as expected.
| Version | Supported | Notes |
|---|---|---|
| 34.0 and up | Yes | -- |
Updated 29 days ago