
Exception Management
Learn about managing exceptions for security findings, including workflows, approval processes, and admin settings.
Overview
In the context of risk management, Exceptions are permissions to leave certain vulnerabilities unresolved. This is typically done when immediate remediation is difficult due to business, technical, or operational reasons. Exceptions require justification and risk acknowledgement.
Axonius Exception Management provides a centralized, auditable interface for defining and managing Exception Rules at the Security Finding (specific vulnerability on a specific asset) level. This solution empowers security teams to:
- Filter Exceptions from dashboards and workflows across all integrated scanners.
- Configure structured approval workflows, track and manage them in one place.
- Balance security needs with real-world constraints while maintaining oversight.
- Uphold compliance and operational integrity while reducing manual effort.
Exception Management is the main operational space used by requestors and approvers to submit, view, approve, deny, and track Exception requests.
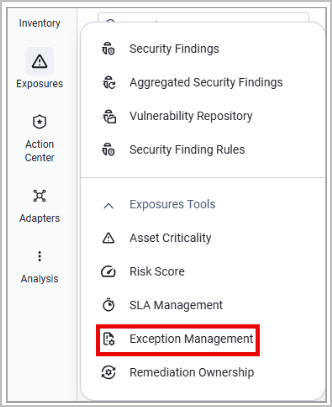
To access this page:
- In the Security Findings page, expand the Exposures Tools menu.
- Select Exception Management.
In Axonius New Navigation Experience:
- Select Exposures from the left navigation menu.
- Expand the Exposures Tools menu and select Exception Management.
The Exception Management workflow is as follows:
- An admin defines which user roles can request Exceptions, whether they need approval, and who can approve them.
- A user with the appropriate permissions creates an Exception request.
- The approver(s) defined in the Exception Rule for this user role review the request.
- The approver(s) decide whether to approve or deny this Exception.
- If the Exception is approved, it becomes active, and takes effect until its expiration date (if set).
The main page of the Exception Management page displays the Exception Table.
Note
The system launches an Exception Rules update every 4 hours and every discovery cycle.
Exception Table
The table of Security Findings Exceptions displays the following information:
- Exception Name
- Query - The query this Exception applies to.
- Security Findings - The Security Findings this Exception applies to.
- Status - Contains one of the following values:
- Active - Exception is currently in effect.
- Deactivated - Exception was approved previously but was deactivated by an approver.
- Pending Approval - Exception is waiting for all the approvers to approve it.
- Denied - Exception is not approved.
- Expired - The expiration date of this Exception has passed.
- Expiration Date and Applied since - Information on the date range in which this Exception should be active.
- Requested By and Request Date - Who requested this Exception and when.
- Approvers - The users that need to approve this Exception.
- Waiting for - The user who needs to approve this Exception so it can move to the next step (another approver or final approval).
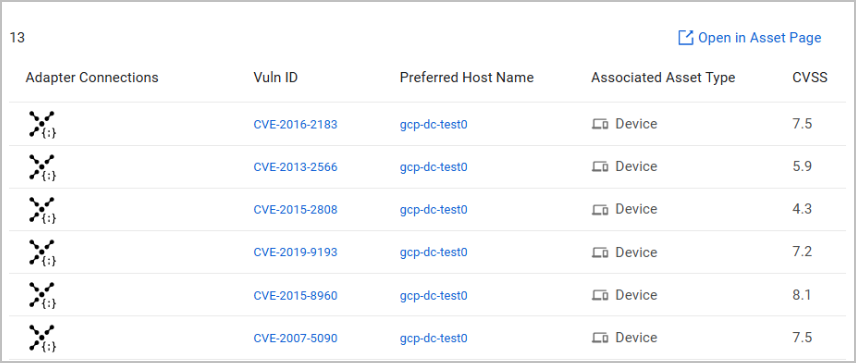
Select an Exception from the table to view its details: general details, approval info (which step the Exception reached in the approval workflow), and a list of all the Security Findings included in the Exception. You also have the option to open this list in the Security Findings Assets page.
Note that this list is dynamic and prone to changes based on the assets included in the query.
Admin Settings - Exception Rules
Notes
- Only users with Admin privileges can access this page. If you are not an admin, you can skip this section.
- Admins must have the Manage Security Findings Exceptions permission to create and edit Exception Rules.
Exception Rules provide a consistent, controlled Exception management by tailoring the process to specific user attributes. Use the Admin Settings page to create Exception Rules based on user roles and permissions. Define the following:
- Which user roles can request Exceptions
- Whether their requests require approval
- If their requests require approval - how many approval steps are required, and who are the approvers in each step.
- Additional instructions for the requester, if needed.
To access these settings, click Admin Settings from the Exception Management page.
To create an Exception Rule:
-
Click Create Rule.
-
Select the user role this rule applies to.
-
Set the approval workflow for this user's Exception requests. The options are:
-
Auto Pilot - Any request by this user role will be approved automatically.
-
Approvers - Select who should approve requests from this user role. You can select multiple approvers per step, as well as add multiple approval steps. When adding multiple approvers per step, either of them can approve the request in this step - the requester selects the approver for each step.. Click the trash bin icon next to each step to remove it from the workflow.
Notes
- The approval workflow will follow the order in which you add the steps.
- You can select approvers from all user roles.
-
-
(Optional) Add specific instructions you want the user to follow when requesting an Exception. These instructions will appear on the requester's Create Exception form.
-
Click Create Rule. The new Exception Rule is added to the Rules table.
Editing an Exception Rule
To edit rule details, select the relevant rule from the table. Changes to a rule apply only to future Exceptions and don't affect existing ones.
Attention
Exception Rules cannot be deleted, they can only be edited.
Enabling Email Notifications (Optional)
As an admin, you have the option to to enable email notifications for Exception requests for easy management and tracking. From the Admin Settings page, toggle on Enable Email notifications (enabled by default; disable it to stop all email notifications).
A summary of the email notification flow:
- A user creates a new Exception request. The system sets the request status to Pending Approval and notifies both the first approver via email.
- If the approver doesn't take any action after 48 hours, the system sends them another email reminder. If the approver still fails to act, the request status remains Pending Approval until its expiration date.
- The requester receives an email notification for every decision made on their request throughout the process. If there are multiple approvers, the system passes the request to the next approver on the list to repeat the cycle.
- For active Exceptions: the system sends the requester an email notification 7 days prior to, 24 hours prior to, and on the day of expiration, and prompts them to submit a new request if needed.
Creating an Exception
To request a new Exception, click Create Exception. After your request is approved, the Exception is synced with the system correlation every 12 hours.
There are two ways to select Security Findings to include in the Exception:
- Selecting a Security Findings query - see step 2 in the procedure described below.
- Manually Selecting Security Findings - Go to the Security Findings Assets page and:
-
To create an Exception for one Security Finding, hover over the asset's row, and from the icons that appear on the right, click Create Exception.
-
To create an Exception for multiple Security Findings (up to 1000), mark the checkboxes of the assets you want to include, and click the Create Exception button above the table.

The Create Exception drawer opens. Follow the steps detailed below to complete the request. Note that the section of selecting assets from a query is disabled at this stage.
-
In the Create Exception drawer, follow these steps:
-
In the Exception Setup tab, provide general Exception details, such as a title (name) and a justification reason for requesting this Exception. For example, "These vulnerabilities exist in a legacy system that is protected from external access by strict firewall rules". Some fields are optional, like the Evidence Link supporting this justification.
-
Select a Security Findings query that contains the assets you want this Exception to apply to. For example - "All Low-Risk Security Findings".
-
Any query you select is duplicated and becomes a managed query after submitting the request. This managed query cannot be edited, renamed, moved, or deleted. Such queries are centrally managed by Axonius and are used to ensure the integrity of exception scopes.
Notes
- The query is dynamic, as the Security Findings included in it change according to changes in your data.
- The managed query is a duplication of the original query. The original query is not managed, and you can edit, rename, move, or delete it as needed.
-
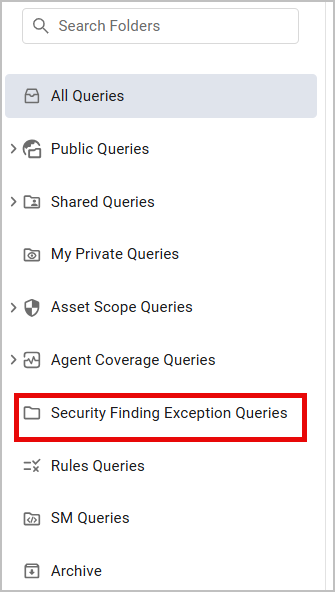
To access managed queries, navigate to the Queries page and select the Security Finding Exception Queries folder.
-
-
After you select a query, you can view all the assets it includes in the Security Findings List tab.
-
If there are multiple approvers configured for your role, select one approver whom you want to approve this request. It is recommended to choose the approver that is most relevant to you (for example, your team leader) or to this specific Exception. If automatic approval was configured, the system informs you of that.
Notes
- The approval workflow (automatic or requires approvers) and the list of available approvers is preconfigured for each user role in the Admin Settings.
- In case there are multiple approval steps and multiple approvers in each step, you need to select one approver per step.
-
Set an expiration date for the Exception - either it never expires, or expires within a set number of days, or on a specific date.
-
After you populate all the required fields, click Create Exception. The new Exception appears as a new row in the Exception Table with a "Pending Approval" status, unless it is automatically approved, and then its status is "Approved".
If you created an Exception request by selecting assets directly from the Security Findings Assets page, navigate to Exception Management to see your request listed there.
Impact of Active Exceptions Across the Product
For Security Findings under active Exceptions, the value of the Exception Status field is Active. Use this field for filtering when creating dashboards, reports, queries, or any other use of Security Findings data in Axonius.
Approving Exceptions
Users who were selected as approvers for Exception requests can see the list of requests in the Exception Table. If any requests are pending your approval, select the relevant request to review it. Use the table’s filters such as Status or Requested by to easily navigate through the requests.
In the Exception Details drawer that opens, review the details of this Exception, the Security Findings included in it, whether there are any other approvers, and if so, what is their status.
After reviewing the request, select whether to Deny Exception or Approve Exception.
Attention
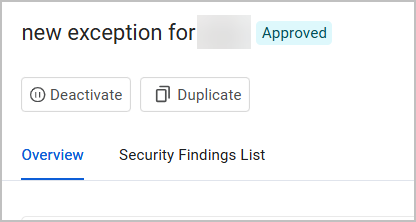
While you can't change your selection (denying or approving), admins and approvers can still deactivate the Exception after it was approved.
Note
Since the approval workflow follows the order of the approval steps, approvers can approve or deny Exceptions only when their assigned step is in effect. For example, an approver who was assigned Approval Step 2 will see these the Deny Exception and Approve Exception buttons in the Exception Details drawer only after Approval Step 1 was complete.
Approval Workflow - Example
According to the Exception Rule, users with the role X require 3 approval steps for their Exceptions, and the following approvers are assigned to each step:
- Approval Step 1: User A, User B
- Approval Step 2: User C, User D, User E
- Approval Step 3: User F
When a user with the role X creates an Exception, they need to select the following approvers for each step:
- Approval Step 1: User A or User B
- Approval Step 2: User C or User D or User E
- Approval Step 3: User F
Assume that the user selected the following approvers:
- Approval Step 1: User B
- Approval Step 2: User D
- Approval Step 3: User F
User D will only be able to approve or deny the Exception after User B approved it; and User F will only be able to approve or deny the Exception after User D approved it.
Additional Actions on Exceptions
Deactivating Exceptions
An Exception can be deactivated after it was approved by either:
- Its creator
- An admin
- A user who had already approved the request
To deactivate an Exception, select it from the Exceptions table and click Deactivate. This action cannot be undone.
Duplicating Exceptions
If you want to create multiple Exception requests with similar details, or submit a request identical to an existing request that was expired; instead of creating a new request from scratch, you can duplicate an existing request and edit the relevant details there. Thus, to extend an expired request, you only need to change the expiration date.
To duplicate an Exception:
- Select it from the Exceptions table and click Duplicate. A new Create Exception drawer opens.
- Edit the relevant details and click Create Exception.
Updated about 2 months ago