
LivePerson
LivePerson is a conversational AI platform that enables businesses to engage with customers through messaging, chatbots, and agent tools. The LivePerson adapter connects Axonius to LivePerson Conversational Cloud to fetch agent and user account data, giving security and IT teams full visibility into who has access to the platform and in what capacity.
Use Cases the Adapter Solves
- Agent Access Governance: Inventory all LivePerson agents and their assigned skill groups, permission profiles, and line-of-business (LOB) assignments to verify that access rights align with current roles and responsibilities.
- Offboarding Verification: Identify agents whose accounts are disabled or marked for deletion in LivePerson and cross-reference them with your identity provider to ensure offboarding is complete and consistent across systems.
Asset Types Fetched
- Users
Data Retrieved through the Adapter
The following data can be fetched by the adapter:
Users - Fields such as: Username, Email Address, Employee ID, Skills
Before You Begin
Required Ports
TCP port 443 (HTTPS)
Authentication Methods
OAuth 2.0 Client Credentials Grant Type
APIs
Axonius uses the LivePerson Users API (v6.0). The following endpoints are called:
POST /sentinel/api/account/{accountId}/app/tokenGET /api/account/{accountId}/configuration/le-users/users
Required Permissions
The OAuth 2.0 application must be granted the following scope:
users.external— grants read access to the LivePerson Users API
Supported From Version
Supported from Axonius version 8.0.17.2
Setting Up LivePerson to Work with Axonius
Before adding the adapter connection in Axonius, follow the instructions in LivePerson.
Step 1: Get your LivePerson Account ID
Your LivePerson Account ID is the numeric identifier for your Conversational Cloud account. You can find it in your account URL or by contacting your LivePerson account manager.
Step 2: Retrieve your base domain using the LivePerson Domain API
The LivePerson Domain API returns the correct base URL for your account and region. To find the base domain for the Users API, call:
GET https://api.liveperson.net/api/account/{accountId}/service/accountConfigReadOnly/baseURI.json?version=1.0The response returns a baseURI value (for example, lo.agentvep.liveperson.net). Prefix it with https:// when entering it in Axonius. For more details, see the LivePerson Domain API documentation.
Step 3: Create an OAuth 2.0 application in LivePerson
- Log in to your LivePerson Conversational Cloud account.
- Navigate to Campaigns > Data Sources > API tab.
- Click + Add new under OAuth 2.0 Authentication.
- Enter an application name (for example,
Axonius Integration). - Under Scope, select or enter
users.external. - Click Save to generate your Client ID and Client Secret.
- Copy and store the Client ID and Client Secret — they will not be shown again after you leave this page.
For more details, see OAuth 2.0 Client Credentials — LivePerson Developer Center.
Connecting the Adapter in Axonius
Navigate to the Adapters page, search for LivePerson, and click on the adapter tile.
Click Add Connection.
To connect the adapter in Axonius, provide the following parameters:
Required Parameters
- Host Name or IP Address - Enter the base domain retrieved from the LivePerson Domain API for the
accountConfigReadOnlyservice, prefixed withhttps://. Example:https://lo.agentvep.liveperson.net - Account ID - Enter your LivePerson account ID.
- Client ID - Enter the OAuth 2.0 Client ID from your LivePerson application.
- Client Secret - Enter the OAuth 2.0 Client Secret from your LivePerson application.
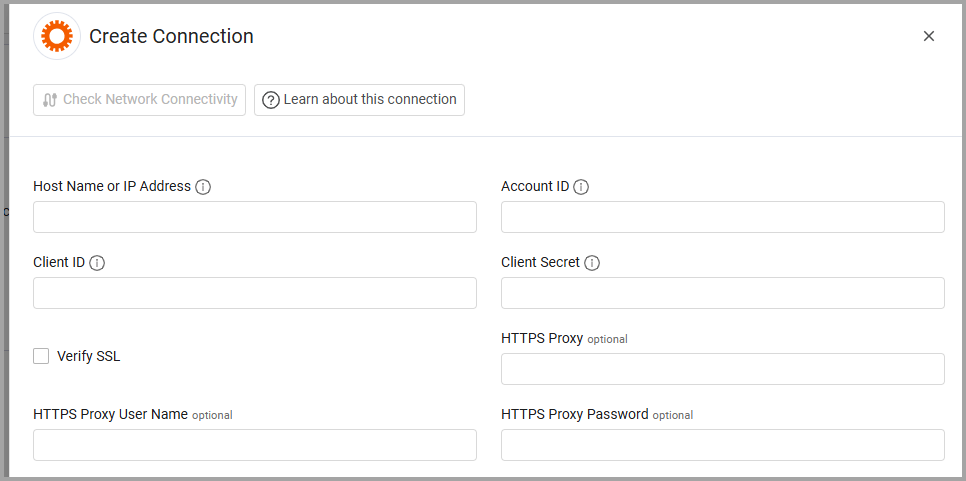
Optional Parameters
- Verify SSL - Select whether to verify the SSL certificate of the server against the CA database inside of Axonius. For more details, see SSL Trust & CA Settings.
- HTTPS Proxy - Connect the adapter to a proxy instead of directly connecting it to the domain.
- HTTPS Proxy User Name - The user name to use when connecting to the value supplied in Host Name or IP Address via the value supplied in HTTPS Proxy.
- HTTPS Proxy Password - The password to use when connecting to the server using the HTTPS Proxy.
To learn more about common adapter connection parameters and buttons, see Adding a New Adapter Connection.
Updated 5 months ago