Managing Dashboards
Use the Dashboard Manager page to manage the dashboards on your system. The Dashboard Manager table provides a centralized summary of information about all existing dashboards. You can create, update, and delete dashboards. You can also arrange dashboards into folders, assign and arrange dashboard Favorites, and define the default dashboards for your Data Scope.
To access the Dashboard Manager:
- Open the Dashboard page. It opens by default every time you log in to Axonius. You can also click
.png) on the left navigation panel.
on the left navigation panel. - Above the folders pane, click Manage Dashboards.
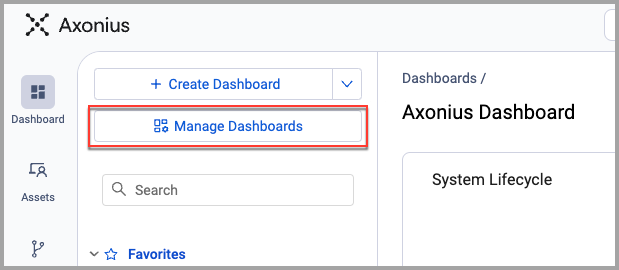
The Dashboard Manager is displayed.
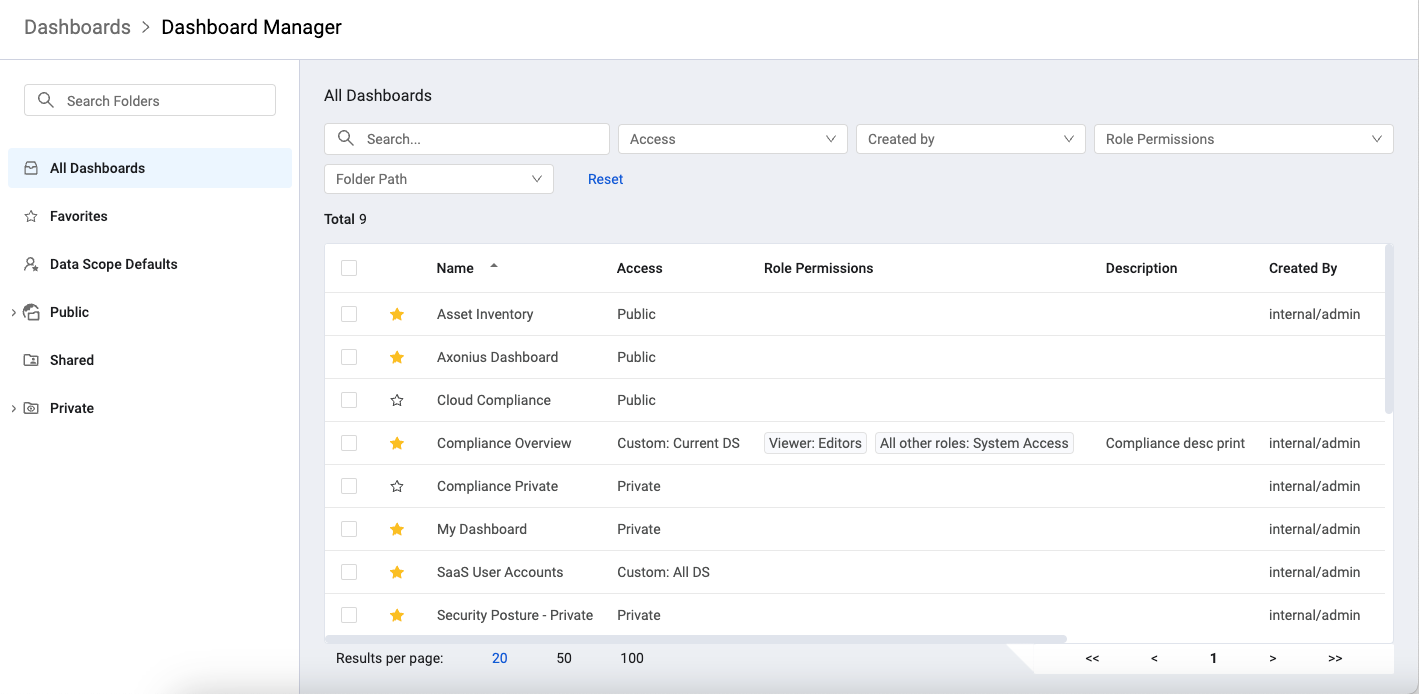
The Dashboard Manager page consists of the following main elements:
- Folders pane (left pane)
- Dashboards table (main area)
- Search/Filter bar
The Folders Pane
The Folders pane organizes dashboards into various folders according to access level.
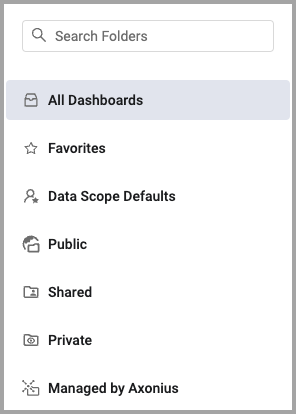
Dashboards are organized under the following main folders based on access permissions:
- All Dashboards - Lists all dashboards including Private dashboards. This list is displayed when you access the Dashboard Manager page.
- Favorites - Lists all dashboards starred as a Favorite. See Favorites for more information on working with Favorites.
- Data Scope Defaults - Lists the dashboards that are set as default for your Data Scope.
- Public - Lists all dashboards accessible to all users in your Data Scope. Dashboards you create are available only to this Data Scope. This folder includes the Axonius default dashboards.
- Shared - Lists all dashboards shared across all Data Scopes. You must have the Add or Edit for all data scopes permission and have access to the Global Data Scope to edit dashboards in this folder.
- Private - Lists dashboards accessible only to you.
- Managed by Axonius - These are non-editable dashboards creating and maintained by Axonius.
Subfolders can be created under the Public, Shared, and Private folders. See Creating, Deleting, and Renaming Folders. Changes to the dashboard arrangement made in the Dashboard Manager will appear in the folders on the Dashboards page.
To search for a specific dashboard, start typing in the Search bar at the top of the pane. Matching results are shown immediately.
Folders can be expanded and collapsed by clicking the arrows next to the folder name. See Creating, Deleting and Renaming Folders for more about working with folders.
The Dashboards Table
Dashboards in each folder are listed in the Dashboard Manager table. Click on one of the folders in the Folders pane to see the list of dashboards in that folder.
The following information is displayed on the Dashboard Manager page:
-
Name - The name of each Dashboard. Click on the name of a dashboard to go to that dashboard on the dashboards page.
-
Access - Which Data Scope/Role has access to this dashboard.
-
Role Permissions - The type of access each role has to the dashboard:
- No Access - Users with this role have no access to the dashboard.
- System Access - Users are assigned the same access level as exists in the role definition.
- Viewer - Users with this role can view the dashboard.
- Editor - Users with this role can view and edit the dashboard.
-
Description - Describes the type of information the dashboard provides.
-
Charts - Displays a tile for each chart in the dashboard.
-
Created By - Lists the user who created the dashboard.
-
Last Modified - The latest date when changes were applied to the dashboard, including name and description, filters, access management, chart location, and any other presentation changes.
-
Date Created - The date the dashboard was created.
-
Last Viewed - The date the dashboard was last viewed by any user.
-
Folder Path - The path where the dashboard is stored. If the path is long, and not fully displayed, mouse over to see it.
See Working with Tables to learn more about tables in Axonius.
Searching and Filtering the Dashboards Table

In the Search box, enter the text to search for in the Dashboards you want to see. Description text is also searched.
You can also filter the Dashboards by the following fields:
- Access - Filters for the selected access permissions.
- Role Permissions - Filters for dashboards with the selected role permissions. Select the role and then the specific permission for that role. You can select as many role/permission combinations as you want.
- Created By - Filters for dashboards created by the selected users.
- Folder Path - Filters by the path where the dashboard is stored. If the path is long, and not fully displayed, mouse over to see it.
Within a filter list, click Select All to select all options. Click Clear All to deselect all options.
Click Reset to clear all filter selections.
Performing Actions on Dashboards
Actions provide a convenient way to perform certain activities with dashboards. Some Actions only work on a single dashboard and are disabled when multiple dashboards are selected.
Actions are displayed at the right side of the row when you hover over any dashboard in the table. On hover, only the first three Actions are displayed. Click the More Actions icon
![]() to see all other Actions.
to see all other Actions.

When one or more dashboards are selected in the table, the first three Actions are displayed above the table to the right. Click More Actions to see the complete list of Actions.

Actions are displayed in the same order whether displayed by hovering or by selecting items in the table.
The following functions can be performed with Actions:
- Favorites Star - Add a dashboard to the Favorites list. This can also be done in the Favorites star column in the table.
- Edit - Edit the dashboard name and access permissions.
- Export - Export the selected dashboards.
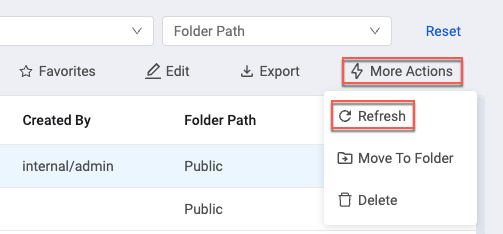
- Refresh - Refresh the data displayed on the selected dashboard. Only one dashboard can be refreshed at a time.
- Move to Folder - Move the selected dashboards to a different folder.
- Data Scope Defaults - Add the selected dashboards to the Data Scope Defaults folder. See Arranging Dashboard Favorites and Data Scope Defaults.
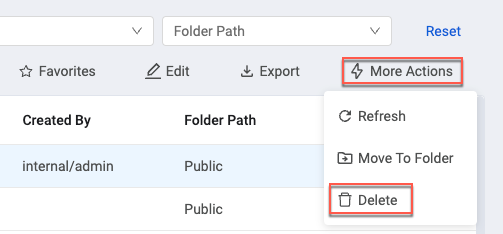
- Delete - Deletes the selected dashboards from the system. Deleted dashboards are no longer available. System dashboards cannot be deleted.
Setting Favorites in the Dashboard Manager
You can mark a dashboard as a favorite to add it to the Favorites folder. This makes it easy to find the dashboards you use the most.
Note
To set favorites for all users, set them in the data scope defaults.
To add a dashboard to Favorites:
-
Do one of the following:
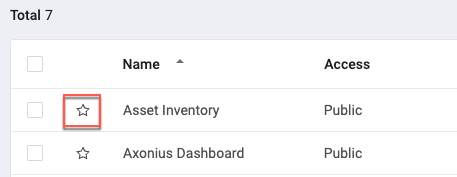
- To the left of the dashboard name in the table, click
 .
.
- Hover over a dashboard in the table and in the Actions hover menu, click
 and then Add to Favorites. To remove a dashboard from Favorites, click Remove from Favorites.
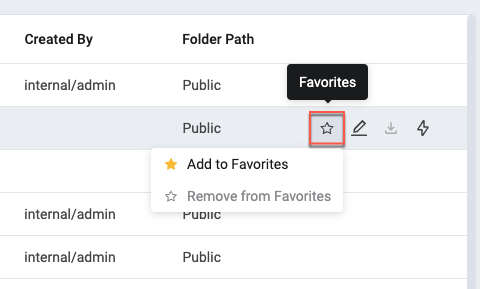
- Select one or more dashboards in the table and at the top right of the table click Favorites.
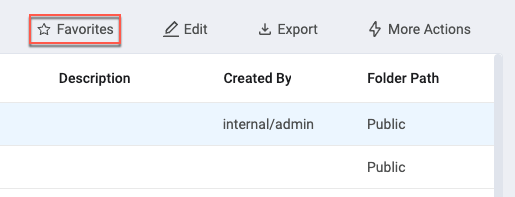
- Select one or more dashboards in the table and at the top right of the table click Favorites. Then click Add to Favorites to add the dashboard to the Favorites list or Remove from Favorites to remove it from Favorites.
- If some selected dashboards are already Favorites and some are not, a half-yellow star appears next to Favorites above the table and both the Add to Favorites and Remove from Favorites Actions are available. Select the Action you want.
- To the left of the dashboard name in the table, click
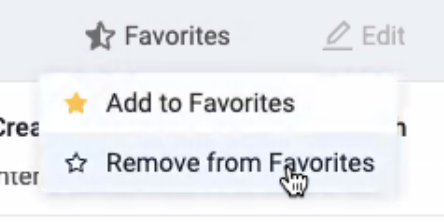
- The stars turn yellow and the dashboards are added to the Favorites folder in both the Dashboard Manager and the Dashboards List on the Dashboards page.
You can arrange the order in which the Favorites dashboards are listed in the Favorites folder of the Dashboards List. See Arranging Dashboard Favorites and Data Scope Defaults.
Editing, Refreshing and Deleting Dashboards in Dashboard Manager
You can edit, refresh and delete dashboards. Only one dashboard can be edited or refreshed at a time. You can delete any number of dashboards at the same time.
To edit a dashboard:
- In the table, find the dashboard you want to edit.
- Do one of the following:
- Hover over the dashboard in the table and in the Actions hover menu, click
 .
. - Select a dashboard in the table and at the top right of the table click Edit.
- Hover over the dashboard in the table and in the Actions hover menu, click
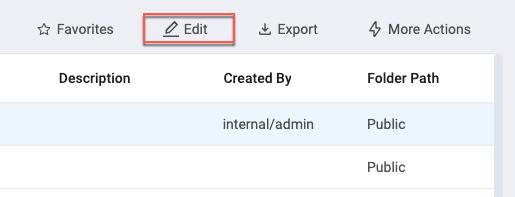
- Make the changes that you want and click Save.
To refresh the data displayed on a dashboard:
-
In the table, find the dashboard you want to refresh.
-
Do one of the following:
- Hover over the dashboard in the table and in the Actions hover menu, click
 and then Refresh.
 - Select a dashboard in the table and at the top right of the table click More Actions and then Refresh.
- Hover over the dashboard in the table and in the Actions hover menu, click
The refresh may take a while to complete.
To delete a dashboard:
-
In the table, find the dashboard you want to delete.
-
Do one of the following:
- Hover over the dashboard in the table and in the Actions hover menu, click
 and then Delete.
 - Select a dashboard in the table and at the top right of the table click More Actions and then Delete.
- Hover over the dashboard in the table and in the Actions hover menu, click
Moving Dashboards to Another Folder
You can move dashboards to another folder.
To move dashboards to another folder:
-
In the table, find the dashboard you want to move.
-
Do one of the following:
- Hover over the dashboard in the table and in the Actions hover menu, click
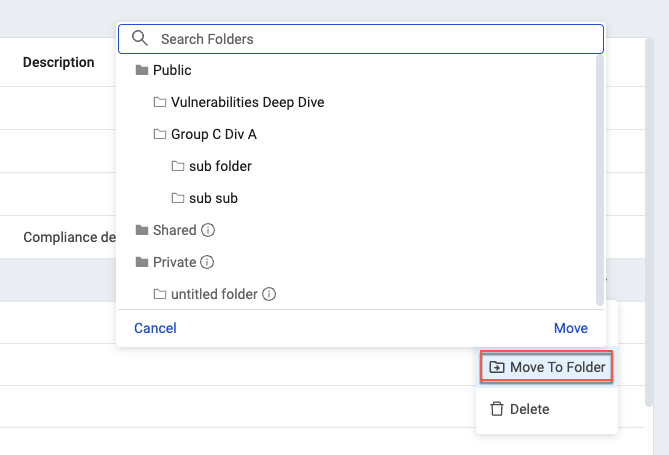
 and then Move to Folder.
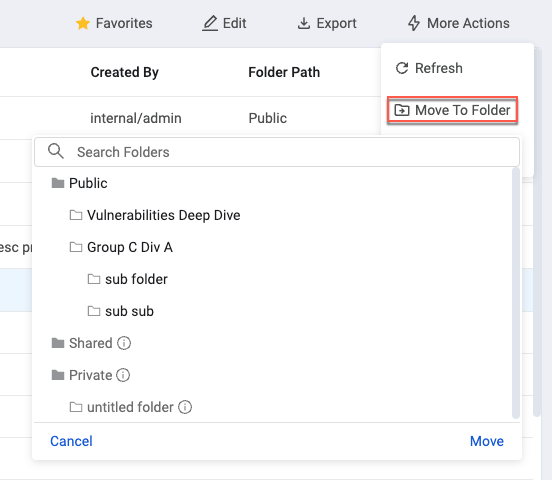
- Select a dashboard in the table and at the top right of the table click More Actions and then Move to Folder.
- Hover over the dashboard in the table and in the Actions hover menu, click
-
In the Folder List dropdown use the vertical and horizontal scrollbars to find the destination folder you want or search for a specific folder by entering part or all of its name in Search Folders.
-
Click the destination folder, and then click Move. The dashboards are moved to the selected folder.
Exporting Dashboards in Dashboard Manager
You can export either one dashboard or multiple dashboards in bulk. Only Public and Shared dashboards can be exported.
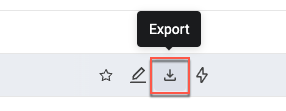
To export a single dashboard:
- In Dashboard Manager, hover over the dashboard you want to export.
- From the Actions hover menu on the right, click the Export icon.
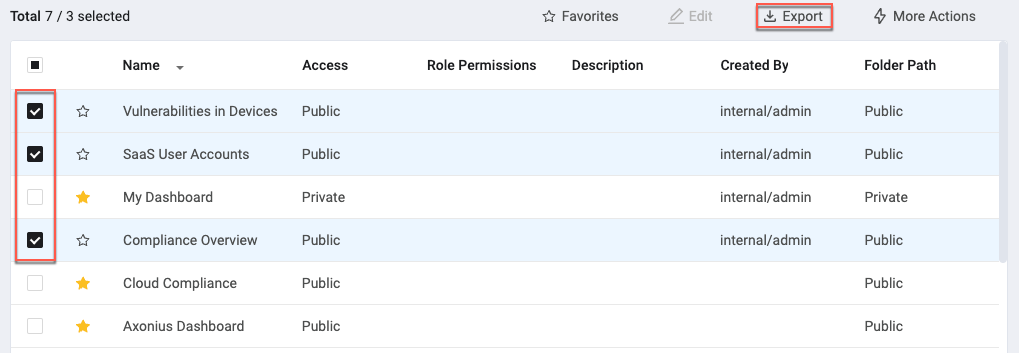
To export multiple dashboards:
-
In Dashboard Manager, select the dashboards you want to export.
-
Click Export above the right side of the dashboards list.
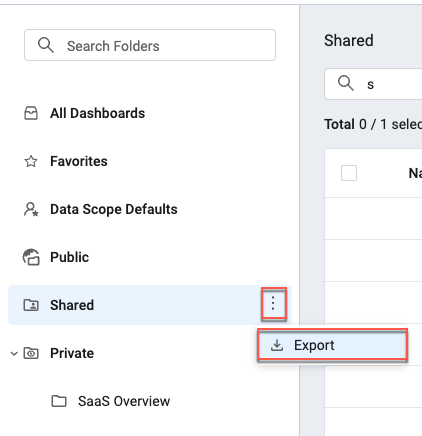
To export all dashboards in a folder:
-
In Dashboard Manager, in the folder pane, click the 3-dot menu next to the folder that contains the dashboards you want to export.
-
Click Export.
For more details about importing and exporting dashboards, see Importing and Exporting Dashboards.
Assigning Data Scope Defaults
A user in the data scope with the Set Data Scope Defaults permission can define default dashboards for the data scope. Users without this permission will not see the Data Scope Defaults folder. These dashboards are displayed in the Favorites folder of the Dashboard page for all new users. Once the user makes any changes to the Favorites list, changes made to the Data Scope Defaults will no longer appear under the new user's Favorites.
To add/remove dashboards to/from Data Scope Defaults:
- In the table, find the dashboard you want to add to Data Scope Defaults.
- Do one of the following:
- Hover over the dashboard in the table and in the Actions hover menu, click the 3-dot menu and then Data Scope Defaults. Then click Add to Data Scope Defaults to add the dashboard to the list or Remove from Data Scope Defaults to remove it from the Data Scope Defaults.

- Select one or more dashboards in the table and at the top right of the table click More Actions and then Data Scope Defaults. Then click Add to Data Scope Defaults to add the dashboard to the list or Remove from Data Scope Defaults to remove it from the Data Scope Defaults.
- Hover over the dashboard in the table and in the Actions hover menu, click the 3-dot menu and then Data Scope Defaults. Then click Add to Data Scope Defaults to add the dashboard to the list or Remove from Data Scope Defaults to remove it from the Data Scope Defaults.
See Performing Actions on Dashboards for all the available ways to use Actions on dashboards.
Arranging Dashboard Favorites and Data Scope Defaults
Use the Manage Dashboards window to arrange the dashboards in the Favorites or Data Scope Defaults folders.
Notes
This arrangement only affects the arrangement of dashboards on the Dashboards page in the Dashboards List, not in the Dashboards Manager.
In order to set Data Scope defaults, you must have the permission Set Data Scope Defaults for your role. Manage dashboard folders permission allows you to create and edit folders on the Dashboard Manager page.
The Manage Dashboards window has two lists:
- Available Dashboards - Lists all available dashboards with the selected access permissions.
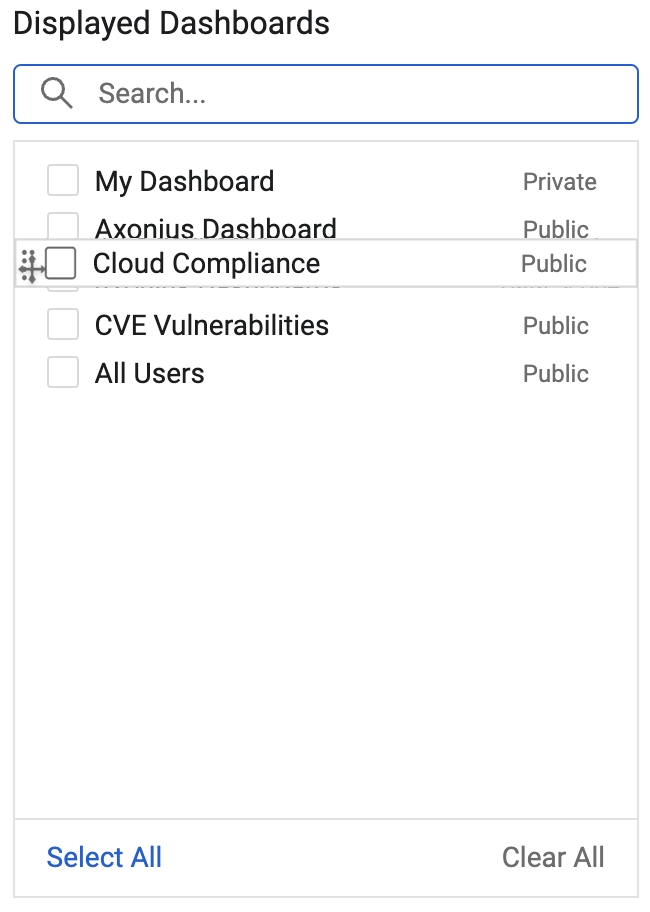
- Displayed Dashboards - Lists the dashboards to be displayed.
The access level of each dashboard is listed to the right of the dashboard name.
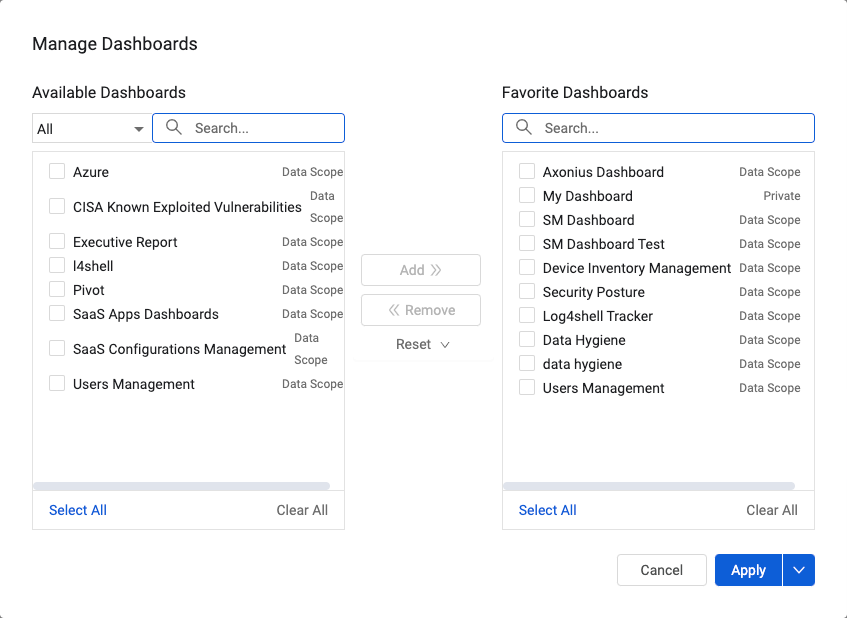
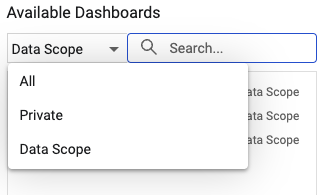
You can filter the Available Dashboards list:
- All - List all available dashboards.
- Private - List dashboards that are private to me.
- Data Scope - List dashboards available to all users with access to this Data Scope.
- Restricted - List dashboards available to the selected roles.
- Shared - List dashboards available to all users in the Data Scope.
To arrange the order of Favorites and Data Scope Defaults:
- In Dashboard Manager, in the folder pane, select either the Favorites or Data Scope Defaults folder.
- Above the Dashboards table to the right, click Set Dashboard Order.
- In the Manage Dashboards window, do one of the following:
- To move Dashboards to the Favorite Dashboards list, select the Dashboards you want to display and click Add.
- To move Dashboards to the Available Dashboards list, select the Dashboards you want to remove and click Remove.
- To revert to one of the default order settings:
- Click Reset and then Reset to Data Scope Default. This change is not saved unless you save your order selections by clicking Apply to save the change temporarily, or one of the options in the Apply dropdown to save. (See the next step.)
- When you are finished arranging the Dashboards, do one of the following:
-
Click Apply. The dashboards in the Favorite Dashboards list are added to the Favorites folder. This is a temporary change. The next time you log in to Axonius, the dashboard order will revert to the previously selected Data Scope Default.
-
From the Apply dropdown, select Save as Data Scope Default - Available to Admin users or users with the Set dashboard order permission. Saves the current selections as the default Favorites for all users within the Data Scope with no defined Favorites list. Users with the proper permission can still assign their own default order.
-
NOTES
The system default order cannot include private Dashboards or Dashboards assigned to specific roles.
To search for a Dashboard:
You can also search both lists by entering text into the Search fields at the top of each list.
To select a Dashboard:
To select a dashboard, click the box next to the Dashboard. You can also click Select All to select all the Dashboards in the list.
To change the order of the Displayed Dashboards:
You can change the order of the Dashboards by clicking and dragging a Dashboard to a new position in the list.
-
In the Favorite Dashboards list, hover over a Dashboard name. The handle appears to the left.
-
Click the handle and drag'n drop the dashboard to a new location. Dashboards will be displayed in the order they appear in this list.
To remove user default selections and revert to the system default:
Reverting to the system default removes your user default configuration.
- In the Select Dashboards window, click Reset to system default.
- From the Apply list, select Revert to system default. You no longer have a configured user default dashboard configuration.
Creating, Deleting and Renaming Folders
You can create new folders under the Public, Private, and Shared folders. Existing folders can be deleted and renamed. If you have the Manage dashboard folders permission, you can rename and delete all non-Private folders.
Subfolders created here in the Dashboard Manager also appear in the folder structure of the Dashboards page.
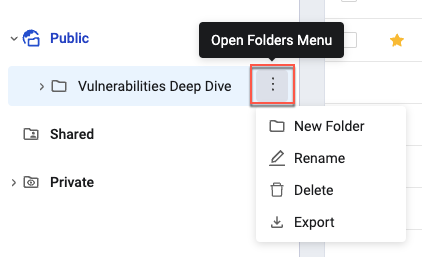
These functions are found in the 3-dot menu to the right of the folder name that is visible when you hover over it.
To create a new folder:
-
Hover over the folder under which you want to create a new folder.
-
Click the 3-dot menu and select New Folder.
-
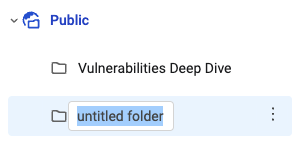
A new folder is created with the name untitled folder in a text box and the name is selected. Type a name for the folder.
-
Click outside the text box or press Enter and the name is saved.
To delete a folder:
- Hover over the folder you want to delete.
- Click the 3-dot menu and select Delete.
- In the Delete Folder dialog, click Delete Folder to confirm. All dashboards in the folder will also be deleted from the system.
To rename a folder:
- Hover over the folder you want to rename.
- Click the 3-dot menu and select Rename. The name of the folder is displayed in a text box and the name is selected.
- Type a name for the folder.
- Click outside the text box or press Enter and the name is saved.
Updated about 1 month ago
