
Deploying the CrowdStrike Falcon Adapter
To deploy the CrowdStrike Falcon adapter, perform the following steps:
1. Create CrowdStrike Falcon credentials with the appropriate permissions
To create credentials using the following authentication method:
Client ID / Client Secret
- Log in to the Falcon admin panel.
- Go to Support and resources then select API clients and keys.
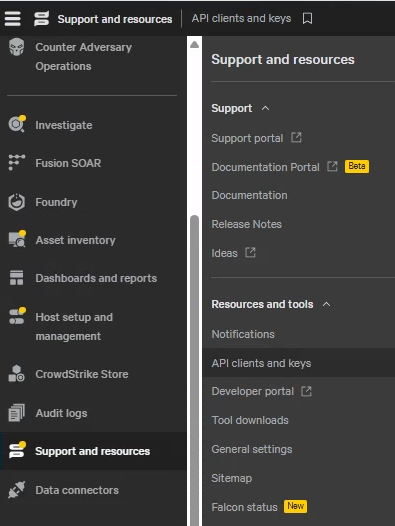
- Click Add API Client and select the permissions.
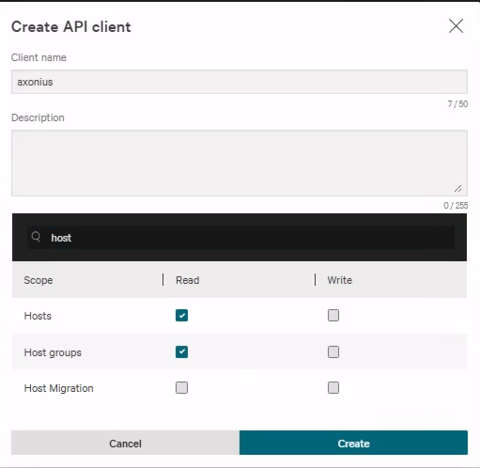
- Click Create, then copy and securely store the generated Client ID, Client Secret, and Base URL.
Username / Password
-
Log in to the Falcon admin panel.
-
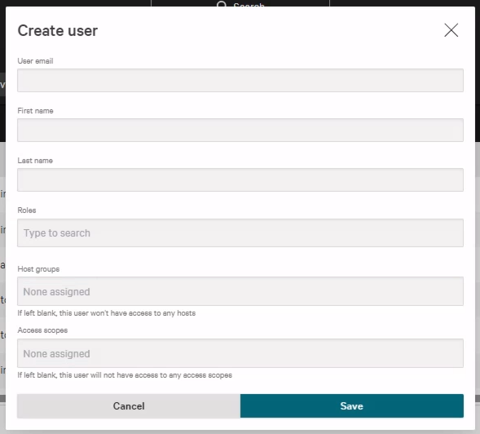
Navigate to Host setup and management then select User management.
-
Click Create user and enter the User email, First name, Last name and Roles for the service account.
-
Assign the permissions to fetch Axonius SaaS Applications Settings.
-
Log in once as this new user to initialize Multi-Factor Authentication.
-
Securely store the Email and Password for later use.
2. Set up the CrowdStrike Falcon adapter in Axonius
Create the Adapter connection in Axonius. Based on the authentication method, fill out the specific fields, and configure optional settings.
Add a New Connection
-
Navigate to the Adapters page, search for
CrowdStrike Falcon, and click on the adapter tile.
-
On the top right side, click on Add Connection.
-
The Add Connection drawer opens.
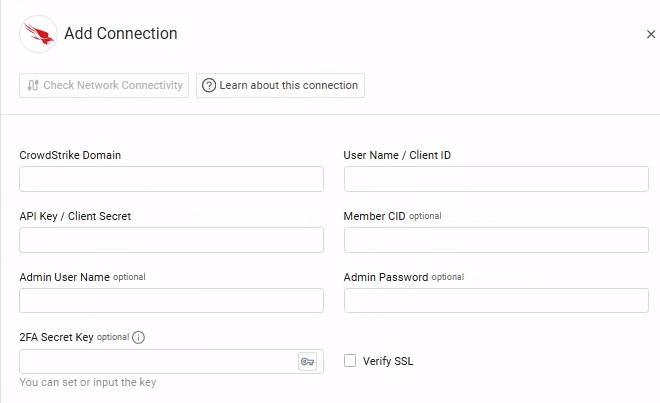
Required Fields
-
CrowdStrike Domain - The hostname of the API server. Could be one of the following:
https://api.crowdstrike.comorhttps://api.us-2.crowdstrike.com(US region)https://api.eu-1.crowdstrike.com/(EU region)https://api.laggar.gcw.crowdstrike.com/(Government)
-
User Name / Client ID and API Key / Client Secret - Enter the Client ID and Client Secret generated when you created the API client in CrowdStrike Falcon admin console.
Note
Older or custom CrowdStrike deployments might use User Name and API Key. If your environment uses these legacy settings, enter them into the User Name / Client ID and API Key / Client Secret fields respectively.
- Connection Label - Name to identify this adapter connection.
Optional Fields
Expand/Collapse
-
Admin User Name - The value you enter in the User Name field in CrowdStrike for the new user you created to allow Axonius to fetch Axonius SaaS Applications data.
-
Admin Password - The password you set for the new user in CrowdStrike.
-
2FA Secret Key - The secret generated in CrowdStrike for setting up 2-factor authentication for the CrowdStrike user created for collecting Axonius SaaS Applications data.
-
Member CID – Enter a CrowdStrike CID to fetch data from all tenants associated with that CID. To fetch data only from the primary tenant, leave this field blank.
-
Verify SSL – Select whether to verify the SSL certificate of the server against the CA database inside of Axonius. For more details, see SSL Trust & CA Settings.
-
HTTPS Proxy – Connect the adapter to a proxy instead of directly connecting it to the domain.
-
Ignore devices that have not been seen by this connection in the last X hours – Select whether to avoid fetching old devices that are no longer part of your network, but that still exist in the present adapter connection.
- When enabled, the adapter fetches only device assets that have been seen by this connection within the specified number of hours (Last Seen field).
- For example, if set to 2160 hours, any device not seen in the last 90 days will be ignored..
- When disabled, the adapter fetches devices according to the global Ignore devices that have not been seen by this connection in the last X hours option. For more information, see Adapter Advanced Settings.
- When enabled, the adapter fetches only device assets that have been seen by this connection within the specified number of hours (Last Seen field).
-
Threat Graph API User and Threat Graph API Key – Fetch data from the CrowdStrike Threat Graph API.
-
Notes – Add a note of up to 250 characters for this adapter connection.
-
Select Gateway – Select the Axonius Gateway to use when connecting adapters whose sources are only accessible by an internal network.
To use this option, you need to set up an Axonius Gateway.
Troubleshooting
If you get an 403 Client Error when trying to connect the adapter:
- Verify your API scopes.
- In the CrowdStrike Admin Console, add the IP address of your Axonius instance to your IP allow list.
3. (Optional) Configure Advanced Settings
Refer to CrowdStrike Falcon Advanced Settings.
Updated 5 months ago