
Lucidchart
Lucidchart allows users to collaborate on drawing, revising, and sharing charts and diagrams.
Asset Types Fetched
- Users, Roles, Licenses, Application Settings, SaaS Applications
Resources Required by Asset Type
The following connection parameters, advanced settings, permissions, and configurations are required to fetch each asset type.
Search by Asset Type to find the resources required for your specific needs.
Note
All configurations must be performed by a user with Admin privileges who can access the Lucid admin console.
| Asset Type | Connection Parameters | Permissions | Additional Configuration |
|---|---|---|---|
| Users |
| Developer privileges | Generating a Client ID and Client Secret Getting an Access Code |
| Roles |
| Developer privileges | Generating a Client ID and Client Secret Getting an Access Code |
| Licenses |
| Developer privileges | Generating a Client ID and Client Secret Generating a Redirect URL Getting the Username and Password |
| Application Settings |
|
| Generating a Client ID and Client Secret Generating a Redirect URL Getting the Username and Password |
| SaaS Applications |
| Developer privileges | Generating a Client ID and Client Secret Generating a Redirect URL Getting the Username and Password |
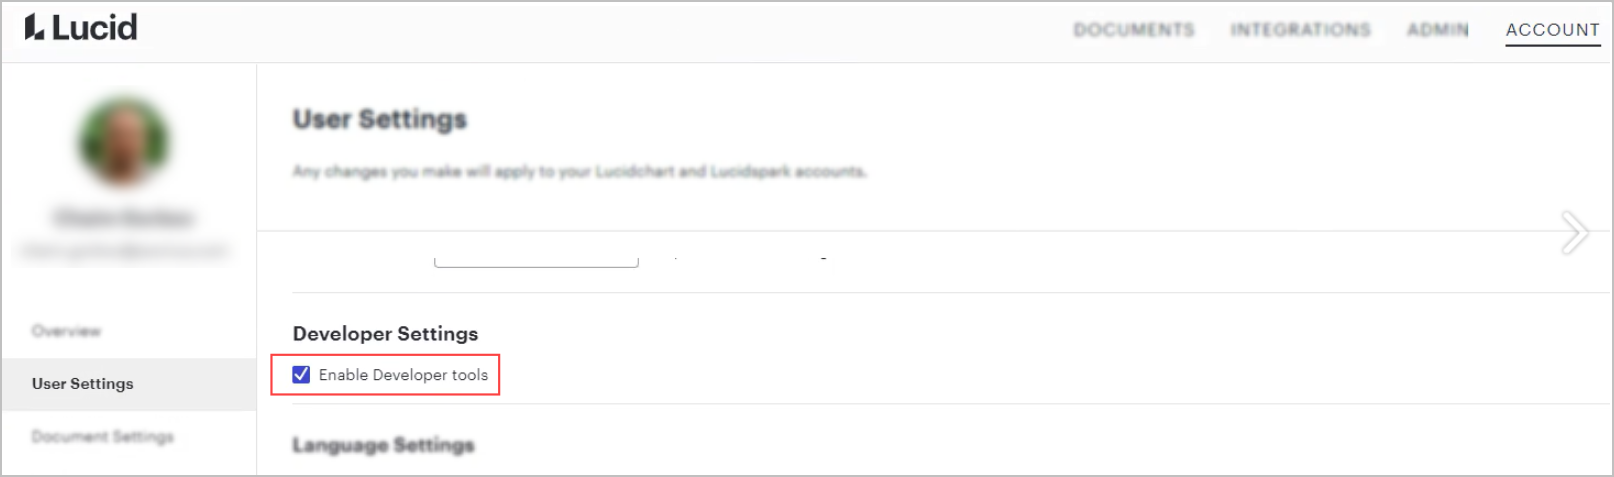
To set up Developer privileges, on your Lucid admin console, Go to User Settings> Developer Settingsand check Enable Developer tools.
Required Ports
- 80
- 443
APIs
Axonius uses the Lucid API Version 1.
Supported From Version
Supported from Axonius version 5.0
Setting Up Lucidchart to Work with Axonius
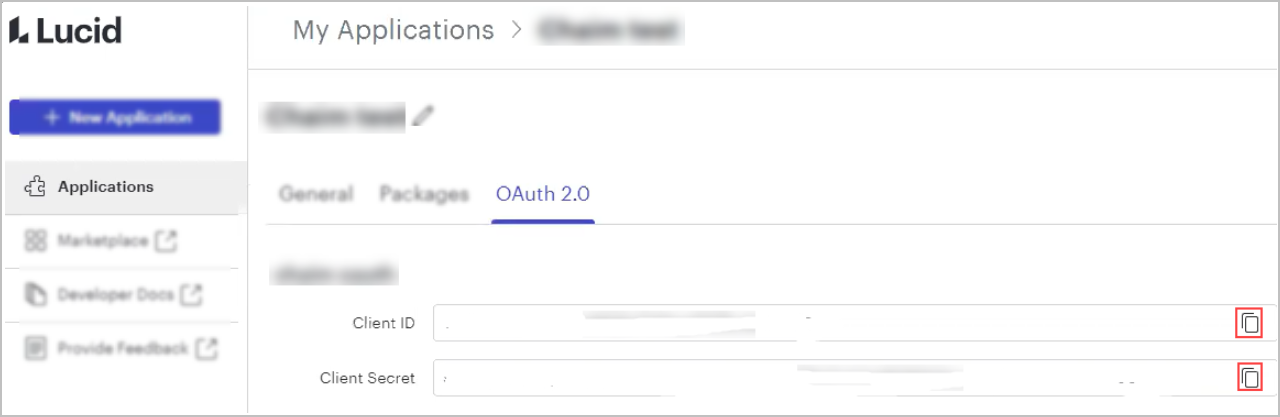
Generating a Client ID and Client Secret
Note
Client ID and Client Secret are required to fetch allasset types.
The Lucidchart adapter uses Oauth2 verification, which requires a Client ID and Client Secret.
- Login as an Account Admin user to your Lucid admin console.
- Ensure that the account has Developer tools Enabled (see above image).
- From the left navigation menu, go to App Integration
>General>Custom OAuth app. - Under Create Custom OAuth 2.0 Client, provide a name for your app and click on Create OAuth 2.0 Client. A new app is added.
- Grant the View users on your account permission for the app.
- Open the new app and select the OAuth 2.0 tab.
- Copy the generated Client ID and Client Secret and paste them into their corresponding parameters in Axonius.
Getting the Access Code
Note
Access code is required only for fetching Users and Roles.
This process creates an Account Token. For more information, see Access Token Types.
- Navigate to:
https://lucid.app/oauth2/authorizeAccount?client_id={CLIENT_ID}&redirect_uri=https://lucid.app/oauth2/clients/{CLIENT_ID}/redirect&scope=account.user:readonly+offline_access - Select Grant Access.
- You will be redirected to
lucid.app/oauth2/clients/{CLIENT_ID}/redirect. - Underneath the verification code, click Copy to Clipboard.
- In Axonius, paste the verification code into the One Time OAuth Access Code parameter.
Fetching Licenses, Application Settings, and SaaS Applications
Generating a Redirect URL
Paste the following URL into the Redirect URL parameter (make sure to add your specific Client ID into the URL):
https://lucid.app/oauth2/clients{CLIENT_ID}/redirect
Getting the Username and Password (Creating a New User Account)
- Login as an admin user to your Lucid admin console.
- From the left navigation menu, go to Users.
- Click Add Users
>Add a single user. - Provide an email address you can access.
- Edit the users' roles and set it as Team Admin Privileges, Developer Privileges, and Billing Admin Privileges.
- You will receive an activation email. Open the email and use it to set the password.
- Copy the generated Username and Password.
- Paste the copied values into their corresponding parameters in Axonius.
Connecting the Adapter in Axonius
To connect the adapter in Axonius, provide the following parameters. Refer to Resources Required by Asset Type for the parameters required for specific asset types.
- Host Name or IP Address - The hostname or IP address of the Lucidchart server that Axonius can communicate with via the Required Ports.
- Client ID and Client Secret - The Client ID and Client Secret for an account that has read access to the API. For more information, see Generating a Client ID and Client Secret.
- One Time OAuth Access Code - The access coded generated in Lucidchart for getting the refresh token and access token, for accounts that authorize with OAuth. For more information, see Getting the Access Code.
- Verify SSL (default: false) - Select whether to verify the SSL certificate of the server against the CA database inside of Axonius. For more details, see SSL Trust & CA Settings.
- HTTPS Proxy(optional, default: empty) - Connect the adapter to a proxy instead of directly connecting it to the domain.
- HTTPS Proxy User Name (optional, default: empty) - The user name to use when connecting to the value supplied in Host Name or IP Address via the value supplied in HTTPS Proxy.
- HTTPS Proxy Password(optional, default: empty) - The password to use when connecting to the server using the HTTPS Proxy.
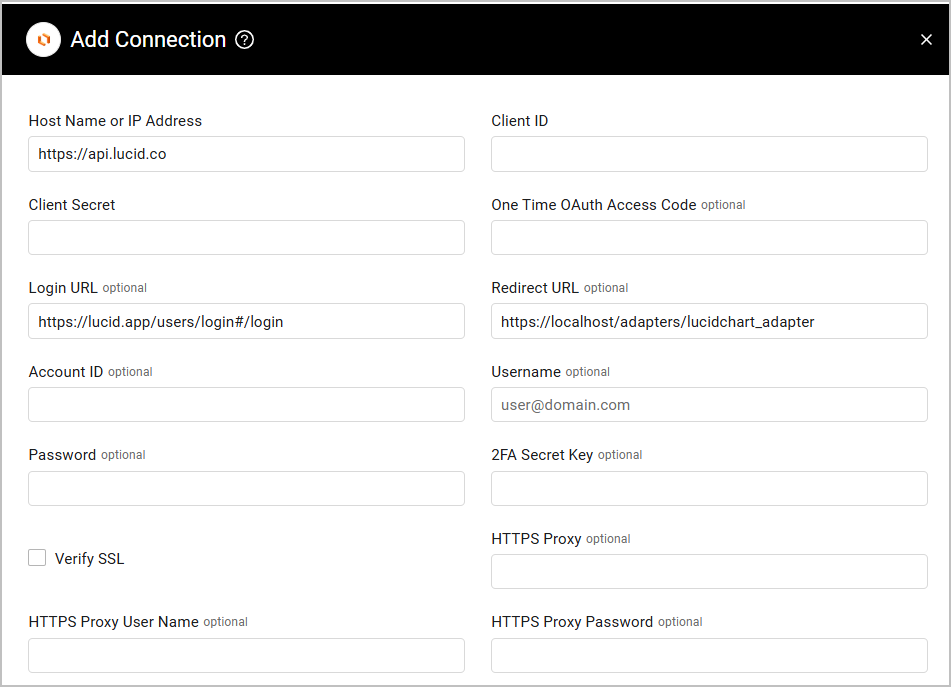
Parameters required to fetch Licenses, Application Settings and SaaS Applications:
- Login URL - Your Login URL. The format for this URl is:
https://lucid.app/users/login#/login - Redirect URL - The Lucidchart OAuth app URI. The format for this URL is
https://lucid.app/oauth2/clients{CLIENT_ID}/redirect. - Account ID - Your Lucidchart account ID. This is the number in your admin console URL. For example, if your URL is
https://admin.lucid.app/teams/123456789#/, then the Account ID is 123456789. - Username and Password - The username and the password of an Axonius user account.
- 2FA Secret - Required only if the user created to collect Application Settings accesses Lucidchart through an SSO solution that requires 2-factor authentication. In this case, you need to generate a secret key in that solution and paste it here. See Set Up Google Authenticator in for the Okta adapter, for example.
To learn more about common adapter connection parameters and buttons, see Adding a New Adapter Connection.
Version Matrix
This adapter was only tested with the versions marked as supported, but may work with other versions. Contact Axonius Support if you have a version that is not listed, which is not functioning as expected.
| Version | Supported | Notes |
|---|---|---|
| API v1 | Yes | -- |
Updated 9 months ago