
Box Platform
Box Platform provides data security, file sharing, collaborating, and content management tools. Box Platform provides access to Box APIs.
Asset Types Fetched
- Users, Roles, Groups, Application Settings, Permissions
Resources Required by Asset Type
The following connection parameters, advanced settings, permissions, and configurations are required to fetch each asset type.
Search by Asset Type to find the resources required for your specific needs.
| Asset Type | Connection Parameters | Advanced Settings | Permissions | Additional Configuration |
|---|---|---|---|---|
| Users |
| No specific setting required |
| Creating an Application |
| Roles |
| No specific setting required | No specific permission required | Creating an Application |
| Groups |
| Fetch Groups | No specific permission required | Creating an Application |
| Application Settings |
| Fetch Application Settings |
| Creating an Application Creating a User Account |
| Permissions |
| No specific setting required | No specific permission required | Creating an Application |
Fetching Application Settings
- Some high-privilege settings cannot be fetched with client credentials (Box Platform enterprise ID, Client ID and private key configuration file) alone. These settings require additional parameters: Box Login URL, Username, Password, 2FA Secret Key (if required by your organization), and Use SSO (if required by your organization). See Connecting the Adapter in Axonius for more information on these parameters.
APIs
Axonius uses the Box REST API - List enterprise users.
Setting Up Box Platform to Work with Axonius
Creating an Application
Note
Only users with a Developer account can create an application.
The values supplied in Client ID and Box Platform private key configuration file refer to the generated Client ID and private key configuration file of your Custom App.
- For details on setting up a Custom App using JWT authentication, see Box Guides - Setup with JWT. The following App Scopes (permissions) are required for creating a Custom App:
- Read and write all files and folders stored in Box
- Manage groups
- Manage enterprise properties
- Manage users
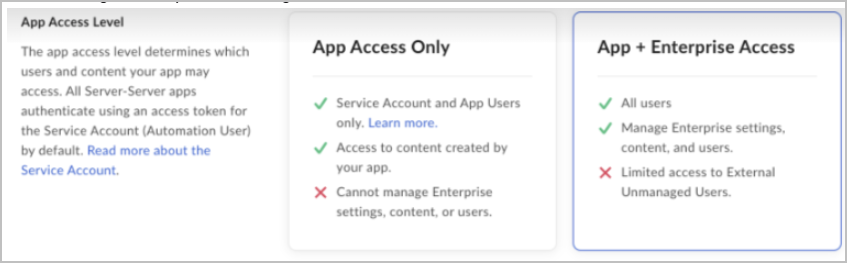
- Select Configuration from the left sidebar in your application, scroll down to App Access Level, and select App + Enterprise Access. This enables your application to access all users and manage enterprise settings, content, and users.
-
Create a configuration file from the Developer Console. This file will include the keypair as well as a number of other application details that are used during authentication.
- Select Configuration from the left sidebar in your application and scroll down to Add and Manage Public Keys.
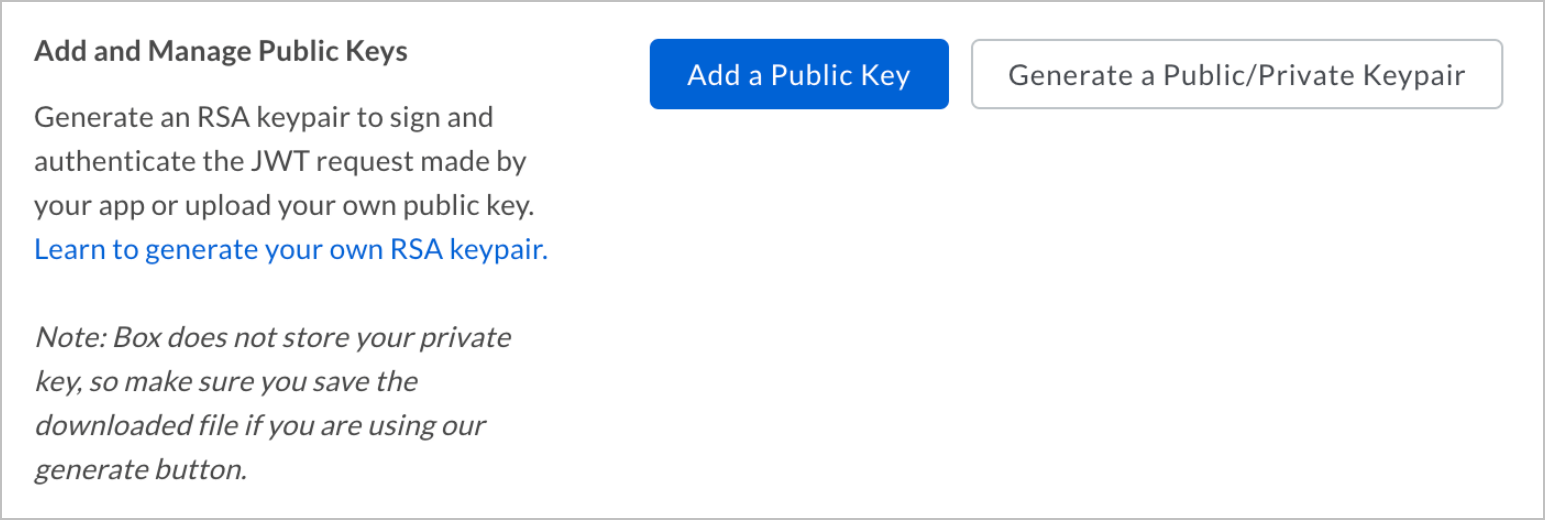
- Click Generate a Public/Private Keypair to have Box generate a keypair. This triggers the download of a JSON configuration file that you can move to your application code.
- Upload this file as the Box Platform private key configuration file.
- Select Configuration from the left sidebar in your application and scroll down to Add and Manage Public Keys.
-
To get the Client ID, log into your Box developer console and select Edit Application for the application you're working with.
-
In the OAuth 2.0 Parameters section of the configuration page, find the item labelled
client_id. The text of that item is your application's Client ID.
Creating a User Account
Notes
This is required only to fetch some Application Settings. While to access Application Settings data you need to grant roles and/or permissions that include write capabilities, the adapter only actually reads data from the application.
It is recommended for the username and password to be derived from a newly created user account dedicated for the usage of Axonius SaaS Applications. Retrieve the username and password from that user account.
When single-sign-on is enabled, and direct login flow is disabled, then it is recommended to derive the username and password from a user account maintained by the single-sign-on solution.
-
Log into Box as an administrator and navigate to Admin Console
>Users & Group. -
Click the + User button.
-
Clear Allow this user to sync files between Box and the user's desktop.
-
Click Add User.
-
Look up for the newly created user, click on its options button, and select Change User Settings.
-
Check Exempt this user from maximum allowed devices.
-
Check Exempt this user from 2-step login verification.
-
Check User is granted the following administrative privileges.
-
Clear the following:
- Manage users
- Manage groups
- View users' content
- Edit users' content
- Log in to users' accounts
- Create, edit and delete automations for your company
- Create and edit metadata templates for your company
-
Check the following:
- View settings and apps for your company
- Edit settings and apps for your company
- Run new reports and access existing reports
- View automations set up for your company
-
Click Save.
Connecting the Adapter in Axonius
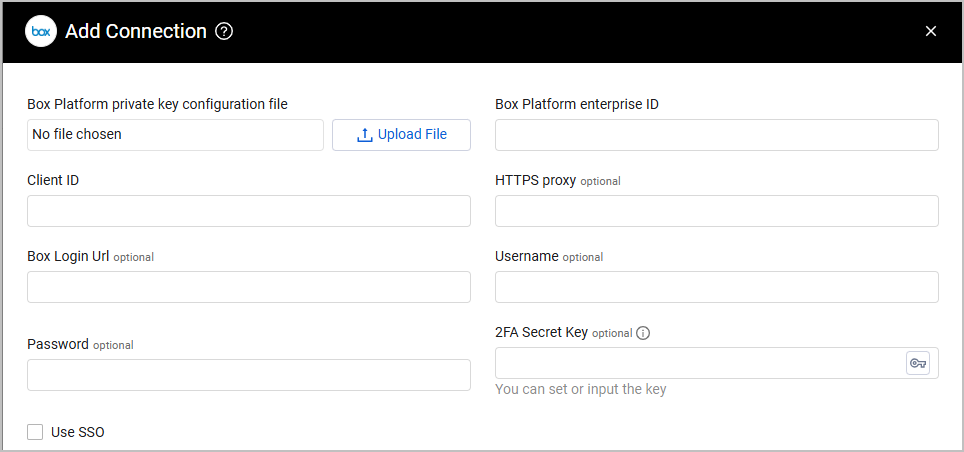
To connect the adapter in Axonius, provide the following parameters. Refer to Resources Required by Asset Type for the parameters required for specific asset types.
- Box Platform enterprise ID - Specify your Box enterprise account ID. The Box Platform enterprise ID is located in the Enterprise settings view. Click the Admin Console link from the top of your Box account. Then choose the Gear icon / Enterprise settings. Your Enterprise ID may also be located in the Account and Billing tab of the Admin Console.
- Client ID and Box Platform private key configuration file - The Client ID and private key configuration file that provides the Required Permissions to fetch assets. Refer to Creating an Application for instructions on how to obtain these parameters.
- HTTPS Proxy (optional) - Connect the adapter to a proxy instead of directly connecting it to the domain.
Parameters required to fetch SaaS Application Settings:
- Box Login URL - The URL as it appears in the browser's address bar after signing-in.
- Username and Password - The username and the password of the dedicated account created for Axonius SaaS Applications.
- 2FA Secret Key - The secret generated in the adapter for setting up 2-factor authentication (if your organization uses it) for the adapter user created to collect SaaS Applications Settings.
- Use SSO - Select this option if your organization uses SSO to log in to Box Platform. When you check Use SSO enter the SSO username, password, and the 2FA from the SSO provider, in these configuration fields, instead of BOX credentials.
To learn more about common adapter connection parameters and buttons, see Adding a New Adapter Connection.
Advanced Settings
Note
Advanced settings can either apply to all connections for this adapter, or to a specific connection. Refer to Advanced Configuration for Adapters.
- Fetch Groups - Select this option to fetch Box groups.
- Fetch User Last Login Time - Select this option to fetch the last time the user logged in.
- Fetch Application Settings - Select this option to fetch Application Settings.
Note
To learn more about Adapter Configuration tab advanced settings, see Adapter Advanced Settings.
Related Enforcement Actions
Updated 5 months ago