
Cato Networks
Learn how to set up and connect Cato Networks with Axonius, including asset types fetched and advanced settings.
Adapter Description
Cato SASE cloud connects branch locations, mobile users, and physical and cloud datacenters in a unified network. The Cato Networks adapter enables Axonius to discover and manage assets from your Cato SASE cloud deployment.
Asset Types Fetched
![]() Devices |
Devices | ![]() Users |
Users | ![]() SaaS Applications
SaaS Applications
Before You Begin
Ports
- TCP port 80/443
Authentication Method
API Key
APIs
Axonius uses the Cato Networks GraphQL API v1 to fetch asset information. The following GraphQL queries are utilized:
accountSnapshot- For retrieving user and device information (newer API version)vpnUsers- For retrieving VPN user information (legacy API version)entityLookup- For paginating through user entitiesappStats- For retrieving user application usage statisticsevents- For retrieving DNS query events
Permissions
The API key must have the following permissions in Cato Networks:
- Viewer access to account data
- Viewer access to VPN user information
- Viewer access to device information
- Viewer access to application statistics
- Viewer access to event logs
Supported From Version
Supported from Axonius version 4.5
Setting Up Cato Networks to Work with Axonius
You need to generate a Service Principal API Key. See Service Principal API Keys in Cato Learning Center for full details of how to do this.
Connecting the Adapter in Axonius
Navigate to the Adapters page, search for Cato Networks, and click on the adapter tile. Click Add Connection.
To connect the adapter in Axonius, provide the following parameters:
Required Parameters
- Host Name or IP Address (required, default:
https://api.catonetworks.com/) - The hostname or IP address of the Cato Networks server. - Account ID (required) - Specify your Cato Networks account ID.
- API Key (required) - An API Key associated with a user account that has permissions to fetch assets.
- Connection Label - A descriptive label for this connection to help identify it in Axonius.
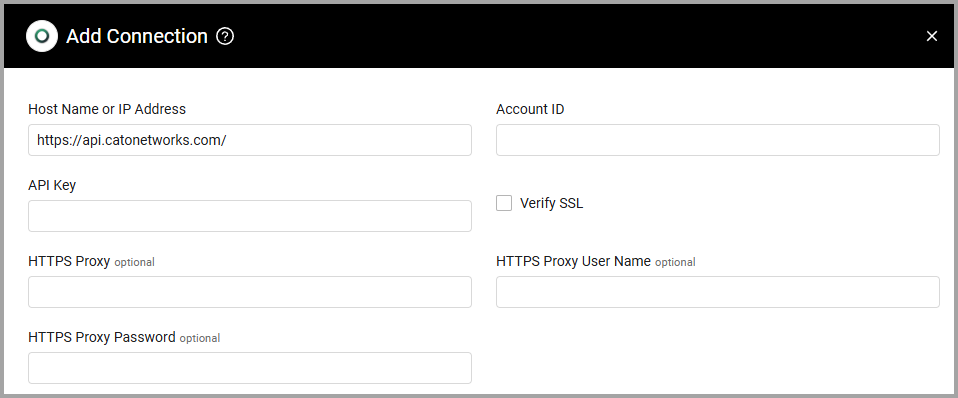
Optional Parameters
- Verify SSL - Select whether to verify the SSL certificate of the server against the CA database inside of Axonius. For more details, see SSL Trust & CA Settings.
- HTTPS Proxy - Connect the adapter to a proxy instead of directly connecting it to the domain.
- HTTPS Proxy User Name- The user name to use when connecting to the value supplied in Host Name or IP Address via the value supplied in HTTPS Proxy.
- HTTPS Proxy Password - The password to use when connecting to the server using the HTTPS Proxy.
-
Select Gateway – Select the Axonius Gateway to use when connecting adapters whose sources are only accessible by an internal network and not from the primary Axonius instance, which may be an Axonius-hosted (SaaS) instance or Customer-hosted (on-premises / private cloud). To use this option, you need to set up an Axonius Gateway.
To learn more about common adapter connection parameters and buttons, see Adding a New Adapter Connection.
Advanced Settings
Note
Advanced settings can either apply for all connections for this adapter, or you can set different advanced settings and/or different scheduling for a specific connection, refer to Advanced Configuration for Adapters.
- Fetch Users Applications (optional) (only for accounts with Axonius SaaS Applications) - Toggle on this option to fetch users applications.
- Usage Time Frame In Days (optional, default: 7) - Set the number of days you want as a usage time frame. If Fetch Users Applications is enabled, the adapter will fetch user usage in the time frame configured, add the application to your Direct Assigned Applications, and create SaaS applications.
- Parse UUID as MAC Address - Select this option so that the adapter will attempt to parse device UUIDs as MAC addresses if they conform to MAC address format.
Note
To learn more about Adapter Configuration tab advanced settings, see Adapter Advanced Settings.
Updated 7 months ago