
Managing Custom Fields
Use Custom Data Management to manage all custom fields in the system from one central location without viewing the details of a specific asset.
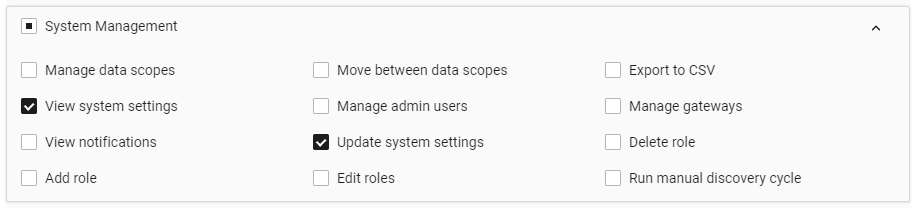
Only users assigned the View system settings and Update system settings permissions (default for admins) can manage custom fields.
Custom fields are supported for all asset types.
There are three types of custom fields:
- Single Value - Allows the user to enter a single value into the field.
- Single Select - Allows the user to select one value from a specified list of values.
- Multiple Values - Allows the user to enter multiple values into the field. This is a list field.
- Multiple Select - Allows users to select a number of values from a specified list of values.
To manage custom fields
- From the top right corner of any page, click
.png) , and in the Categories/Subcategories pane of the System Settings page that opens, expand Data, and select Custom Data Management. OR From the Manage Asset Custom Fields dialog, click the Manage Custom Fields button. The Custom Data Management page opens.
, and in the Categories/Subcategories pane of the System Settings page that opens, expand Data, and select Custom Data Management. OR From the Manage Asset Custom Fields dialog, click the Manage Custom Fields button. The Custom Data Management page opens.
Tip:
In Axonius New Navigation Experience access Custom Data Management from the Inventory menu under Inventory Tools.
.png)
The Custom Fields table shows all custom fields in the system that match the filter or search criteria, including all fields added to assets in their details page and fields added by Enforcement Actions.
The following information is included for each field:
- Field Name - The name of the field.
- Field Type - The type of field. Single Value, Single Select, Multiple Select, or Multiple Values.
- Value Type - The type of data the field accepts. String, Date, Float, Integer, or Boolean.
- Asset Type - The asset type to which the field applies.
- Affected Assets - The number of affected assets for which the field has values. Click the number of Affected Assets to see a list of assets with their details.
- Field Values - The values assigned to the field. Values appear when the custom field is assigned to assets.
By default, the table includes all fields - those with and without affected assets. To see a list of fields only with no affected assets, toggle on Show fields with no Affected Assets. The list updates automatically every hour. The Last updated field indicates the date and time that the list was last updated.
Refreshing the Table
The table updates automatically every hour or when you create a new custom field from the Custom Data Management page. Click Refresh  to manually update the table at any time.
.png)
Adding a Custom Field
You can add as many custom fields as required.
To add a custom field
-
In the upper-right corner of the Custom Fields table, click + Add Custom Field.
-
In Enter Field Name, type a name for the field.
-
In Field Type, select a data type.
-
In Value Type, select from the available options. Options change depending on the field type. Options may include: Boolean, Float, Integer, Date, or String.
Note About Float Custom Fields
For float custom fields, you can control how many digits are displayed after the decimal point across the Axonius system. The default number of digits is 2, but you can set it to be between 1 and 9. For example, if you set the number to 4, a field value such as
98.123456will be displayed as98.1234.To set the number of digits to display after the decimal point:
- Navigate to System Settings → GUI → UI.
- Scroll down to the following setting: Set the number of digits to show after the decimal for custom float fields.
- Enter a number between 1 and 9.
- Click Save.
-
In Asset Type, select the asset category.
-
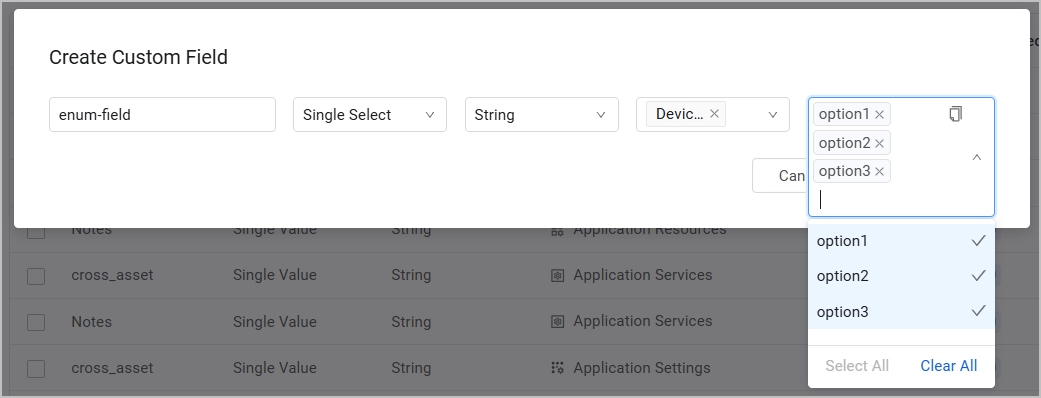
When you create a Single Select or Multiple Select field, in the right-hand dropdown, enter potential values to select from. To add a value, type comma(,), semicolon (;), or press Enter after the previous value. You can enter as many values as needed, but you must enter at least two values. You can also paste a list of multiple values from an external source, separated by commas, semicolons, or rows, into the values dropdown. To delete a value, hover over the value and click the X icon, or, from the dropdown list of values displayed below, hover over the value and click the V icon. You can also delete all values by selecting Clear All.
Note
Newly created custom Single Select values cannot include a comma(,) or semicolon (;) in the string.
- Click Create Field. The system confirms that the Custom Field was created The table automatically refreshes and is updated with the newly added custom field. You can toggle on Show fields with no Affected Assets to filter the table to show only those fields with no affected assets, which includes the newly added custom field.
Note
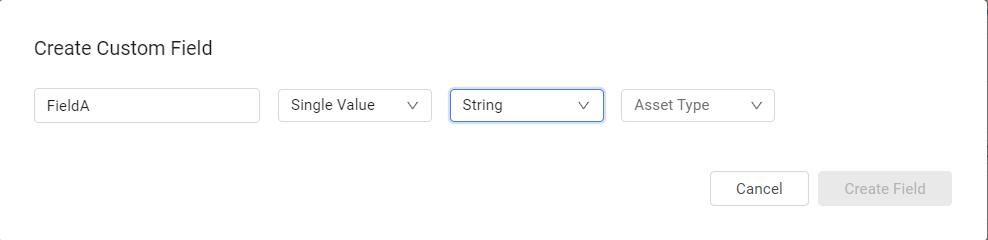
The Create Field button is grayed out (i.e., disabled) until all details of the new custom field are filled in. In the example below, the Asset Type has not yet been chosen, and therefore the Create Field button is grayed out.
Copying Single and Multiple Select Field Values
To copy the list of values you entered for a custom Single/Mulitple Select field, click the Copy selected tags icon  . Then, you can paste the list of values elsewhere.
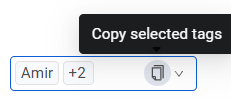
Filtering and Searching for Custom Fields
Use the filter bar at the top of the page to select criteria to filter the Custom Fields table. The table can be filtered by:
- Field Type.
- Value Type.
- Asset Type - Displays custom fields relevant for the selected asset type.
-
From the Asset Type dropdown, select one or more asset types to return the custom fields that apply to these asset types. For example: Users, Application Settings, Devices, Tickets. The assets in the dropdown are listed according to asset category (as on the Assets page). In addition, you can to type and search to easily locate ithe asset type required.
-
You can also search the table according to Field Name, Field Type, or Asset Type by entering a search string in the Search field. This table is updated as soon as filter criteria are selected or a search string entered.
Click the column headers to sort the table.
Exporting the List of Custom Fields to CSV
You can export the list of custom fields to a CSV file. Only the currently listed items are exported.
To export the list of custom fields
- Click Export CSV. The file is generated and downloaded to the local computer.
Performing Actions on Custom Fields
Editing a Single/Multiple Select Custom Field
From the Custom Fields table, you can edit one or more values of an existing Single/Multiple Select custom field. This means that you can edit the custom field's list of values by doing any of the following:
- Modifying existing value(s).
- Adding value(s).
- Deleting value(s).
Note
You can never change the Field Type or Value Type of an existing field.
To edit Single/Multiple Select custom field values
- In the Custom Fields table, optionally filter the table to show only Single or Multiple Select custom fields.
- Hover over a Single or Multiple Select custom field.
- Select Edit. The Edit Custom Field dialog opens with the list of values open.
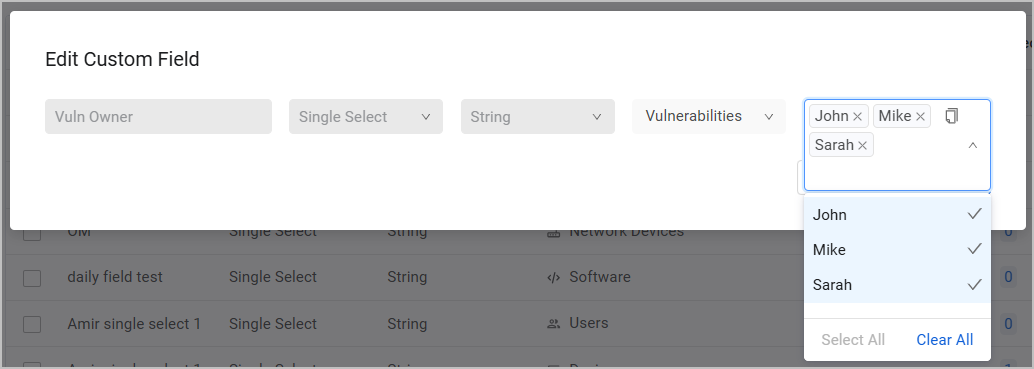
- From here, hover over a value to delete it or add new values as explained in Adding a Custom Field.
- Click Save. The list is updated to reflect the changes. Note that you can only save your changes if there are at list two values entered.
Notes:
Changing the values of fields in the Custom Data Management table only changes the values available to the users when selecting this field on the asset from this point onward. It does not change the values already configured on the assets themselves.
From the Custom Fields table, you can only edit the values of a Single or Multiple Select custom field. You can edit Single Value and Multiple Values custom fields from the assets page, as described in Working with Custom Data.
Renaming a Custom Field
From the Custom Data Management table, you can rename a single custom field and repeat for each custom field that you want to rename. The new name appears wherever the field is used, affecting all assets with that custom field.
To rename a custom field
- In the Custom Data Management table, hover over a custom field and click the Actions button at the right side of the row.
- Select Rename. The Rename Field dialog opens.
- Enter a new name for the field.
- Click Save Changes. To see the changes, you may need to click the Refresh Data
 icon.
icon.
Deleting Custom Fields
From the Custom Data Management table, you can delete one or more custom fields. The deleted fields are removed from all affected assets.
To delete a custom field
- In the Custom Data Management table, hover over one custom field or select multiple custom fields.
- Click Delete just above the table. You can also select all records on the page (mark the top left checkbox) or in the table (Select All), or clear your entire selection (Clear All). The system asks you to confirm the deletion.
- Click Delete Fields. The selected custom fields are completely deleted from the system. This cannot be undone.
Updated 18 days ago