
Managing Roles
Implement Axonius Role Based Access Control (RBAC) by creating roles. Use the Roles page to create and manage roles.
A role is a predefined set of permissions. Each user is assigned to a specific role. This means that any changes to the role permissions affect all the users to whom the role is assigned.
To manage Roles:
- From the top right corner of any page, click
 . The System Settings page opens.
 - In the Categories/Subcategories pane of the System Settings page, expand User and Role Management, and select Roles.
You can export the roles and related permissions to a CSV file.
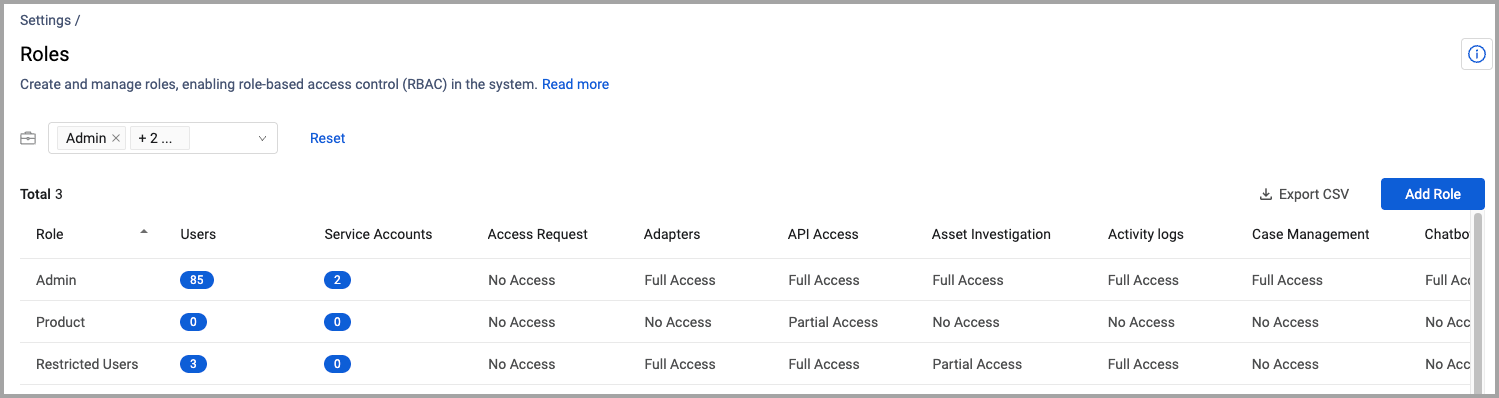
The Roles page displays the following:
- Roles - the list of defined Axonius roles.
Axonius includes the following default system roles:- Admin - A user with maximum permissions for all Axonius platform and product pages and capabilities.
- Viewer - A user with 'View' permissions for all Axonius platform and product pages, and who has no access to the System Settings (including user management).
- Restricted - A user who can view only the Dashboards page, and who has no access to all other pages and capabilities.
- No Access - A user with no permissions.
In addition, all roles the admin defined appear here.
Note
- System roles cannot be edited.
- A system role can be duplicated and configured by a user who has the required set of permissions.
-
Users - The number of users in the system with that role. This does not include Service Accounts. Click on a number to open the Asset Profile page and display a list of users with that role.
-
Service Accounts - The number of Service Accounts this role can access. Click the blue number to view the Service Accounts page filtered on this role.
-
Roles categories and permissions levels - A role consists of multiple categories. Each category consists of a different set of permissions.
- The Permissions List describes the permission and behavior for each category and permission.
- Each category is summarized to one of the following levels:
- No Access - None of the permissions within the category are enabled.
- Partial Access - Some of permissions within the category are enabled.
- Full Access - All of permissions within the category are enabled.
Notes
All logged-in Axonius users can view certain basic information regardless of their associated roles. This includes the names of Adapters, any Adapter Labels, and the names of Axonius nodes.
All changes to roles are recorded in the Activity Log.
Find All Users with a Specific Role
You can find all users with a specific role.
-
In the Role table, click on the Role drop down box. All existing roles are displayed, both the system roles and the user configured roles. This does not include service accounts.
.png)
-
You can select one or more roles. Each selected role is represented by a chip in the search box.
- Click Clear All to clear all of your selections. Click Reset to clear the search.
Defining Basic Query Mode Fields per Role
Note
This option is only available for administrators.
Use the Roles setting page to define default query fields (filters) for each asset type based on user roles. These fields appear by default in Basic Query Mode on each Assets page.
-
Hover over a role row and click Edit Basic Query Fields from the top right corner.

-
In the dialog that opens:
- Select the Module, that is, the asset type: Devices, Users, Vulnerabilities, etc.
- Select the Basic Mode Fields for this module. The default fields are displayed. You can add and remove fields by clicking them.
- Click
+to add settings for more modules. There is no limit on the number of modules or the number of fields to set per role.
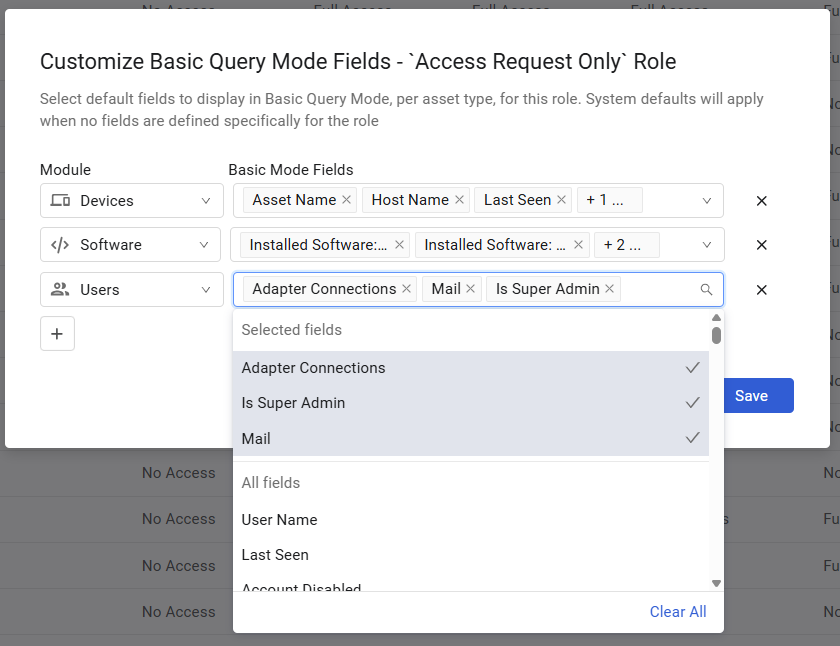
- Click Save.
- A column titled Custom Basic Query Fields is added to the Roles table. When hovering over it, it displays the asset types (modules) for which you defined default fields.
- To edit the settings, click View All Results or click the Edit Basic Query Fields button again. You can edit the settings at any time.

When no role-specific fields are set, the Axonius system default fields apply to the Basic query mode. However, users can override both system and role-based defaults by creating their own default filters directly from the Assets page.
Adding a New Role
You add a new role using the New Role drawer. Role categories are in the left pane. Sub-categories and specific permissions are displayed in the right pane.
- To view all available permissions for both platform capabilities and asset types, click All Permissions in the left pane.
- To view permissions for specific capabilities, click Platform Capabilities or expand it and select a category.
- Click Asset Types or expand it to select permissions to specific asset types. Asset types are sorted as they appear on the Axonius Assets page.
- Use the search fields in each pane to search by category/asset or permission name. When a specific category is selected, the search on the right page returns only matches from the selected category.
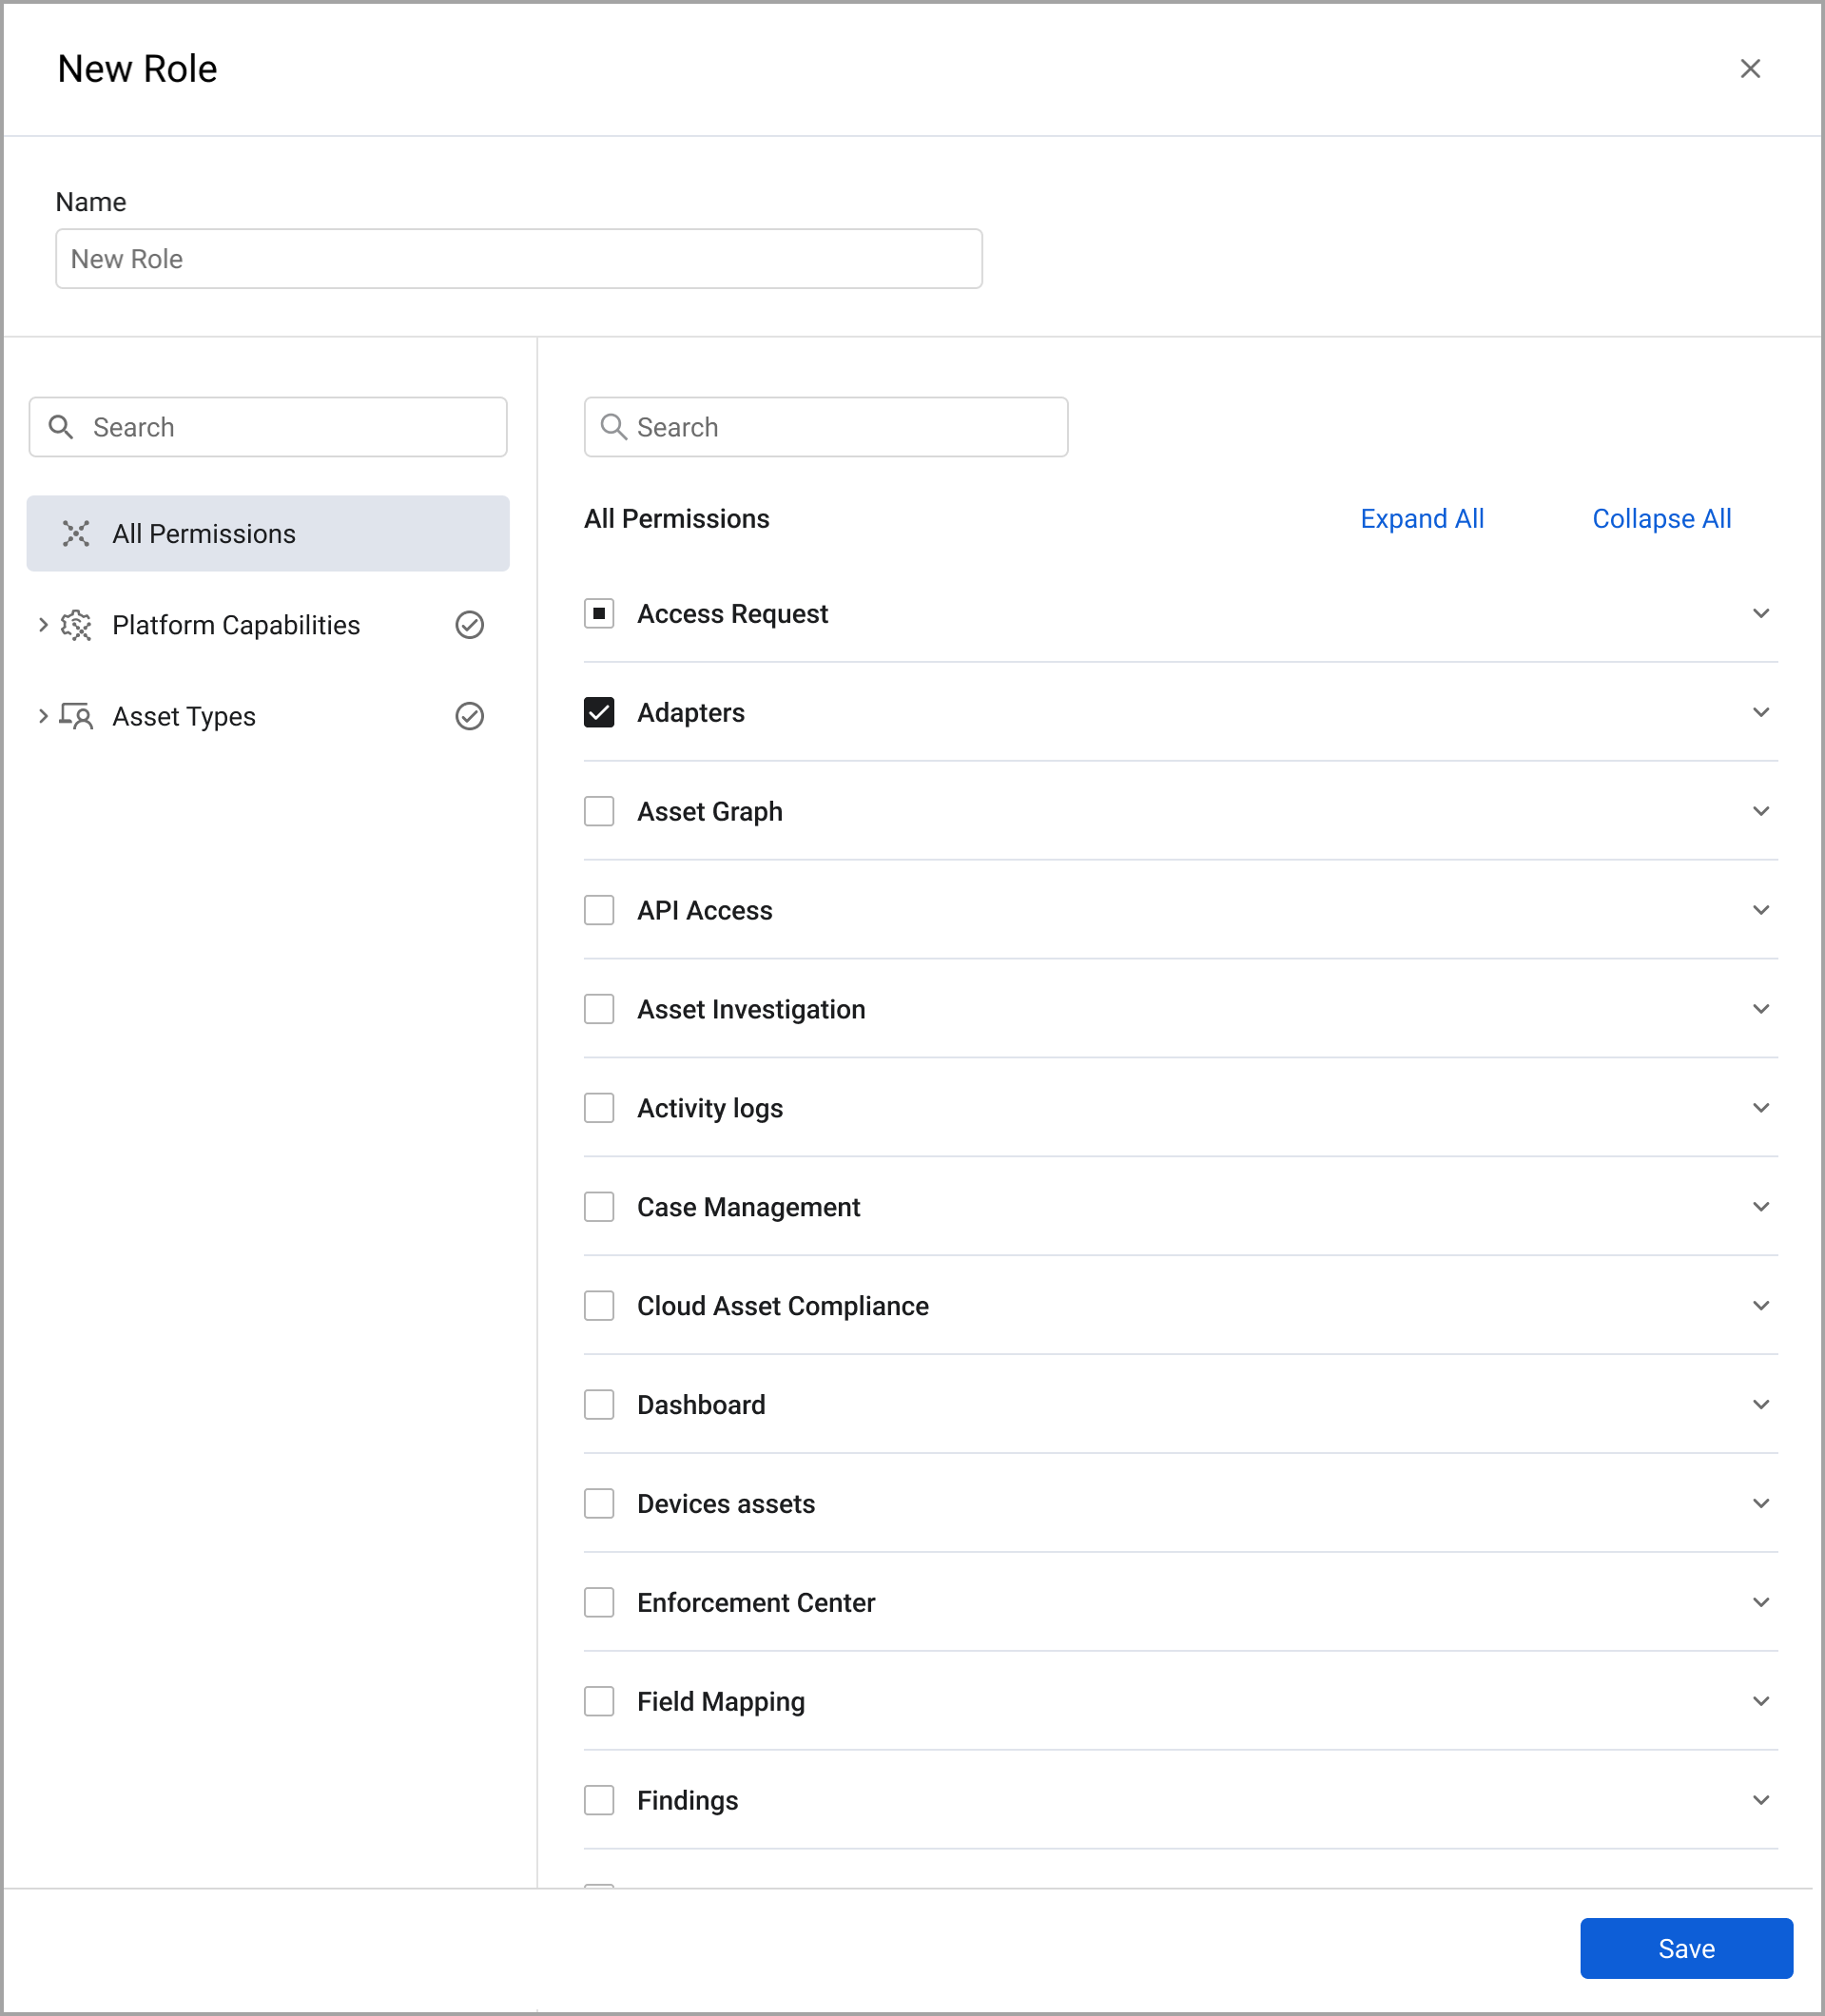
To add a new role:
-
From the Roles page, click Add Role.
-
The New Role drawer opens. Permission categories are listed in the left pane and details are in the right pane. Some categories also appear in the right pane and can be expanded.
Note
The following permissions are selected by default when creating a new role:
- API access enabled
- Add and edit private dashboards
- View dashboard
You can deselect them if they are not appropriate for the role you are creating.
-
In Name, provide a name for the role.
-
Select the permissions you want to assign to the selected role.
Important
Assigning a user with a role that provides permissions to both add and edit users and roles will allow that user to create any user type with any permission level.
-
Click Save. The new role is added to the Roles table.
Note
If you are using an Identity Provider Login, for example SAML, any user logging in for the first time will be automatically added to the users list and assigned a role based on the configured role assignment rules. For details, see Identity Provider Settings.
Duplicating an Existing Role
To duplicate an existing role:
- From the Roles page, click the role you want to duplicate; the New Role drawer opens.
- On the right side of the drawer, click the duplicate (
(700).png) ) icon.
) icon. - Change the permission name or desired permissions.
- Click Save.
Updating an Existing Role
- From the Roles page, click the role you want to update; the Manage Role drawer opens.
- On the right side of the drawer click the edit (
(696).png) ) icon.
) icon. - Change the permission name or desired permissions.
- Click Save.
Note
Changing the role permissions affects all users. A notification is displayed when the update is successful.
When the following fields are updated with new values, the user is logged out:
- Edit password
- Edit main data scope
- Edit “allow to move between DS”
Deleting an Existing Role
- From the Roles page, click the role you want to delete; the Manage Role drawer opens.
- On the right side of the drawer, click the Delete (
(695).png) ) icon.
) icon.
Note
A Role can be deleted only if it is not assigned to any user.
Default system roles cannot be deleted.
For general information about working with tables, refer to Working with Tables.
Updated 6 months ago