
Configuring Retention Settings
Use historical snapshots to save historical collected data. Use this page to define how often, and how far back historical data is saved on your system.
To open the Retention Settings:
- From the top right corner of any page, click
.png) . The System Settings page opens.
. The System Settings page opens. - In the Categories/Subcategories pane of the System Settings page, expand Lifecycle, and select Retention.
Setting Historical Snapshot Scheduling
- Enable scheduled historical snapshot (required, default: switched on)
- Toggle on so that Axonius saves historical collected data. This data can be used in the dashboard and in the assets pages to show insights on historical data.
- Toggle off so that Axonius does not save historical collected data.
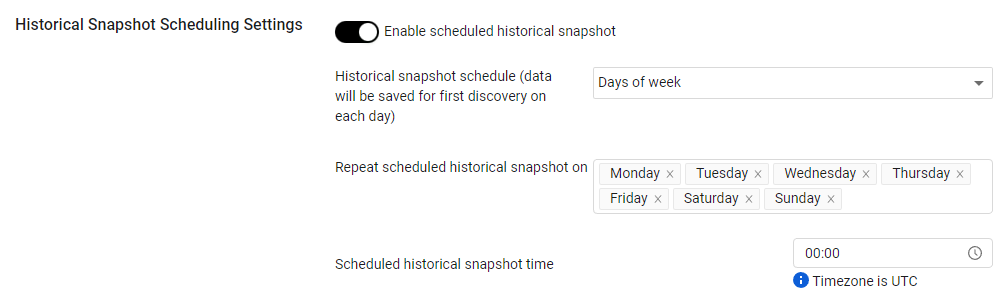
Once switched on, specify the following parameters:
* **Historical snapshot schedule (data will be saved for first discovery on each day)** *(required, default: Every global discovery cycle)* - Select the historical snapshot schedule option:
* **Every global discovery cycle** - When this option is selected, historical snapshot data is saved as part of every discovery cycle. Note
Historical snapshot data is saved only for the first discovery cycle on each calendar day based on the UTC clock.
- Every x days - When this option is selected:
* Historical snapshot data is saved at the time specified in Scheduled historical snapshot time every number of days defined in Repeat scheduled historical snapshot every (days). Note that the time set here is in UTC.
The start time is determined based on the specified value, starting the 1st of each month. For example, if the specified value is 10, the historical snapshot data is saved on the 1st, 11th, 21st, 31st (if exists), 1st, 11th, etc. The first start time is the closest interval. For example, If the specified value is 10, and the configuration was saved on the 12th, the next time that the historical snapshot data is saved will be on the 21st. The maximum possible interval is 30.
Historical snapshot data is not saved as part of any discovery cycle. Days of week - When this option is selected:
* Historical snapshot data is saved at the time specified in Scheduled historical snapshot time in the selected days of week specified in Repeat scheduled historical snapshot on.
* Historical snapshot data is not saved as part of any discovery cycle.
Historical Snapshot Retention Settings
Note
Configure the settings in this section, only if Enable scheduled historical snapshot is switched on.
Use historical snapshots to save historical collected data. You can set a retention period that defines the number of days for which historical data will be kept.
In addition you can use the snapshot settings to set rules to control the way historical data is retained. These rules define how many snapshots to keep or delete for set time periods. This helps conserve disk space and allows you to save reduced amounts of data for a longer period of time.

-
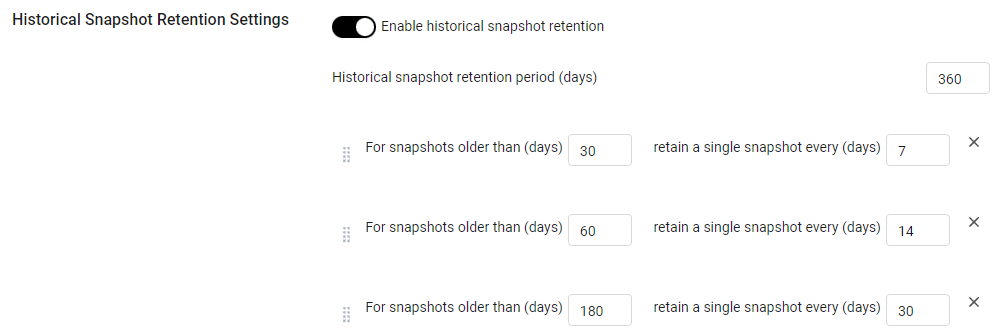
Enable historical snapshot retention (required, default: switched on) - Select this checkbox to enable historical data retention.
Once enabled, specify the following parameters:
- Historical snapshot retention period (days) (required, default: Customer-hosted 180 days, Axonius-hosted (SaaS) 90 days) - Specify the number of days for which the historical data will be kept. Any historical data which is older than the number of days specified, will be deleted.
Warning
Once you delete snapshot data this means the data from the time periods defined is deleted everywhere in the Axonius system. This includes Dashboard charts that use historical data and Reports that display historical data.
Setting Rules

Use the Rules button (optional) to set snapshot retention rules.
Set rules as follows:
-
Click the add button to add a new rule; the snapshot definition fields are displayed.
-
Specify the parameters for:
-
Snapshot Age - **If the snapshot is older than (days)** -
Frequency - **retain a single snapshot every (days)**
-
-
Use Add
.png) to add rules, for instance to define rules for older snapshots. You can add up to five rules.
to add rules, for instance to define rules for older snapshots. You can add up to five rules.
-
Once you apply the rule, the system finds all snapshots older than the age defined and keeps a single snapshot every retention period.
-
Snapshot retention is active until the day defined in the historical snapshot retention period, so if you define that you’re saving historical snapshots for 180 days, the rules you create apply to data up to 180 days back.
For example:
You can define rules:-
Retain data up to 180 days. -
When the snapshot is older than 30 days, retain 1 snapshot every 7 days.
With this rule, there will be 30 snapshots for 30 days, and from day 30 only one snapshot will be retained every week. Day 30 is saved, and when the six following days become 30 days old, they are erased.
When the snapshot is older than 60 days, the system retains 1 snapshot every 30 days. Therefore, from day 60 only one snapshot is retained every month. -
- Click Save on the Lifecycle Settings page to save your settings.
Deleting rules
- Click X to delete a rule,
Historical Snapshot Data Settings
Note
Configure the settings in this section, only if Enable scheduled historical snapshot is switched on.

- Save entity advanced view data (required, default: False) -
- Select this option to save entities advanced view data (the raw data fetched from the adapter connection source) as part of the historical collected data.
- Clear this option to exclude advanced view data of all entities from the saved historical collected data.
- Always override earlier daily snapshot data, when snapshot data is taken more than once a day. - Set the system to override snapshot data from earlier in the day with the latest snapshot data from that day, for systems that run a discovery cycle more than once a day,
Updated 9 months ago