
Deploying the Azure Adapter
To deploy the Azure Adapter, perform the following steps:
1. Create Azure credentials with the appropriate permissions
Note:
If you already have an Application registered for Axonius, you do not need to create a new one. You can reuse the existing application and add the required additional permissions.
1.1 Register the Application in Entra ID
Follow the steps below:
Prerequisites
-
Log in to the Azure Portal with an administrator account.
-
In the App registrations click on New registration.
-
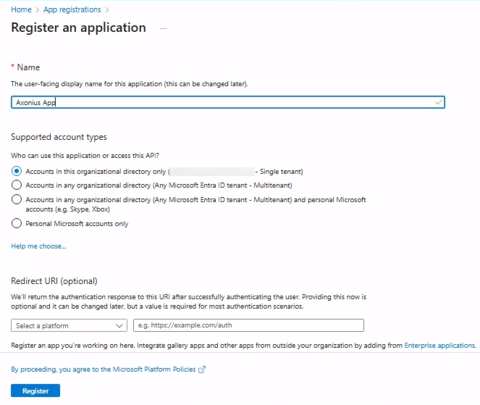
Fill in the details:
a. Enter the name
Axonius Appfor the application.
b. Select Single tenant as the supported account type. -
Click Register to create the application.
-
After you have created the app, the Application (client) ID and Directory (tenant) ID values are displayed. Copy these values to use when you configure the adapter in Axonius.

-
Assign Directory Permissions (Entra ID)
a. Go to Microsoft Entra ID and select Enterprise applications.
b. Select the application you created.
c. Navigate to Roles and administrators.
d. Assign the Directory Reader role to the application.
1.2 Authentication Methods
Axonius supports the following authentication methods for connecting to Microsoft Azure adapter:
Enterprise Application (Client ID / Client Secret)
-
Create a Client Secret
a. Open the application you registered.
b. Within the app registration, navigate to Certificates & secrets, then go to Client secrets and select New client secret.
c. Choose an expiration period for the client secret.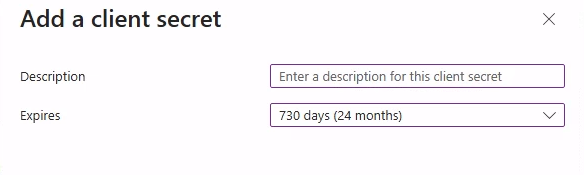
d. Click Add and copy the Client Secret Value to use when you configure the adapter in Axonius. Note that you cannot view it again once you leave the page.
-
Assign Required Roles
Assign the Reader role at either the Management Group level (recommended) or the Subscription level. Management Group is recommended to prevent blank spots.
Option 1: Management Group Level (Recommended)
a. Navigate to Management Groups.
b. Select the Management Group that contains the subscriptions to be scanned.
c. Open Access control (IAM).
d. Click Add, then select Add role assignment.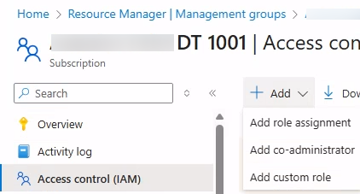
e. Assign the Reader role to the Enterprise Application.
Option 2: Subscription Level
a. Navigate to Subscriptions.
b. Select the subscription to be scanned.
c. Open Access control (IAM).
d. Click Add, then select Add role assignment.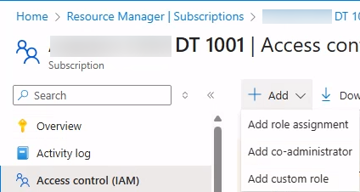
e. Assign the Reader role to the Enterprise Application.
Enterprise Application (Certificate)
-
Upload a Certificate
a. Open the application you registered.
b. In the app registration, navigate to Certificates & secrets, then go to Certificates and select Upload certificate.
c. Upload your public certificate file (.cer,.pem, or.crt).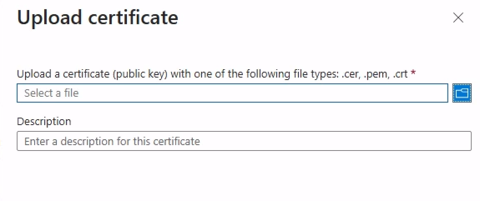
d. The certificate’s thumbprint will be used as the authentication key for the adapter.
-
Assign Required Roles
Assign the Reader role at either the Management Group level (recommended) or the Subscription level, depending on your required scope.
Option 1: Management Group Level (Recommended)
b. Navigate to Management Groups.
c. Select the Management Group that contains the subscriptions to be scanned.
d. Open Access control (IAM).
e. Click Add, then select Add role assignment.f. Assign the Reader role to the Enterprise Application.
Option 2: Subscription Level
a. Navigate to Subscriptions.
b. Select the subscription to be scanned.
c. Open Access control (IAM).
d. Click Add, then select Add role assignment.e. Assign the Reader role to the Enterprise Application.
Service-Specific Permissions
Keys & Certificates from Key Vaults
To fetch certificates or keys from Key Vaults (optional):
-
In the Azure Portal search and select Key Vaults.
-
Select the Key Vault you want Axonius to access.
-
In the Key Vault menu, go to Access control (IAM), click Add, and select Add role assignment.
To assign role:
a. Certificates: Select the Key Vault Certificates Reader role and assign it to the Enterprise Application created for Axonius.
b. Keys: Select the Key Vault Crypto Officer role and assign it to the Enterprise Application created for Axonius. -
Click Review + assign to finalize each role assignment.
2. Set up the Azure adapter in Axonius
Create the Adapter connection in Axonius. Based on the authentication method, fill out the specific fields, and configure optional settings.
Add a New Connection
-
Navigate to the Adapters page and search for
Azurethen click on the adapter tile.
-
On the top right side, click on Add Connection.
-
The Add Connection drawer opens.
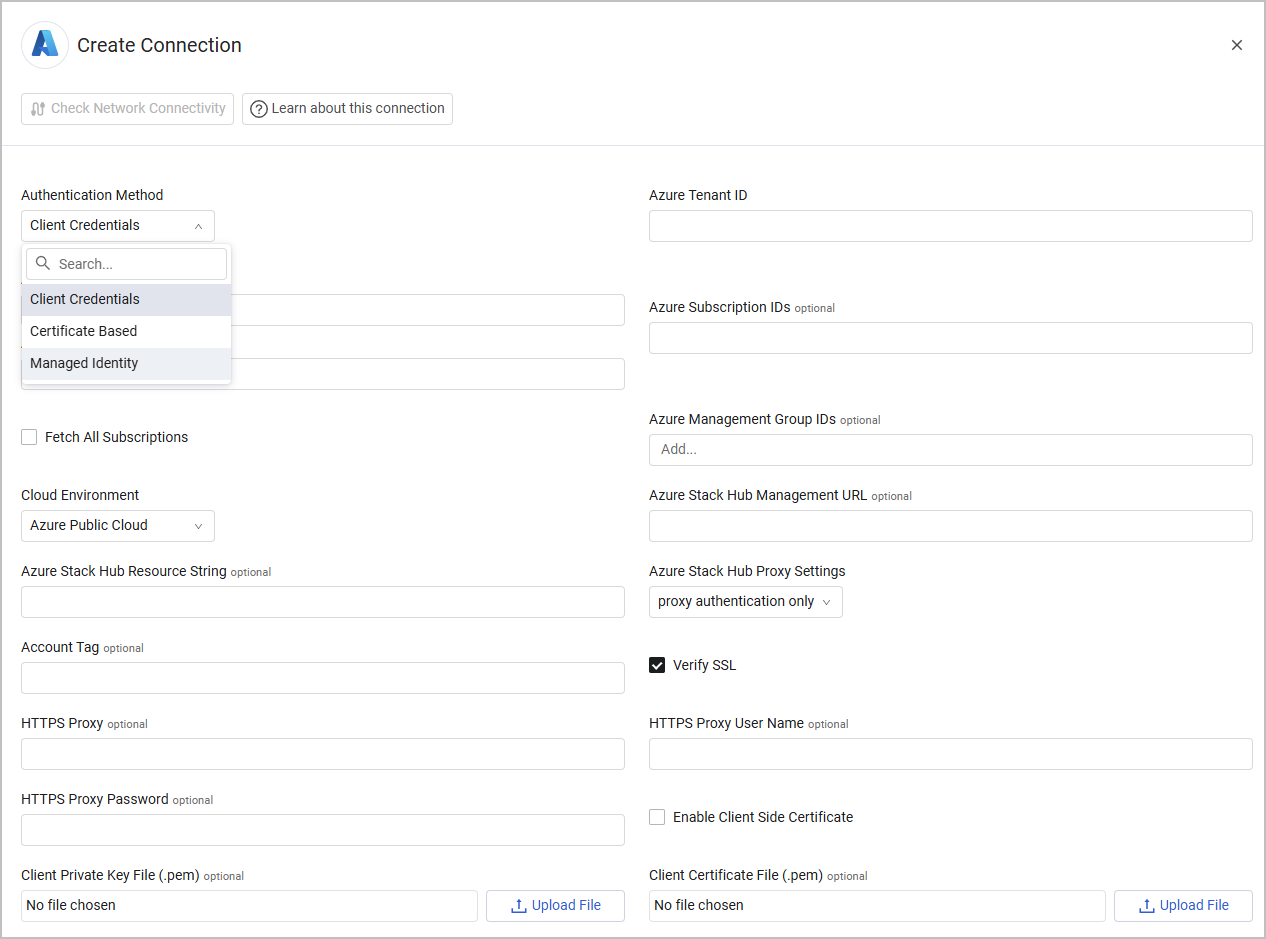
Required Fields
- Azure Client ID – The Application ID of the Axonius application.
- Azure Tenant ID – The ID for Microsoft Entra ID.
- Connection Label – Name to identify this adapter connection.
- Azure Subscription IDs / Fetch All Subscriptions – Either provide a comma-separated list of subscription IDs or select Fetch All Subscriptions to fetch data from all subscriptions in the tenant. One of these options is required.
- Authentication Methods
- Azure Client Secret – Specify a non-expired key generated from the new client secret.
- Certificate File – Upload a public certificate used for authentication
- Enable Certificate-Based Authentication - Enable this so that Axonius can use certificate-based authentication on Microsoft required APIs.
- Click Upload file next to Private Key File to upload an Azure private key file in PEM format.
- Private Key Password (optional) - This is required only if the private key file is password-protected.
- Click Upload file next to Certificate File to upload an Azure public key file in PEM format.
Use this method to run your Axonius instance on Azure virtual machines with managed identities to authenticate without storing client secrets or certificates. To use this method, ensure of the following:
- Axonius is running on an Azure VM with a managed identity configured.
- The managed identity has appropriate permissions to access Azure resources and Azure AD.
- The Azure Tenant ID is configured correctly.
The required parameters are:
- Azure Tenant ID
- Azure Client ID - Mandatory only if you're using a User-assigned managed identity. If you're using a System-assigned managed identity (Automatically created and tied to the Azure VM), leave this field empty.
Optional Fields
Expand/Collapse
- Azure Management Group IDs - Enter the Azure management group IDs associated with the subscriptions you want to fetch data from. The adapter will fetch data only from the subscriptions with the specified management groups.
- Cloud Environment – Select Microsoft Azure cloud environment type.
- Azure Stack Hub Management URL and Azure Stack Hub Resource String - Specify the hostname or IP address of the Microsoft Azure Stack Hub server (a Microsoft Azure on-premises server) and the URL for the Azure Stack Hub Resource String.
- If supplied, Axonius will authenticate to the Microsoft Azure cloud server, and will fetch asset data from the Microsoft Azure Stack Hub server. Axonius will not fetch any asset data from Microsoft Azure cloud server.
- If not supplied, Axonius will authenticate to the Microsoft Azure cloud server, and will fetch asset data from the Microsoft Azure cloud server. Axonius will not fetch any asset data from Microsoft Azure Stack Hub server.
- Azure Stack Hub Proxy Settings (default: Do not use proxy) - Select one of the following proxy options:
- Do not use proxy - Axonius will not use a proxy to authenticate to the Microsoft Azure cloud server and will not use a proxy to fetch asset data from the Microsoft Azure Stack Hub server.
- Proxy authentication only - Axonius will only use the proxy specified in the HTTPS Proxy field to authenticate to the Microsoft Azure cloud server.
- Proxy Azure Stack Hub only - Axonius will only use the proxy specified in the HTTPS Proxy field to fetch asset data from the Microsoft Azure Stack Hub server.
- Proxy all - Axonius will use the proxy specified in the HTTPS Proxy field to authenticate to the Microsoft Azure cloud server and also to fetch asset data from the Microsoft Azure Stack Hub server.
- Account Tag - Tag for the Azure Cloud instance ("nickname").
- If supplied, Axonius will tag all devices fetched from this adapter connection.
- If not supplied, Axonius will not tag any of the devices fetched from this adapter connection.
- Verify SSL – Select whether to verify the SSL certificate of the server against the CA database inside of Axonius. For more details, see SSL Trust & CA Settings.
- HTTPS Proxy – A proxy to use when connecting to the selected Azure cloud environment.
- HTTPS Proxy User Name and Password – The user name and password to use when connecting to the selected Microsoft Azure cloud environment via the value supplied in HTTPS Proxy.
- Enable Client Side Certificate – Use certificate-based authentication instead of a client secret.
- Client Private Key File – Upload the private key (.pem) used for certificate-based authentication.
- Client Certificate File (.pem) – Upload the public certificate file (.pem) used for certificate-based authentication.
- Notes – Add a note of up to 250 characters for this adapter connection.
- Select Gateway – Select the Axonius Gateway to use when connecting adapters whose sources are only accessible by an internal network. To use this option, you need to set up an Axonius Gateway.
3. (Optional) Configure Advanced Settings
Refer to Azure Advanced Settings.
Updated 24 days ago