
Viewing and Editing Workflows
Workflows begin with a triggering Event or Action, followed by various routes and sub-routes composed of Actions, Action Conditions, Events, and Event Conditions. This document explains how to view, adjust, rename, and edit workflows.
Opening a Workflow
From the Workflows page, you can open a Workflow in the same or in a new tab. When you open it in the same tab, you can use the Back arrow to return to the Workflows page.
To open a workflow
- In the Workflows table, do one of the following:
- Open in the same tab: Click the Workflow that you want to view.
- Open in a new tab.
The Workflow canvas appears in the left pane and the configuration of the triggering event/action is displayed in the right pane.
Viewing Workflow Components
You can view the configuration of any node within the Workflow canvas.
To view the configuration of a Workflow component
- In the Workflow canvas, click the desired node. The node's configuration opens in the right pane.
To learn more about each of the Workflow components, refer to its relevant page.
Adjusting the Workflow View
You can move the workflow within the page to position it how you want and you can zoom into it to focus on specific parts of the workflow.
Make use of the icons on the bottom left of the Workflow pane to get the optimal view.
.png)
-
Pan: Click and drag within the empty space of the left pane in the direction that you want to move the Workflow.
-
Fit View: Click the Fit View icon
 to display the entire workflow.
 -
Zoom In/Out: Repeatedly click the Zoom in icon
 and Zoom out icon
  to adjust magnification.
Resizing the Panes
Drag the divider between the left and right panes to resize them and optimize the view of components in the left pane or fields in the right pane. Resizing is temporary and reverts to the default layout when you leave this view.
Renaming a Workflow
You can rename a workflow with a unique name.
To rename a workflow
- In the Workflows table,open the desired Workflow.
- In the left pane, click the Workflow Settings icon
 next to the workflow name.
 - In the Workflow Settings pane that opens, enter a new Workflow name. The new name appears in the Workflow pane.
- Click Save, Save and Activate (for Event-triggered workflows), or Save and Run (for Action-triggered Workflows).
Editing a Workflow
From the canvas of a selected workflow, you can modify a workflow by adding, deleting, replacing, or editing its components.
To edit a Workflow
- In the Workflows table,open the Workflow that you want to edit.
- In the canvas of the selected Workflow, do any of the following:
- Delete an action from the workflow.
- Delete an Event or Condition from the workflow.
- Replace an Event.
- Replace an Action.
- Modify an action's settings.
- Modify an event's conditions.
- Modify the timeout of an Event.
- Modify an action's conditions.
- Add a component to the workflow - Hover over the
+icon under the workflow component where you want to add the component, to reveal the components that you can add. For information on how to configure the added component, refer to the relevant section in Creating Workflows.
- Click Save, Save and Activate (for Event-triggered workflows), or Save and Run (for Action-triggered workflows).
Deleting an Action from the Workflow
You can remove from a Workflow a single non-triggering action or a parent action and all its child nodes.
Note
You cannot delete an Action trigger from the Workflow.
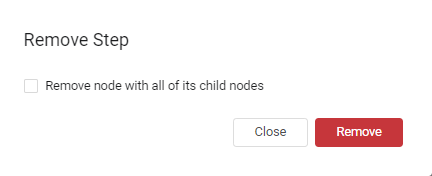
To delete an action (with or without its child nodes) from a workflow
-
In the Workflow, click the action that you want to delete, and in the header of the Action Setup pane for that action, click the Trashcan icon.
-
If the action that you want to delete has child nodes, in the Remove Step confirmation dialog that opens, you are given the option to choose one of the following:
- Clear the Remove node with all of its child nodes checkbox to remove this action only.
- Select the Remove node with all of its child nodes checkbox to remove this action and the entire workflow below this action.
-
Click Remove.
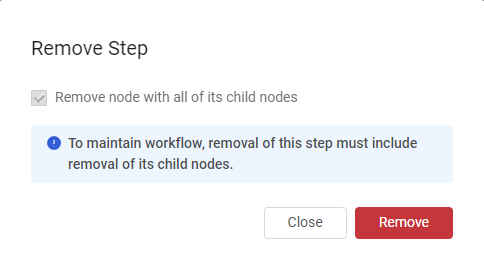
Deleting an Event or Condition from the Workflow
You can remove from a workflow an event, event condition, or action condition.
Note
You cannot delete an Event trigger.
To maintain the workflow, removal of this step always includes removal of its child nodes.
To delete an event (non-triggering), event condition, or action condition from a workflow
- In the workflow, click the event, event condition, or action condition that you want to delete, and in the header of the Event or Event Conditions pane for that event / event condition / action condition, click the Trashcan icon.
- In the Remove Step confirmation dialog that opens, click Remove. The selected component and all its child nodes are removed from the workflow.
Replacing an Event
You can replace an event in the workflow with another event.
To replace an event in the workflow
- In the workflow, click the event that you want to replace.
- Click the Replace Event icon
 .
. - From the available events that are displayed in the Event pane,select another event..
Modifying Event Timeout Settings
In a non-triggering event, you can disable or enable timeout settings or modify its timeout settings.
Note
A triggering event does not have Timeout settings.
To enable/disable an event's timeout settings
- In the workflow, click the event for which you want to enable/disable timeout settings.
- Modify the event's timeout settings..
Replacing an Action
You can replace an action in the workflow with another action.
To replace an action in the workflow
-
In the workflow, click the action that you want to replace.
-
In the Action Setup pane that opens with the action configuration, above the Action name, click

-
In the Select Action pane that opens, select another action and fill in its information.
Modifying Action Settings
You can modify the name or settings of an action in the workflow.
To modify the settings of an action in the workflow
- In the workflow, click the action that you want to modify.
- In the Action Setup pane that opens, modify the Action name and any other settings of the action.
Modifying Event Conditions
You can modify the conditions resulting from an event that determine which route to take in a workflow.
To modify event conditions
- Click an Event Condition box in the workflow.
- In the Event Conditions pane that opens, do any of the following:
- Modify an existing event condition: From the Select Field or Func dropdowns, select a different field or function, or in the textbox, type a different value.
- Add a new event condition..
- Delete an event condition by hovering on a condition and clicking the Remove Expression x to the right of the condition.
Modifying Action Conditions
You can modify an action condition by configuring it to check the outcome of the Action for success instead of failure, or vice versa.
To modify Action conditions
- Click inside an Action Conditions box in the workflow.
- In the Action Conditions pane that opens, change Success to Failure or change Failure to Success.
Updated 9 months ago