
LastPass
LastPass is a password manager that stores encrypted passwords online.
Types of Assets Fetched
This adapter fetches the following types of assets:
- Users
- SaaS data
Parameters
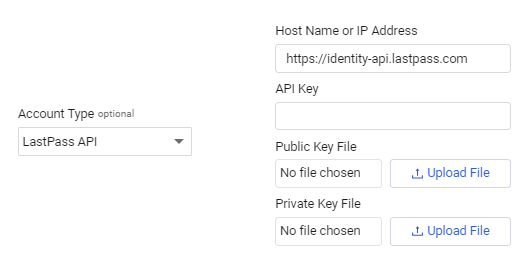
- Account Type (required, default: LastPass API) - Select the Account Type from the dropdown.
- If the Account Type selected is LastPass API, the following parameters are displayed:
- Host Name or IP Address (required, default:
https://identity-api.lastpass.com) - The hostname or IP address of the LastPass server that Axonius can communicate via the Required Ports. - API Key (required) - An API Key associated with a user account that has the Required Permissions to fetch assets.
- Public Key File and Private Key File (required) - Click Choose file to upload the Public key file and Private key file, used for authentication. For more information, refer to Generating Keys.
- Host Name or IP Address (required, default:
- If the Account Type selected is LastPass API, the following parameters are displayed:
-
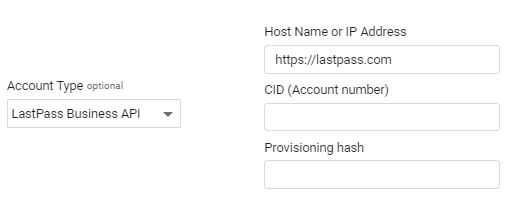
If the Account Type selected is LastPass Business API, the following parameters are displayed:
1. Host Name or IP Address (required, default:https://lastpass.com) - The hostname or IP address of the LastPass server that Axonius can communicate via the Required Ports.
2. CID (Account number) (required) - Specify the CID (account number) used to make requests to the LastPass Business API.
3. Provisioning hash (required) - Specify the provisioning hash used to make requests to the LastPass Business API.
To obtain the CID and provisioning hash, see Generating the CID and Provisioning Hash.
-
Username and Password (only used to fetch SaaS data) Credentials for an account dedicated to Axonius SaaS Applications to fetch SaaS data only.
-
2FA Secret Key (only used to fetch SaaS data) - The secret generated in the adapter for setting up 2-factor authentication for the adapter user created to collect SaaS data.
-
Verify SSL - Select to verify the SSL certificate offered by the value supplied in Host Name or IP Address. For more details, see SSL Trust & CA Settings.
-
HTTPS Proxy (optional, default: empty) - A proxy to use when connecting to the value supplied in Host Name or IP Address.
-
HTTPS Proxy User Name (optional, default: empty) - The user name to use when connecting to the value supplied in Host Name or IP Address via the value supplied in HTTPS Proxy.
-
HTTPS Proxy Password (optional, default: empty) - The password to use when connecting to the value supplied in Host Name or IP Address via the value supplied in HTTPS Proxy.
-
For details on the common adapter connection parameters and buttons, see Adding a New Adapter Connection.

Advanced Settings
Note
Advanced settings can either apply for all connections for this adapter, or you can set different advanced settings and/or different scheduling for a specific connection, refer to Advanced Configuration for Adapters.
- Fetch only Enabled Accounts - Select whether to only fetch accounts that are enabled.
Note
To learn more about Adapter Configuration tab advanced settings, see Adapter Advanced Settings.
APIs
Axonius integrates with APIs for LastPass Personal and LastPass Business accounts.
- If you have a LastPass Personal account, you can use the legacy LastPass Plain Auth API.
- If you have a LastPass Business account, use the LastPass Business API.
Required Ports
Axonius must be able to communicate with the value supplied in Host Name or IP Address via the following ports:
- TCP port 443
Required Permissions
The value supplied in API Key must be associated with credentials that have permissions to fetch assets.
Adapter Integration Setup
Generating Keys
For LastPass API authenication using Axonius CyberSecurity Asset Management
To generate key files
- Navigate to the LastPass Portal LastPass Portal.
- From the left pane, select Advanced Options.
- From the submenu, select Keys. The Keys Management page is displayed.
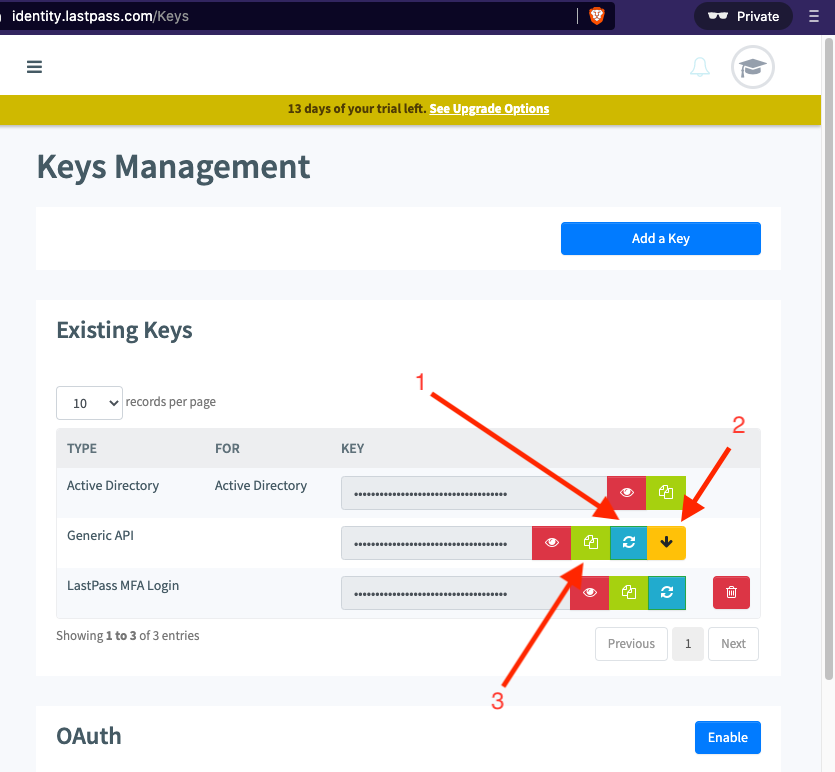
- Under Existing Keys, from the Generic API row, click Refresh (1). When requested to download public-key.cer, save this file to your system.
- Click the yellow Download (2) button. When requested to save the private-key.cer, save this file to your system.
- Click the green Copy (3) button to copy the API key.
Step 1: Create a staged user account
Relevant only to Axonius SaaS Applications. Write permissions are needed to fetch SaaS data
- Login into LastPass as an administrator and navigate to Admin Console
>Users. - Click on Add User. In the opened side panel do the following:
- Select Stage: Add to company without sending activation email
- Enter an email address that you have credentials for.
Note
Copy the email address, that is required for the Username adapter configuration parameter.
- Click on Add Users
- Go to Admin levels and click on Admin. In the opened side panel, click on Assign users, select the newly created staged user account, and click on Assign users.
Step 2: Exclude from multi-factor authentication policies
Note
Relevant only to Axonius SaaS Applications.
Skip this step if multi-factor authentication is disabled.
- Go to the LastPass Admin Console
>Users>General Policies. - Use the Search policies bar to find MFA policies. For any Enabled policy found, click the policiy to add the newly created user account to its exclusion list:
- Click on Edit policy users.
- Select All except these user/groups.
- Click Assign users & groups.
- In the Users tab, select the newly created user and click on Assign Users.
- Click on Back and save the changes.
Step 3: Activate the user account
Relevant only to Axonius SaaS Applications.
- Go to the LastPass Admin Console
>Users. - Select the newly created staged user account and click on Activate user.
- Login to the user’s email account and complete the LastPass registration process.
NOTE
Copy the new master password, that is required for the Password adapter configuration parameter.
Generating the CID and Provisioning Hash
To generate the CID and provisioning hash
- Log in with your email address and master password to access the new Admin Console at the LastPass Login Page.
- Navigate to the Dashboard tab. The CID (account number) is located at the top of the page, preceded by the words "Account number". Jot down the CID information, as you will subsequently need it.
- Navigate to Advanced
>Enterprise API. - Do one of the following:
-
If you have not previously created your provisioning hash, click **Create provisioning hash `>` OK**. The provisioning hash appears at the top of the page. -
If you previously created your provisioning hash but have since forgotten it, generate a new one.
-
Warning
If you have already created a provisioning hash, then generating a new hash will invalidate the previous hash, and will require you to update all integrations with the newly generated hash.
To proceed with creating a new provisioning hash, click Reset your provisioning hash>OK. Your new provisioning hash is displayed at the top of the page.
Note
Update all integrations that used the previous provisioning hash.
Related Enforcement Actions
Updated 9 months ago