
Working with Custom Data
Custom fields allow you to add extra data to an asset. There are two types of custom fields:
-
Common Fields - Also known as Axonius Fields, these are fields from the adapter. The field type and available values are determined by the selected field.
-
Specific Fields - Also known as Custom Fields, these are tailormade fields that you create. A specific field is added only to the selected assets.
-
Custom fields appear in the list of fields in the Query Wizard and in the Custom Data tab under Adapter Connections on the Asset Profile page. Custom fields can also be displayed in an asset table and edited inline.
-
You can also use the Axonius - Add Custom Data to Assets and Axonius - Remove Custom Data from Assets enforcement actions to add/remove custom data to/from assets returned by a query or assets selected on a relevant page.
-
When you add or edit custom data or custom data fields directly from within assets pages, it can take up to 5 minutes for the new data to appear. Until the data appears, it will not be available for use in queries.
Permissions
- To work with custom data on a given asset type, you need the 'Edit tags and custom data' permission enabled for that asset type.
Adding a Custom Field to Assets
You can add a single custom field to one or more selected assets at the same time.
Note
It is currently not possible to add a valid IP/IPv4 address to a newly added Network Interfaces: IPs /Network Interfaces: IPv4s field.
To add a custom field to assets
- On the relevant Assets page, select one or more assets.
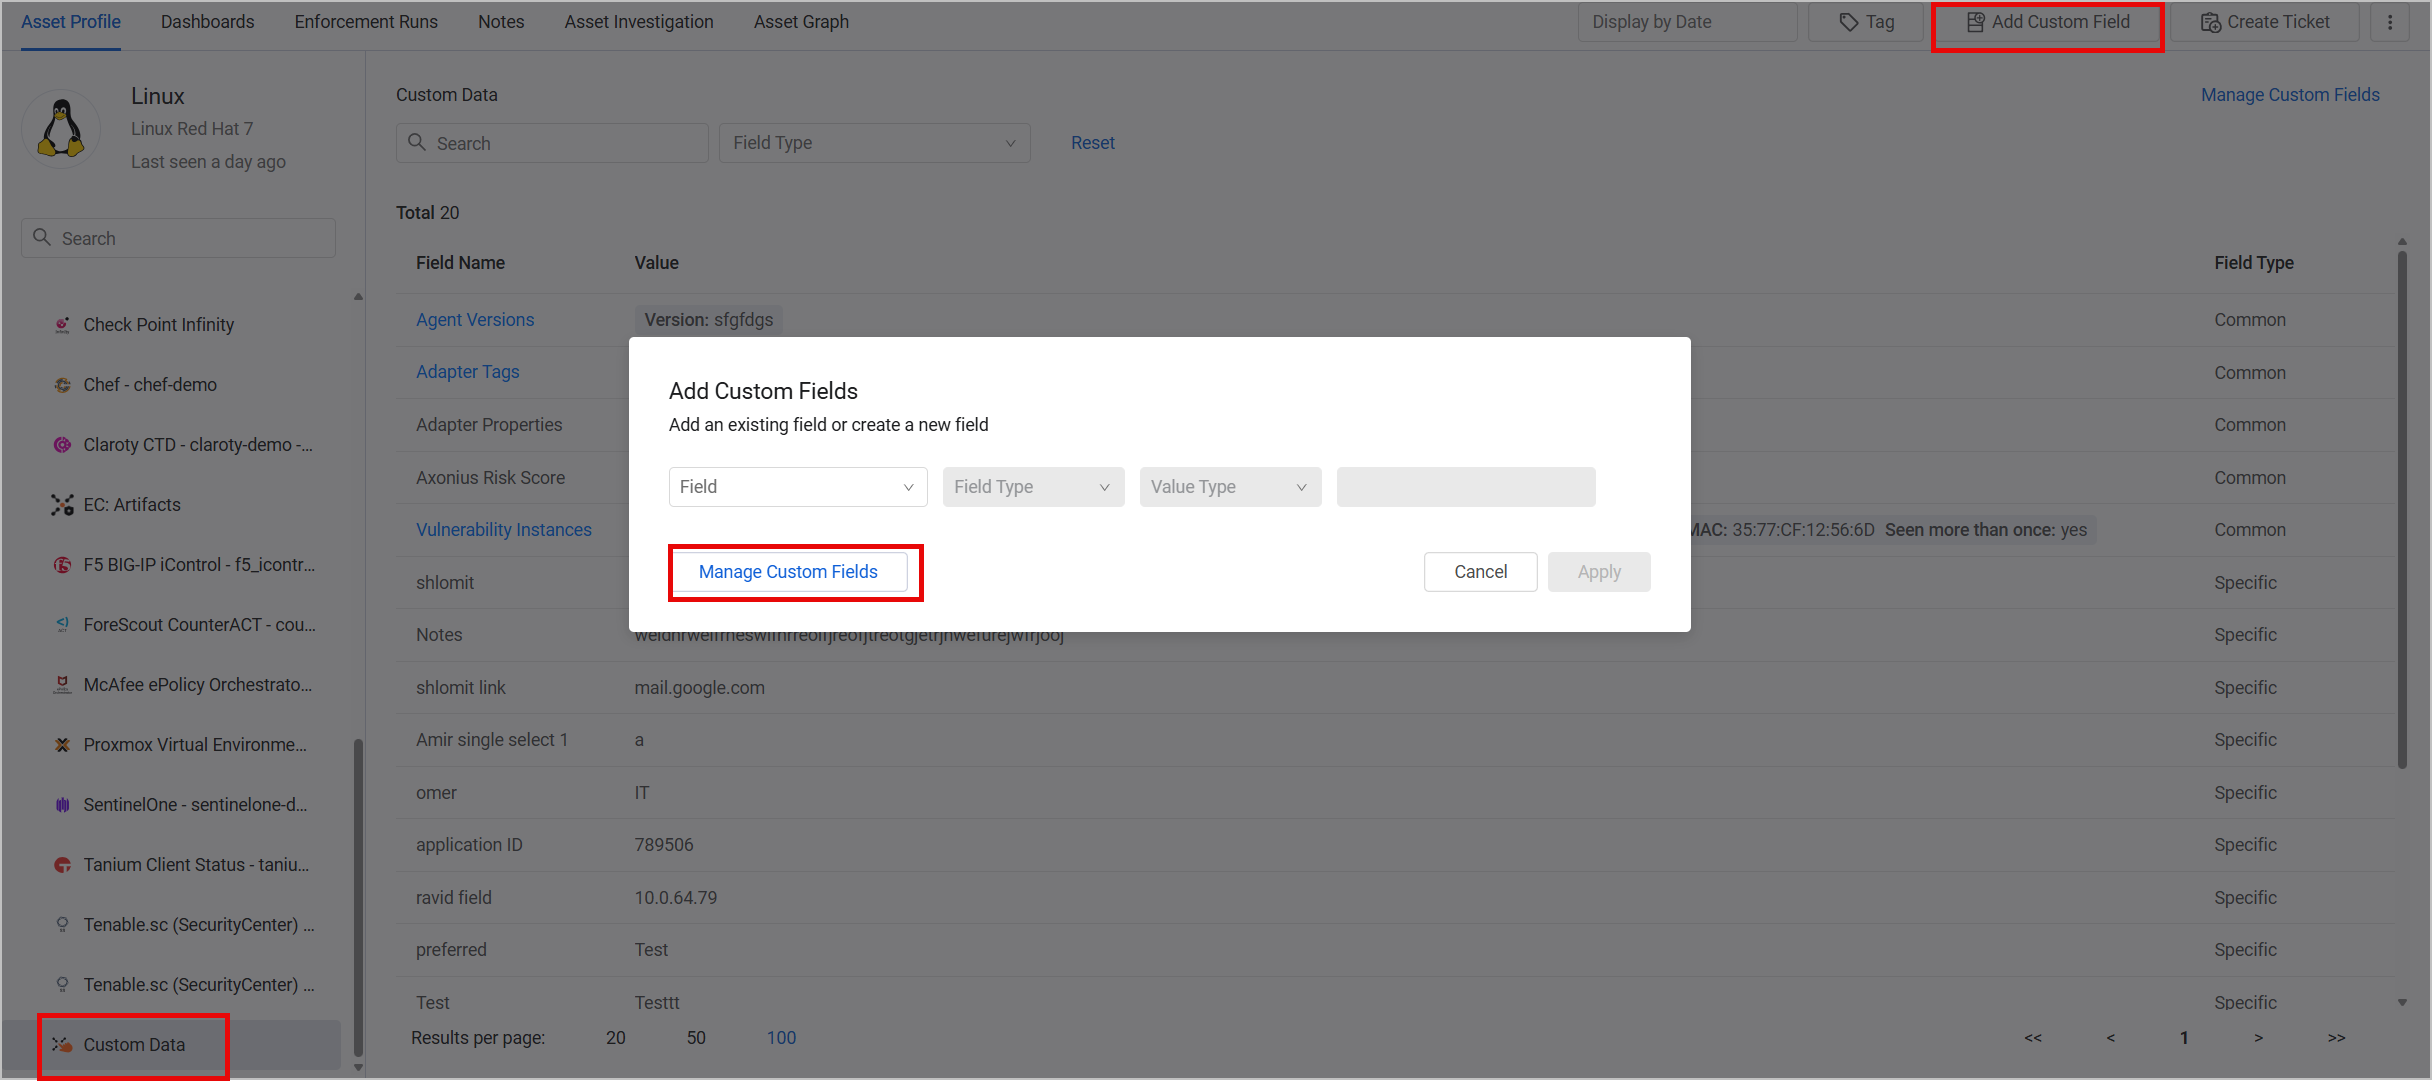
- From the More Actions menu, select Add Custom Field. The Add Custom Fields dialog opens.
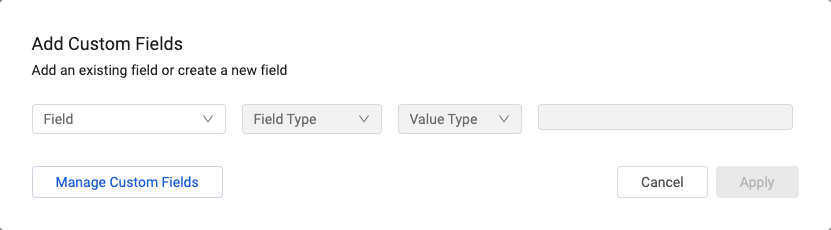
-
Optionally, from the Field dropdown, filter the list of fields.
-
From the Field dropdown, select an existing field. The Field Type and Value Type are preset (determined by the field itself).
You can also define new custom fields. See Creating New Custom Fields. -
In the text field to the right, type or select a value for the field. The value must match the Field Type and Value Type.
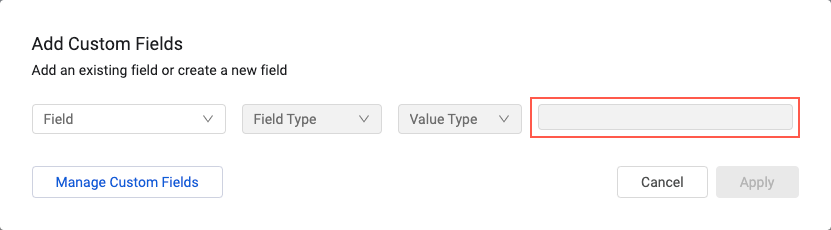
- For Single Value fields, type a value.
- For Single Select fields, select a predefined value.
- For Multiple Values fields, add a list of values with the values separated by pressing Enter, a comma, or semicolon.
-
Click Apply. The custom field is added to the selected assets. The custom field can be selected as a column in the asset table. For each asset, the value of the field is displayed.
Filtering the List of Fields
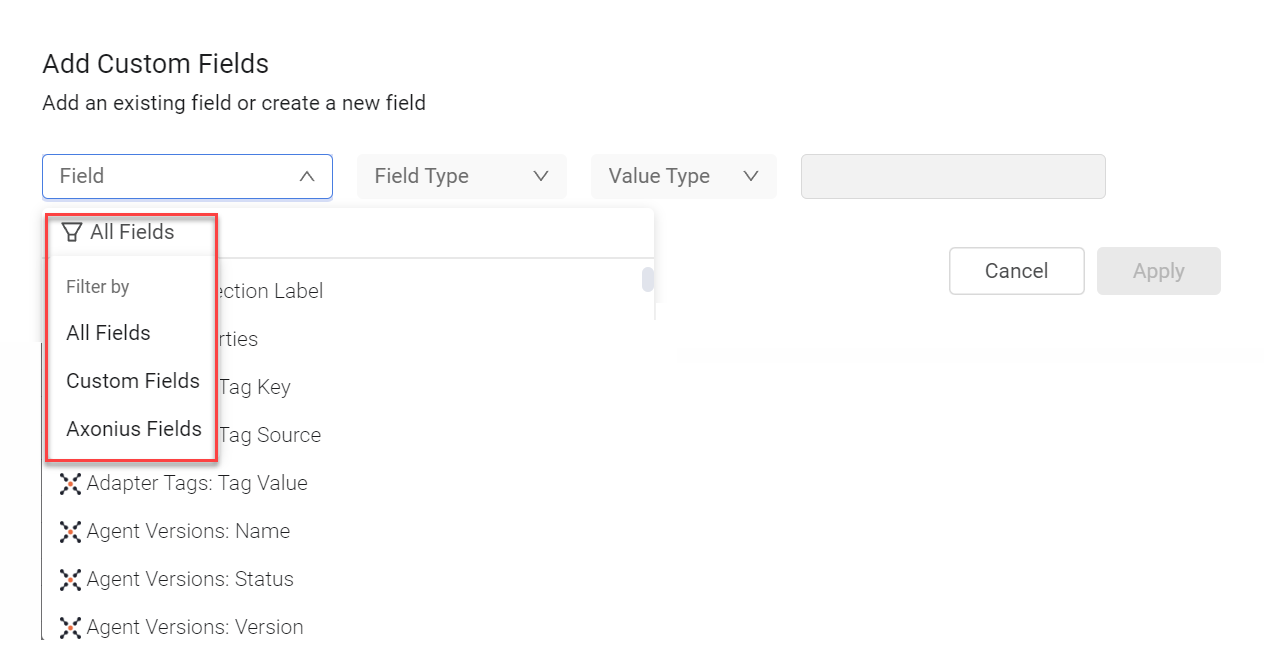
You can filter the list of fields so that the Fields dropdown displays only Custom fields, only Axonius fields, or all fields.
To filter the list of fields
-
Click the Field dropdown, and then click the Filter
.png) icon.
icon. -
From the Filter by menu that opens, select Custom Fields, Axonius Fields, or All Fields (the default). The Field dropdown now lists fields of the chosen Custom Field type.
Creating New Custom Fields
You can create as many custom fields as you need of types Single Value or Multiple Values. These fields can be used just like any other system or adapter field.
Note
- You cannot create Single Select custom fields from an Assets page. You can only create such fields from the Custom Data Management page.
- Once you create a field, you can never change its Field Type.
To add a new custom field to the system
-
On the relevant Assets page, select one or more assets.
-
From the Actions menu, select Add Custom Field. The Add Custom Fields dialog opens (see screen in step 2 of Adding Custom Fields to Assets above).
-
Start typing a field name in the Field box. It is recommended to include in a custom field name characters A-Z and 0-9 only.
If a field of that name already exists, it is displayed. Continue to type the full name of the new field and at the bottom of the Field list, click + New Field Name.
Note
Although it is recommended to include in a Custom Field name characters A-Z and 0-9 only, special characters (i.e., characters other than A-Z and 0-9) are also supported.
The only limitation is that the system does not support giving a new custom field a name that is the same as an existing custom field name besides for different special characters. For example: If CustomField*1 is a defined custom field, it is not possible to name new custom fields CustomField$1 or CustomField#1.
If you do give similar field names, when you click Apply to save the changes, the following notification is displayed: Failed to Save Field, and the field is dropped.
-
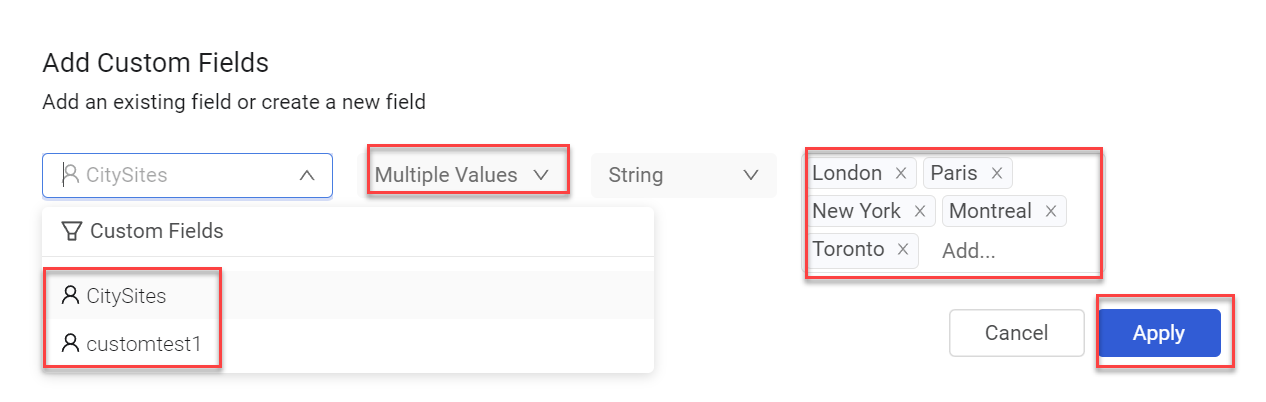
In Field Type, select one of the following:
- Single Value - To create a single-value field.
- Multiple Values - To create a list field.
-
In the Value Type list, select one of the available types:
- When Field Type is Single Value, the following Value Types are available:
- String
- Date - See Adding a Custom Date Field.
- Float
- Integer
- Boolean
- When Field Type is Multiple Values, the following Value Types are available:
- String
- Date - See Adding a Custom Date Field.
- Float
- Integer
Note About Float Custom Fields
For float custom fields, you can control how many digits are displayed after the decimal point across the Axonius system. The default number of digits is 2, but you can set it to be between 1 and 9. For example, if you set the number to 4, a field value such as
98.123436will be displayed as98.1234.To set the number of digits to display after the decimal point:
- Navigate to System Settings → GUI → UI.
- Scroll down to the following setting: Set the number of digits to show after the decimal for custom float fields.
- Enter a number between 1 and 9.
- Click Save.
- When Field Type is Single Value, the following Value Types are available:
-
FIll in a value or values in the text box:
- When the Field Type is Single Value, type a single value in the empty text box. The value is determined by the Value Type.
- When the Field Type is Multiple Values, in the Add text box, type the list of field values. Press Enter, comma, or semicolon to add another value. You can click the x of a value to remove it, or click a value to edit it.
Custom fields are marked with a user  icon in the list of fields.
-
Click Apply to add the new field to the selected assets.
-
If you have Admin permissions, you can manage all custom fields in the system. Click Manage Custom Fields. You will be taken to the Managing Custom Fields page.
Adding a Custom Date Field
You can add one or more dates in a custom field. This is useful for instance, to identify the first time an asset was noncompliant. You can add a single or multiple date field.
To add a single date or a list of dates
-
On the relevant Assets page, select one or more assets.
-
From the Actions menu, select Add Custom Field. The Add Custom Fields dialog opens (see screen in step 2 of Adding Custom Fields to Assets above).
-
Start typing in the Field box. If a field of that name already exists it is displayed. Continue to type the full name of the new field and at the bottom of the Field list, click + New Field Name.
-
In Field Type, select one of the following:
- Single Value - To add a single date.
- Multiple Values - To add a list of dates.
-
Select Date as the Value Type.
-
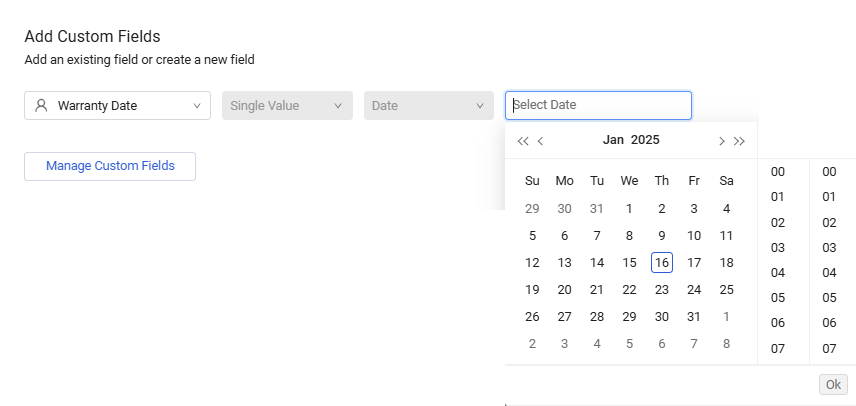
In the rightmost text box, add a date or dates:
-
For a Single Value date field: Click Select Date.
-
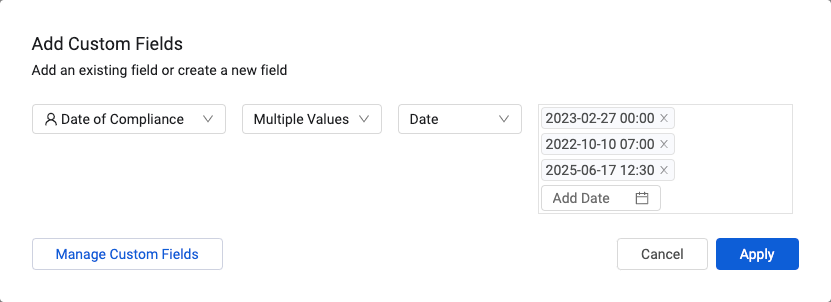
For a Multiple Values date field: Click Add Date.
-
-
In the Date Picker that opens, select a date in the past, present, or future.
-
Optionally, select the time on the current date. By default, the current time is 00:00 for the selected date.
-
Click Ok to set the date and time.
-
For a Multiple Values date field, for each additional date that you want to add to the field, click Add Date and select a date and time (see steps 7 to 9 above).
-
Click Apply to add the new date field to the selected assets.
Editing Existing Single Value or Multiple Values Custom Fields
You can edit the value of an existing custom field of type Single Value or Multiple Values, whether common (Axonius field) or specific (Custom field). You cannot edit its Field Type.
Editing a Custom Field from the Add Custom Fields Dialog
To edit a value of an existing custom field from the Add Custom Fields dialog
-
On the relevant Assets page, select one or more assets.
-
From the Actions menu, select Add Custom Field. The Add Custom Fields dialog opens (see screen in step 2 of Adding Custom Fields to Assets above).
-
Optionally, from the Field dropdown,filter the list of fields.
-
From the Field dropdown, select the field that you want to edit.
-
Click the Value field, and type the new value.
-
When you are finished adding or editing custom fields, click Apply.
Inline Editing a Custom Field on the Assets Page
You can use inline editing to modify an existing value of a custom field or add a value to an empty custom field.
To edit an existing value or add a value using inline editing
- On the relevant Assets page, configure the columns to display the custom fields you want to edit. See Setting Page Columns Display on how to configure the page columns.
- Hover over the empty space or existing value of an asset's custom field and click the pencil icon that appears.
.png)
- In the Edit dialog, add or change the value according to the field type and click Save Changes.
Editing Existing Single Select Custom Fields
You can modify, delete, or add values of an existing custom field of type Single Select, whether common or specific, from the Custom Data management table in System Settings.
For a complete explanation, see Managing Custom Fields.
Adding Custom Fields to Query or Filter Results with a Quick Enforcement Action
You can use a quick Enforcement Action to add custom fields to all assets returned by a query.
To add custom fields to assets using a quick Enforcement Action
-
On the relevant Assets page, run a saved query or filter the Assets list.
-
From the EC Actions menu, select Add custom field. The Add Custom Field dialog opens.
-
In the Enforcement Set name field, a default value is provided. You can change this to fit your needs.
-
In Field name, type a name for the custom field (see Field in Creating New Custom Fields). Then, select a Field type and Value type.
-
In the Field value text box, type a value for the field.
-
To have this field removed from assets that do not match the query parameters, select Remove this custom data field from entities not found in the query results (True/False), and then select one of the following options that open:
- Remove entire field - Remove the complete custom field.
- Remove values field - Remove values added to the custom field.
A safeguard is displayed. Click Confirm if you want to continue.
-
To run this Enforcement Set on a schedule, toggle on Select a Schedule Plan and configure the schedule you want. To learn more about running Enforcement Sets on a schedule, see Scheduling Enforcement Set Runs.
-
Click Save and Run. The custom field is saved and the notification 'Action Created Successfully' is displayed.
Managing Custom Fields for a Specific Asset
This section describes how to view and manage all the custom data fields configured for a specific asset.
To manage an asset's custom fields
-
On the relevant Assets page, click an asset to navigate to its Asset Profile page.
-
In the left navigation pane, under Adapter Connections, select Custom Data.
-
In the upper-right of the Asset Profile Custom Data, select Add Custom Data
>Manage Custom Fields.
In the Manage Asset Custom Fields dialog, all the custom fields related to this asset are listed.

From this screen, you can do the following:
- Add custom fields - Click + Add Custom Field at the bottom left of the screen (scroll down), and in the field that opens,add an existing Axonius or Custom field to the asset, or create a new Custom field (date or other) to add to the asset.
- Delete existing custom fields - Click the trashcan icon to the right of the field.
- Add values to custom fields - Click inside the Value box of the field and add a value:
- For a Single Value Boolean field, select True/False. For other Single Value fields, overtype the value with a new value.
- For a Multiple Values field, for each value that you want to add, click Add and type the new value, or in the case of a Date field, click Add Date, and add a new date.
- Remove values from Multiple Values custom fields - Click the x in the tiles of the values that you want to delete. Make sure that at least one value remains.
- When you are finished making changes, click Save Changes.
Note
A custom field (Single Value or Multiple Values) must be defined with at least one value. If you delete all values of a custom field, clicking Save Changes fails and keeps the previous configuration. You can remove all values of a custom field only by removing the entire custom field from the system.
At the bottom left of the screen (scroll down), click Manage Custom Fields to open the Custom Data Management screen where you can manage all Custom Fields in the system from one central location.
Updated 4 months ago