
Configuring Workflow Triggers
Workflow triggers initiate workflows, allowing you to automate tasks and responses within your system. They are essential for streamlining processes, enforcing security policies, and ensuring timely actions when specific situations arise. For example, automatically add tags to new devices, remediate vulnerabilities, or receive alerts for unusual user logins.
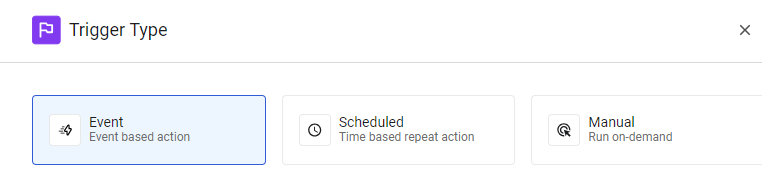
Trigger Types
There are three types of Workflow triggers:
- Event (default) - Workflows are triggered by system events, either internal (Axonius), such as new device discovery, or external (third-party), such as a security alert.
- Workflows run once per asset found by the event.
- You can filter the triggering Event to control which events and assets trigger the Workflow.
- You can trigger a Workflow even when an event finds no assets. To learn more, see below.
- Scheduled Action - Workflows run on a defined schedule, such as daily or weekly.
- The scheduled action in the second node runs according to the schedule in the first node.
- Manual (on-demand) Action - Workflow run by clicking Save and Run in the Workflow configuration.
Note
Each Workflow has only one trigger.
You select (not add) a triggering Event for the top Trigger By Event node.
Triggering events do not have timeout settings.
You add a trigger action (Scheduled or Manual) to the second node of a Workflow.
Setting Up an Event Trigger
To select and configure an Event trigger
-
Choose an Event: From the Trigger Type pane, select an Event. The selected Event is displayed in the top Trigger By Event node, showing the default type of assets it retrieves.

-
Configure the Event: Configure the event, if required, and any prerequisite settings.
- Refer to Configuring Event Webhook for third-party events.
- Refer to the Events Library for details on each supported event.
-
(Optional) Change Asset Type: If the Select the type of asset to be retrieved dropdown is enabled, change the asset type.
- The selected asset type replaces the default in the Trigger By node. The following workflow nodes will run on the selected asset type.

-
(Optional) Parse Event Data:Enable parsing an Event field into additional fields.
-
(Optional) Filter the Event:Limit the Events that trigger the Workflow.
Filtering the Triggering Event
Three filters are available to control which events trigger the Workflow.
-
Event-based filter - Trigger the Workflow only on specific Events (e.g., Slack messages from IT admins).
-
Trigger workflow even if no assets are found - Trigger the workflow even when the event finds no assets. This is useful for things like setting up new users before their devices are added to the system.
-
Asset-based filter - Trigger the Workflow only on Events related to specific assets (e.g., devices with certain software).
Note
When both an event-based filter and an asset-based filter are configured, the Workflow will only trigger if the criteria for both filters are met. This logic functions similarly to conditions in an Event Condition node.
The difference is that a Workflow with filtered event triggers only starts if its criteria are met, whereas Event Condition nodes always start the workflow and log the result in the Run History. This means that the Run History includes many "ghost" Workflow runs that do not go past the Workflow trigger stage.
The Filter counter increments by 1 for each selected filter. For example: Filter (1). It is not incremented per criterion.
Disabled filters retain their previously configured criteria. If you re-enable the filter at a later time, all previously configured criteria are preserved and displayed.
To set filters on the Event trigger
- Expand the Filter section.
- Set an event-based filter, if needed.
- Set the Workflow to run even if the triggering event resolves no assets(if needed).
- Set an asset-based filter(if needed).
To remove event or asset criteria
- Hover over the criteria and click the x .
- If there is at least one other criteria of that type (event or asset), the criteria is removed. Otherwise, if it is the only remaining event/asset criteria, it isn't removed, but its values are cleared.
Filtering Based on Event Criteria
Control which events trigger the Workflow using the Filter based on event criteria. Instead of all Events triggering the Workflow, you can set a filter based on Event criteria so that only Events with the specified criteria trigger the Workflow. For example, instead of allowing all incoming Slack messages to trigger a Workflow, you can apply a filter that allows Slack messages sent by IT admin only to trigger the Workflow.
To set an event-based filter
- Select the Filter based on event criteria checkbox.
- From the Select Field dropdown, select an Event field. View the Event fields and their types.
- From the Func dropdown, select a function (for example, Equals,
>, or<). - In the Comparison Value text box (if relevant for the selected function), type a comparison value for this filter condition.
- Click
+to add more filters.
Triggering Workflow Even if No Assets are Found
By default, Workflows run only when the triggering event identifies assets. However, this limitation prevents workflows from running in situations where assets are discovered later or are not directly related to the event. To handle scenarios where assets aren't resolved by the triggering Event, enable the Trigger workflow even if no assets are found option to trigger the Workflow even when the triggering event resolves no assets.
- This setting applies only to third-party triggering events.
- The Workflow proceeds from the triggering event to the first action, even if no asset is found.
- The event filter (first filter) still applies, ensuring conditions are met before proceeding.
- Actions that require assets fail, and a clear reason for the failure is logged.
- If the actions following the triggering event with no resolved assets run successfully, the run result is marked as Successful. The Affected Asset shows the resolved/returned assets that the action returned.
Use Cases:
- New employee onboarding - A 'New Employee' event triggers a Workflow that creates a User in relevant systems before the employee is fetched during a Global Discovery Cycle.
- Third-party events without asset correlation - An incoming security or IT event, such as policy violation or system alert, which does not necessarily correlate with existing/supported assets.
To set the Workflow to run even if the triggering event resolves no assets
- Enable the Trigger workflow even if no assets are found option.
Filtering Based on Asset criteria
Control which events trigger the Workflow using the Filter based on asset criteria. Instead of all Events triggering the Workflow, you can set a filter so that only Events triggered on assets with specific criteria will trigger the Workflow. For example, for a Slack message event set with an asset-based filter: Recipients of Slack message = Managers, only those messages sent to Managers will trigger the Workflow.
To set an asset-based filter
- Select the Filter based on asset criteria checkbox.
- Create a query on the assets using the Query Wizard.
- Click
+to add more filters.
Examples
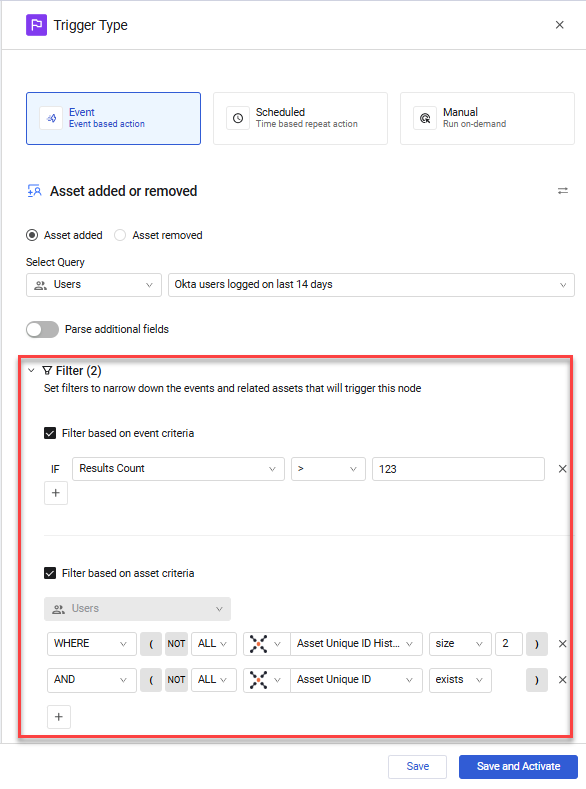
Example - Filtering 'Asset added' triggering event. The 'Asset added' event triggers the Workflow each time an Okta user is added to the pool of Okta users logged on for the last 14 days, and the event and asset criteria are met, the Workflow begins running.
Note
As this Event is internal to Axonius, there is no filter for triggering the Workflow if no assets are found.
Example - 'Slack Message' triggering event
The Slack message event triggers the Workflow if the following criteria exist:
- The Slack message is from a specific channel.
- The message is related to an asset with a specific ID.

Setting Up a Manual Action Trigger
To set up a Manual Action trigger
- In the canvas pane of the Manual workflow, under the Trigger By
-Manual node, hover over the+, and click Add Action .
. - In the newly added Action node,add a triggering action.
Setting Up a Scheduled Action Trigger
Workflows triggered by a Scheduled action (Trigger Type=Scheduled) run every Global Discover Cycle by default. You can define a different schedule for triggering the Workflow. Once saved, the Workflow automatically runs according to your configured schedule.
To set up a Scheduled Action trigger
- In the Trigger Type pane of the Scheduled workflow, in the Select a Schedule Plan section:
- Select and configure a schedule plan for the Workflow run. To learn about the various Workflow scheduling options see Scheduling Workflow Runs.
- Set the Action to run only on assets discovered since the last run, if needed.
- In the canvas pane of the Scheduled workflow, under the Trigger By
-Scheduled node, hover over the+, and click Add Action. - In the newly added Action node,add a triggering action.
Running the Workflow on New Assets Only
For Scheduled triggers, you can choose to run the workflow only on new assets that weren't included in the previous run. This is useful for tasks like tagging new devices or sending alerts for new vulnerabilities.
Every time a Workflow is triggered to run, the following happens:
- The query defined in the Workflow runs and returns a list of assets.
- The Workflow runs against that list of assets.
- The list of assets is saved.
When the Run on added entities only option is enabled, the list of assets returned in the query (from the second run onward) is compared to the previous run's asset list. Only assets that appear in the new list but were not in the previous list are included in this run.
Note
The first Workflow run is always on all assets matching the query.
To run the Workflow only on added entities
- Select the Run on added entities only checkbox.
Example
A Workflow is configured to run on query 'devices with AD admin permissions' at the end of every Discovery Cycle and the Run on added entities only option is enabled.
- At the end of the first Discovery Cycle (first run), the query returns assets A, B, and C. So the Workflow runs on assets A, B, and C.
- At the end of the second Discovery Cycle (second run), the query returns assets B, C, and D. So the Workflow runs only on asset D.
Adding and Configuring Triggering Actions
For Scheduled and Manual triggers, add an Action to the second node of the Workflow, and in the Select Action pane, select an Enforcement Action. For details on each Enforcement Action, refer to the Enforcement Actions Library.
A Scheduled trigger Action runs automatically according to the configured schedule. A Manual trigger Action runs when you click Save and Run in the Workflow configuration.
Note
The ID and Refine Data filters of the triggering Action are transmitted to all nodes in the Workflow. This means that successive actions are run only on asset entities not filtered out (using refine data) of the saved query.
To add the triggering Action to the Workflow
-
Add an Action: In the left Workflow pane, hover on the
+under the Trigger By-Scheduled or Manual node, and click Add Action. -
Select an Action: In the Select Action pane that opens,select an Enforcement Action to start the Workflow. The selected action is displayed in the second node (Action) of the Workflow. The Action Setup pane opens.
-
Select Assets:Define which assets the Workflow should run on.
-
Configure Action settings:Set any required options for the action.

Selecting Action Assets for a Triggering Action
The Workflow runs once per asset returned by the triggering Action's query.
To select the Action assets
-
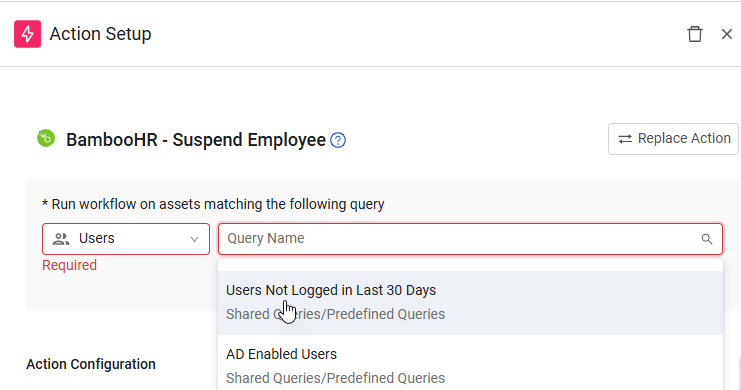
Under Run workflow on assets matching the following query, from the Module dropdown, select the asset type you want to query, and then from the Query Name dropdown, do one of the following:
- Select a predefined query from the list.
- Click + Add Query to create a new query using the Query Wizard. Learn how to create a New Query. The following screen shows setting up the Axonius - Add Tag to Assets triggering action with Managed Cloud Devices (AX) query.
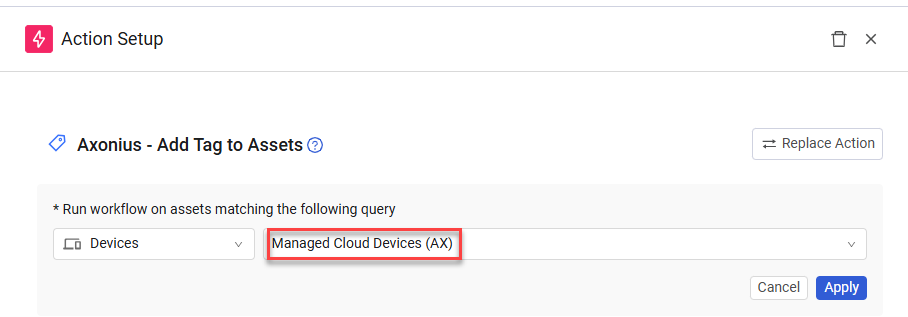
- Select a predefined query from the list.
-
Click Apply.
-
The Action Setup pane displays the Split Runs On label followed by the query name. This indicates that the triggering action runs the Workflow (manual or at the scheduled time) on assets returned from that query - one asset at a time. You can click the Pencil icon to select another query.
-
The query that the Action runs on is also displayed in the Workflow pane, in the Triggering Action node, near Runs on.
Modifying the Triggering Action Asset
To modify the asset that the triggering Action runs on
-
Near the Split Runs On action, click the Edit Asset pencil icon


-
In the section that opens, modify the module and/or query, and click Apply.
Configuring the Action Settings
To configure the action settings
- The default name provided for Action name begins with workflow_. You can use this name or type a new name.
- (Optional)Configure dynamic values for this action.
- Fill in the Required Fields and optionally, the additional fields, for the action. Click the ? adjacent to the Enforcement Action name to navigate to detailed documentation of these fields.
- If the selected Enforcement Action is of the Create Issue/Incident/Ticket category, a Link with a Case button appears. Click it to open the Create A Case Set wizard and create a Case Set.
- If the selected Enforcement Action is Create new case, a Link with a Ticket button appears. Click it to open the Create A Case Set wizard and create a Case Set.
Changing the Trigger Type
-
You can switch between Event, Scheduled, and Manual triggers if you haven't yet configured the trigger node. Once you set up an Event trigger, changing the trigger type deletes all its settings.
-
If you change the trigger node from Event to Action, an Action node is added below the Trigger Type node. This prevents the Workflow logic from breaking.
-
When a triggering Event node is followed by another Event node, the Trigger Type buttons - Scheduled and Manual become disabled, as switching the trigger can break the workflow logic.
Updated about 2 months ago