
IBM QRadar
IBM QRadar is a Security Information and Event Management (SIEM) solution that enables security teams to detect, prioritize and response to threats across the enterprise.
Use Cases the Adapter Solves
- Correlate SIEM Assets with the Full Asset Inventory: Enrich Axonius device records with IBM QRadar log source data to identify which assets are actively monitored by the SIEM and which are not, reducing blind spots in threat detection coverage.
- Investigate Active Security Offenses in Asset Context: Surface open QRadar offenses alongside the full asset profile of the involved devices, enabling security teams to quickly assess risk and prioritize response based on asset criticality.
Asset Types Fetched
- Devices, Users, Networks (if enabled in Advanced Settings), Alerts/Incidents (if enabled in Advanced Settings)
Data Retrieved through the Adapter
Devices - Fields such as: Device name, sending IP, network interfaces (ethernet and bonded)
Users - Fields such as: Username, email, security profile ID
Networks - Fields such as Network name, CIDR blocks, country code
Alerts/Incidents - Fields such as Offense ID, offense status, severity, Source IPs
Before You Begin
Ports
- TCP port 80/443
Authentication Method
- User Name/Password for Cloud
- API Token for on-prem
APIs
Axonius uses IBM QRadar REST API V20.0. The following endpoints are called:
Devices
GET /api/config/event_sources/log_source_management/log_sources- Fetch log sources as devicesGET /api/config/event_sources/log_source_management/log_source_types- Fetch log source type metadataGET /api/config/event_sources/log_source_management/log_source_groups- Fetch log source group metadataGET /api/system/servers- Fetch QRadar servers as devicesGET /api/system/servers/{id}/network_interfaces/ethernet- Fetch ethernet NICs for a server (when Network Interface Enrichment is enabled)GET /api/system/servers/{id}/network_interfaces/bonded- Fetch bonded NICs for a server (when Network Interface Enrichment is enabled)GET /api/asset_model/assets- Fetch asset model assets as devices (when Fetch All Asset Model Assets is enabled)
Users
GET /api/config/access/users- Fetch user accounts
Networks
GET /api/config/network_hierarchy/networks- Fetch network hierarchy (when Fetch Networks is enabled)
Alerts/Incidents
GET /api/siem/offenses- Fetch QRadar offenses (when Fetch Offenses is enabled)GET /api/siem/source_addresses- Resolve source IP addresses for offensesGET /api/siem/local_destination_addresses- Resolve destination IP addresses for offenses
Permissions
The value supplied in API Token must have read access to devices.
-
Steps for creating an API token for IBM QRadar On Prem can be found here: Adding An Authorized Service
-
Steps for creating an API token for IBM QRadar On Cloud can be found here: Adding An Authorized Service Token
Both of these methods produce a token that is only displayed once. Please be sure to copy down the token at the end of the creation process as it can't be viewed again.
IBM QRadar On Cloud users may need to also allow list the IP address of the Axonius instance. Instructions on doing so can be found here: Editing or deleting an allowlisted IP address
The following endpoints require permissions:
/api/asset_model/*- Requires Vulnerability Management or Assets permissions. Data returned is restricted based on the security profile assigned./api/system/*- Requires Admin permission and Admin security profile.
Setting Up IBM QRadar to Work with Axonius
To create an authorized service token in IBM QRadar:
- Log in to the QRadar console as an administrator.
- Navigate to Admin > Authorized Services.
- Click Add Authorized Service.
- Enter a Name for the service.
- From the User Role list, select the appropriate role.
- From the Security Profile list, select the appropriate security profile.
- In the Expiry Date field, select an expiry date or select No Expiry.
- Click Create Service.
- In the Manage Authorized Services window, select the row for the service you created and copy the token string from the Selected Token field.
For detailed steps, see Adding An Authorized Service (on-prem) or Adding An Authorized Service Token (IBM QRadar On Cloud) in the IBM documentation.
Connecting the Adapter in Axonius
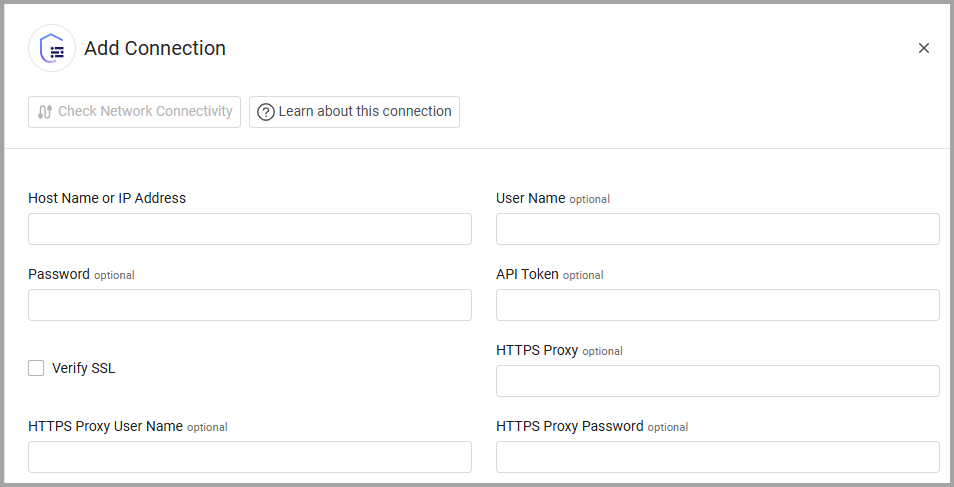
To connect the adapter in Axonius, provide the following parameters:
Required Parameters
- Host Name or IP Address - The hostname or IP address of the IBM QRadar server.
- User Name and Password - The credentials for a user account that has the permissions to fetch assets.
Note
If API Token is not supplied, these fields are required.
- API Token - An API Key associated with a user account that has the Required Permissions to fetch assets.
Note
If User Name and Password are not supplied, this field is required.
Optional Parameters
- Verify SSL - Select whether to verify the SSL certificate of the server against the CA database inside of Axonius. For more details, see SSL Trust & CA Settings.
- HTTPS Proxy - Connect the adapter to a proxy instead of directly connecting it to the domain.
- HTTPS Proxy User Name - The user name to use when connecting to the value supplied in Host Name or IP Address via the value supplied in HTTPS Proxy.
- HTTPS Proxy Password - The password to use when connecting to the server using the HTTPS Proxy.
To learn more about common adapter connection parameters and buttons, see Adding a New Adapter Connection.
Advanced Settings
Note
Advanced settings can either apply to all connections for this adapter, or to a specific connection. Refer to Advanced Configuration for Adapters.
- Fetch Log Sources without Pagination (default: false) - Select this option to fetch all log sources at once without pagination. When enabled, this setting may assist Axonius in receiving log sources that were not received with pagination.
- Fetch All Asset Model Assets - Select this option to fetch all asset model assets as devices.
- Network Interface Enrichment - Select this option to parse network interface related fields.
- Fetch Networks - Select this option to fetch networks.
- Fetch Offenses (default: false) - Select this option to fetch QRadar offenses as Alerts/Incidents.
- Fetch Offenses From The Last X Days (default: 30) - When Fetch Offenses is enabled, enter the number of days back from which to fetch offenses. Minimum value is 1.
- Offense Status Filter (default: ALL) - When Fetch Offenses is enabled, select which offense statuses to fetch. Options are: ALL, OPEN, CLOSED, or HIDDEN.
- Do Not Use IP Address as Host Name or Asset Name - Select this option to omit IP-address values from device host names and asset names. When an IP address is used as a host name, the adapter adds it to the device network-interface IP addresses instead.
Note
To learn more about Adapter Configuration tab advanced settings, see Adapter Advanced Settings.
Updated 3 days ago