
Microsoft Defender for Endpoint (Microsoft Defender ATP)
Microsoft Defender for Endpoint (Microsoft Defender ATP) helps enterprise networks prevent, detect, investigate, and respond to advanced threats.
Asset Types Fetched
- Devices, Aggregated Security Findings, Users , Software, SaaS Applications, Alerts/Incidents, Network Devices, Certificates
Before You Begin
Authentication Methods
- Client Credentials OR Managed Identity (Tenant ID)
Required Permissions
General Permissions
- AdvancedQuery.Read.All
- Machine.Read.All
- Vulnerability.Read.All
- Software.Read.All
- User.Read.All
Permissions to fetch AV information
- AdvancedQuery.Read.All
- Application permissions
Permissions to fetch recommendations
- SecurityRecommendation.Read.All
Permissions to fetch Alerts/Incidents
- Alert.Read.All
Configuring the Axonius App in the Microsoft Azure Portal
-
Log in to the Azure Portal with an administrator account.
-
Select Azure Active Directory. If you have more than one directory, verify that you are logged in to the correct directory. If you are not, select the top-right account logo and then select Switch Directory and select the directory you want Axonius to access.
-
Select App registrations
>New registration. Fill in the details and click Register.(367).png)
-
After you have created the app, you should see its Application ID and Directory ID. Write down these values in a safe place, These values are known as Client ID and Tenant ID.
(368).png)
-
In the left menu, select Certificates & Secrets
>New Client Secret. Click Add and copy the secret.(369).png)
-
In the left menu, select API Permissions
>Add a permission. Then select APIs my organization uses and select the WindowsDefenderATP API. -
Add the permissions Machine.Read.All, Vulnerability.Read.All, Software.Read.All, User.Read.All.
-
To fetch AV information, you also need to add AdvancedQuery.Read.All and AdvancedQuery.Read permissions. Application permissions are required.
-
To fetch recommendations you also need to add SecurityRecommendation.Read.All.
-
To fetch Alerts you need to add Alert.Read.All permissions.
-
Select Grant admin consent for Default Directory to apply these permissions.
(370).png)
Note
The Defender ATP software inventory only lists and makes available via the API, software that has an official Common Platform Enumeration (CPE). The adapter cannot fetch from ATP software that is not listed in the Software Inventory, as it is not made available via the API. For more information, see the Microsoft Defender for Endpoint and ATP documentation.
Connecting the Adapter in Axonius
Required Parameters
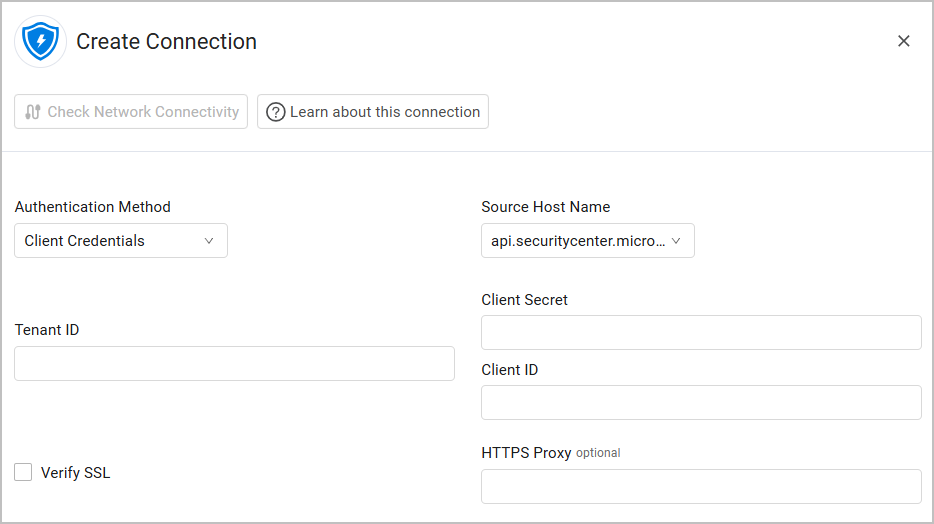
- Authentication Method - Select between Client Credentials and Managed Identity.
- Source Host Name - Select the domain field configuration. If you access the Azure US government environment, select
api-gcc.securitycenter.microsoft.us.
Authenticating with Client Credentials
-
Client ID - The Application ID of the Axonius application
-
Client Secret - A user created key for the Axonius application.
Authenticating with Managed Identity
-
Tenant ID - The Azure Tenant ID, which is the directory tenant you want to request permission from. The value can be in GUID or a friendly name format. If you don't know which tenant the user belongs to and you want to let them sign in with any tenant, use
common.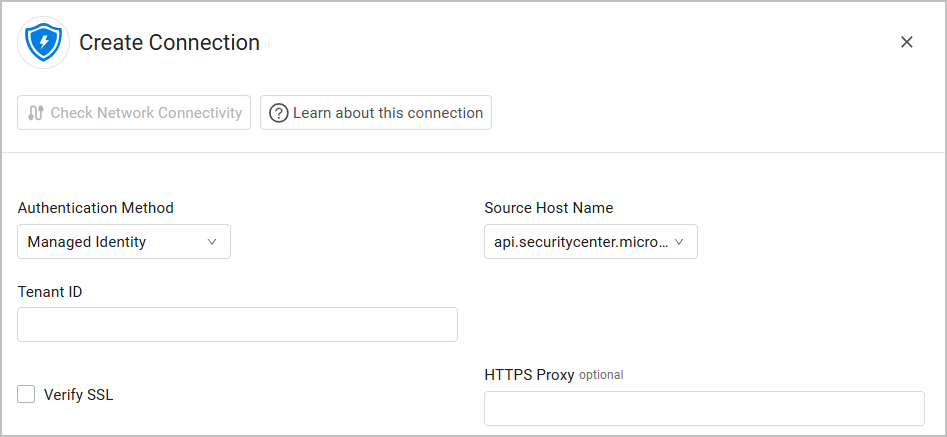
Optional Parameters
- Verify SSL - Select to verify the SSL certificate offered by Microsoft Defender for Endpoint. For more details, see SSL Trust & CA Settings.
- HTTPS Proxy - A proxy to use when connecting to Microsoft Defender for Endpoint.
To learn more about common adapter connection parameters and buttons, see Adding a New Adapter Connection.
Advanced Settings
Note
Advanced settings can either apply to all connections for this adapter, or to a specific connection. Refer to Advanced Configuration for Adapters.
Attention
Configuring Advanced Settings lengthens the time fetches take. Fetching Security Findings or SaaS Applications might take an hour or more. All other Advanced Settings might take much longer. This is due to the Defender for Endpoint configuration.
-
Fetch users - Toggle on to fetch information for users associated with fetched devices assets from Microsoft Defender for Endpoint.
- Fetch only interactive users - Select whether to fetch only users that match the description of interactive in the MDE documentation.
- Username regex search - Enter one or more regex strings that can be used to identify users apart from other accounts.
-
Fetch applications - Select whether to fetch installed applications from Microsoft Defender for Endpoint.
-
Fetch vulnerabilities - Select whether to fetch devices' vulnerabilities from Microsoft Defender for Endpoint.
-
Fetch Secure Assessments configuration (Advanced Hunting Query) - Select whether to fetch data from the
DeviceTvmSecureConfigurationAssessmenttable (Advanced Hunting Query). -
Fetch vulnerability changes - Select whether to fetch vulnerability changes from Microsoft Defender for Endpoint.
-
Fetch recommendations - Select whether to fetch security recommendations from Microsoft Defender for Endpoint.
-
Fetch only applicable and non-compliant recommendations - Select whether to fetch only recommendations that are applicable and non-compliant. You must also enable Fetch recommendations for this setting to take effect. If Fetch only applicable and non-compliant recommendations is disabled and Fetch recommendations is enabled, all recommendations are fetched.
-
Fetch missing KBs - Select whether to fetch missing KBs (security updates). You can choose to fetch them from either of the following sources: Extract from Vulnerabilities API or Fetch from Get Missing KBs API [Background].
-
Fetch alerts - Select whether to fetch API DeviceAlertEvents.
-
Fetch Certificate Assessments - Select to fetch certificate inventory and assessment data.
Note
The adapter fetches Certificates from Microsoft Defender for Endpoint Certificate Assessment Export API.
-
Use unknown as "False" for "AV Info Is Platform Up To Date"; Use unknown as "False" for "AV Info Is Signature Up To Date"; and Use unknown as "False" for "AV Info Is Engine Up To Date" - Enable any of these options to treat Unknown values as "False" for the select fields. When disabled, Unknown values will remain null. These settings are useful when you want to identify devices with potentially outdated antivirus protection. By treating Unknown values as "False", you can:
- Create queries that flag devices where the signature or engine update status is not confirmed as up-to-date
- Generate compliance reports that treat unknown status as non-compliant
- Ensure stricter security posture by assuming devices with unknown status need attention
-
Fetch device AV info - Select this option to fetch additional information about the Anti-Virus status for each device.
-
Fetch only onboarded devices - Select whether to only fetch devices that were onboarded.
-
Fetch only devices with hostname - Select this option to only fetch devices with hostname values (the field
computerDnsNamein Defender for Endpoint). -
Fetch sensors as Devices from Defender Identity - Select this option to fetch Sensors as Devices. Note that you must have the following permissions to fetch sensor information (available under Microsoft Graph permissions):
SecurityIdentitiesSensors.Read.AllThreatHunting.Read.All
-
Ignore offline interfaces - Select whether interfaces that have the operational status 'Down' will not be added to devices.
-
Ignore inactive devices - Select this option to ignore devices that have an inactive status.
-
Fetch Devices by tag - Toggle on this option to enter a comma separated list of tags by which to fetch devices. Only devices with the tags in the list will be fetched.
-
Filter last logged users by domain - Toggle on this option to filter the last logged users by domain.
- Allowed domains list - Enter a comma separated list of domains from which to fetch the last logged users. This option is only available when Filter last logged users by domain is enabled.
-
Fetch discovered devices information - Select this option to fetch additional enrichment data, specifically, which of your onboarded Defender sensors was "seen" on each device on the network. This data will not be added to device records when this setting is unselected.
-
Fetch exploited vulnerabilities - Select this option to fetch the fields related to vulnerability exploitation from Defender for Endpoints Plan 1 & 2.
-
Fetch Critical Asset Management info - Select this option to fetch critical asset management info.
-
Fetch Browser Extensions as Installed Software - Select this option to display browser extension information as Installed Software. The information fetched includes Extension Name, Version, Installation Time, and Browser Type.
-
Avoid duplicate hostnames - Select this option to consider only the latest hostname field data received by Microsoft Defender for Endpoint to avoid duplicating hostnames.
-
Fetch Vulnerabilities seen in the last X days (default: 0=All) - Define how many days back you want to fetch vulnerabilities. If you do not provide a number, the adapter fetches all vulnerabilities.
-
Filter Vulnerabilities by Severity Level - Select one or more severity levels to fetch. If none are selected, all severity levels will be fetched.
-
Fetch vulnerabilities as vulnerability instances (Security Findings assets in Axonius) - When enabled, if a vulnerability is related to multiple file paths, then multiple vulnerabilities will be parsed as Security Findings - a vulnerability for each file path.
-
Fetch vulnerabilities remediation information - Select to fetch remediation details for vulnerabilities. Note that this might increase fetch time.
-
Aggregate vulns having the same cve id, software version/vendor and last seen into one record (default: true) - Select to aggregate vulnerabilities with the same CVE ID, Software Version, Software Vendor and Last Seen values into one record. This can help reduce data size. Uncheck this setting if you prefer to see individual vulnerability records.
-
Include the summary, impact, remediation, and additional info in the vulnerability record, if available - Select to include detailed vulnerability information in your vulnerability records. When selected, the adapter extracts and includes the vulnerability summary, impact description, remediation steps, and additional information from the Vulnerability Description field - if available in the Microsoft Defender API response.
Note: Enabling this setting might increase fetch duration. -
Fetch Listening Port Processes (Last Hour) | Advanced Hunting Query - Select to fetch information about processes listening on network ports from the last hour using Advanced Hunting queries.
-
Fetch Processes (Last Hour) | Advanced Hunting Query - Select to fetch process execution data from the last hour using Advanced Hunting queries.
-
Fetch Recent Executables (Last 7 Days) | Advanced Hunting Query - Select to fetch information about executable files run in the last 7 days using Advanced Hunting queries.
-
Fetch Suspicious DLLs (Last 1 Day) | Advanced Hunting Query - Select to fetch information about potentially suspicious DLL files loaded in the last day using Advanced Hunting queries.
-
Fetch Recent Kernel Events (Last 1 Day) | Advanced Hunting Query - Select to fetch information about kernel-level events from the last day using Advanced Hunting queries.
-
Fetch Recent Scheduled Tasks (Last 7 Days) | Advanced Hunting Query - Select to fetch information about scheduled tasks created or modified in the last 7 days using Advanced Hunting queries.
-
Fetch Removable Storage Events (Last 30 Days) | Advanced Hunting Query - Select to fetch about removable storage events created or modified in the last 30 days using Advanced Hunting queries.
-
Use software last seen as vulnerability last seen - Select to populate the vulnerability's Last Seen field with the software's Last Seen timestamp. This addresses a limitation in the Microsoft Defender API, which does not provide Last Seen timestamps for individual vulnerabilities, but does provide them for software installations. Use this setting when you need to track time context in your vulnerability data.
Note
For details on general advanced settings under the Adapter Configuration tab, see Adapter Advanced Settings.
Related Enforcement Actions
Updated about 1 month ago