
Connecting the AWS Adapter Using an IAM User
Note
This section is deprecated and has been replaced by the instructions found on Connecting the AWS Adapter Using Cloudformation/Organizations
Creating an IAM User
- Open your AWS Dashboard and go to the IAM service.
.png)
- Go to the Policies tab and click Create policy. You need to create a policy that grants read-only access to specific AWS Resources.
.png)
- Click JSON and copy-paste the following code. Note that this JSON includes all the AWS services supported by Axonius, so you might need to edit it according to your needs. See AWS Permissions for more information.
{
	"Version": "2012-10-17",
	"Statement": [
		{
			"Sid": "AdapterFetchPermissions",
			"Effect": "Allow",
			"Action": [
				"apigateway:GET",
				"acm:DescribeCertificate",
				"acm:ListCertificates",
				"appstream:DescribeUsers",
				"appstream:DescribeUserStackAssociations",
				"appstream:DescribeStacks",
				"appstream:ListAssociatedFleets",
				"appstream:DescribeFleets",
				"athena:ListDataCatalogs",
				"athena:ListDatabases",
				"athena:ListQueryExecutions",
				"athena:ListTableMetadata",
				"autoscaling:DescribeAutoScalingGroups",
				"autoscaling:DescribePolicies",
				"autoscaling:DescribeAutoScalingInstances",
				"backup:ListBackupPlans",
				"backup:ListBackupVaults",
				"cloudformation:DescribeStacks",
				"cloudformation:ListStackSets",
				"cloudformation:ListStacks",
				"cloudfront:GetDistribution",
				"cloudfront:ListDistributions",
				"cloudwatch:GetMetricStatistics",
				"cloudwatch:DescribeAlarms",
				"directconnect:DescribeConnections",
				"directconnect:DescribeLags",
				"directconnect:DescribeVirtualGateways",
				"directconnect:DescribeVirtualInterfaces",
				"dynamodb:DescribeTable",
				"dynamodb:DescribeGlobalTable",
				"dynamodb:DescribeGlobalTableSettings",
				"dynamodb:ListGlobalTables",
				"dynamodb:ListTables",
				"dynamodb:ListTagsOfResource",
				"ec2:CreateSnapshot",
				"ec2:DescribeAddresses",
				"ec2:DescribeFlowLogs",
				"ec2:DescribeImages",
				"ec2:DescribeInstances",
				"ec2:DescribeInstanceStatus",
				"ec2:DescribeInternetGateways",
				"ec2:DescribeNatGateways",
				"ec2:DescribeRouteTables",
				"ec2:DescribeSnapshotAttribute",
				"ec2:DescribeSnapshots",
				"ec2:DescribeSecurityGroups",
				"ec2:DescribeSubnets",
				"ec2:DescribeTags",
				"ec2:DescribeVolumes",
				"ec2:DescribeVpcPeeringConnections",
				"ec2:DescribeVpcs",
				"ec2:DescribeVpnConnections",
				"ec2:DescribeCustomerGateways",
				"ec2:DescribeTransitGatewayAttachments",
				"ec2:DescribeTransitGatewayPeeringAttachments",
				"ec2:DescribeTransitGatewayRouteTables",
				"ec2:DescribeTransitGateways",
				"ecr:DescribeImages",
				"ecr:DescribeRegistry",
				"ecr:DescribeRepositories",
				"ecr-public:DescribeImages",
				"ecr-public:DescribeRegistries",
				"ecr-public:DescribeRepositories",
				"ecs:DescribeClusters",
				"ecs:DescribeContainerInstances",
				"ecs:DescribeServices",
				"ecs:DescribeTasks",
				"ecs:ListClusters",
				"ecs:ListContainerInstances",
				"ecs:ListServices",
				"ecs:ListTagsForResource",
				"ecs:ListTasks",
				"eks:DescribeCluster",
				"eks:ListClusters",
				"elasticloadbalancing:DescribeLoadBalancerPolicies",
				"elasticloadbalancing:DescribeLoadBalancers",
				"elasticloadbalancing:DescribeListeners",
				"elasticloadbalancing:DescribeSSLPolicies",
				"elasticloadbalancing:DescribeTargetGroups",
				"elasticloadbalancing:DescribeTargetHealth",
				"elasticloadbalancing:DescribeTags",
				"elasticloadbalancing:DescribeRules",
				"elasticbeanstalk:DescribeEnvironments",
				"elasticache:DescribeCacheClusters",
				"elasticache:DescribeReplicationGroups",
				"elasticache:ListTagsForResource",
				"es:DescribeElasticsearchDomain",
				"es:ListDomainNames",
				"fsx:DescribeFileSystems",
				"globalaccelerator:ListAccelerators",
				"globalaccelerator:ListCustomRoutingAccelerators",
				"glue:GetDatabases",
				"glue:GetTables",
				"guardduty:GetFindings",
				"guardduty:GetDetector",
				"guardduty:GetMembers",
				"guardduty:GetFilter",
				"guardduty:ListDetectors",
				"guardduty:ListFilters",
				"guardduty:ListMembers",
				"guardduty:ListFindings",
				"iam:GenerateCredentialReport",
				"iam:GenerateServiceLastAccessedDetails",
				"iam:GetAccessKeyLastUsed",
				"iam:GetAccountPasswordPolicy",
				"iam:GetAccountSummary",
				"iam:GetCredentialReport",
				"iam:GetLoginProfile",
				"iam:GetPolicy",
				"iam:GetPolicyVersion",
				"iam:GetRole",
				"iam:GetRolePolicy",
				"iam:GetServiceLastAccessedDetails",
				"iam:GetUser",
				"iam:GetUserPolicy",
				"iam:ListAccessKeys",
				"iam:ListAccountAliases",
				"iam:ListAttachedGroupPolicies",
				"iam:ListAttachedRolePolicies",
				"iam:ListAttachedUserPolicies",
				"iam:ListEntitiesForPolicy",
				"iam:ListGroups",
				"iam:ListGroupsForUser",
				"iam:ListInstanceProfilesForRole",
				"iam:ListMFADevices",
				"iam:ListPolicies",
				"iam:ListRolePolicies",
				"iam:ListRoles",
				"iam:ListUserPolicies",
				"iam:ListUserTags",
				"iam:ListUsers",
				"iam:ListVirtualMFADevices",
				"identitystore:ListGroups",
				"identitystore:ListUsers",
				"identitystore:ListGroupMembershipsForMember",
				"sso:ListInstances",
				"sso:ListPermissionSets",
				"sso:ListAccountsForProvisionedPermissionSet",
				"sso:ListAccountAssignments",
				"inspector:ListFindings",
				"inspector:DescribeFindings",
				"inspector2:ListFindings",
				"inspector2:ListMembers",
				"kinesis:ListStreams",
				"kinesisanalytics:DescribeApplication",
				"kinesisanalytics:ListApplications",
				"lambda:GetPolicy",
				"lambda:GetFunctionUrlConfig",
				"lambda:ListFunctions",
				"lambda:ListTags",
				"lightsail:GetInstances",
				"macie2:GetFindings",
				"macie2:ListFindings",
				"macie2:ListMembers",
				"organizations:DescribeAccount",
				"organizations:DescribeOrganization",
				"organizations:ListPoliciesForTarget",
				"organizations:ListTagsForResource",
				"organizations:ListAccounts",
				"organizations:DescribeEffectivePolicy",
				"organizations:DescribePolicy",
				"outposts:ListAssets",
				"outposts:ListSites",
				"outposts:ListOutposts",
				"rds:DescribeDBClusters",
				"rds:DescribeDBInstances",
				"rds:DescribeOptionGroups",
				"rds:DescribePendingMaintenanceActions",
				"redshift:DescribeClusters",
				"route53:ListHostedZones",
				"route53:ListResourceRecordSets",
				"route53domains:ListDomains",
				"route53domains:GetDomainDetail",
				"route53resolver:ListResolverRules",
				"route53resolver:ListResolverRuleAssociations",
				"s3:GetAccountPublicAccessBlock",
				"s3:GetBucketAcl",
				"s3:GetBucketLocation",
				"s3:GetBucketLogging",
				"s3:GetBucketPolicy",
				"s3:GetBucketPolicyStatus",
				"s3:GetBucketPublicAccessBlock",
				"s3:GetBucketTagging",
				"s3:GetEncryptionConfiguration",
				"s3:ListAllMyBuckets",
				"s3:ListBucket",
				"sagemaker:ListNotebookInstances",
				"sagemaker:DescribeNotebookInstance",
				"sagemaker:ListTags",
				"securityhub:DescribeHub",
				"securityhub:GetFindings",
				"securityhub:ListMembers",
				"securityhub:ListTagsForResource",
				"sns:ListSubscriptionsByTopic",
				"states:ListStateMachines",
				"states:DescribeStateMachine",
				"servicecatalog:ListPortfolios",
				"servicecatalog:DescribePortfolio",
				"secretsmanager:ListSecrets",
				"secretsmanager:GetResourcePolicy",
				"sqs:ListQueues",
				"sqs:GetQueueAttributes",
                "ssm:DescribeAvailablePatches",
                "ssm:DescribeInstanceInformation",
                "ssm:DescribeInstancePatches",
                "ssm:DescribePatchGroups",
                "ssm:GetInventorySchema",
                "ssm:ListInventoryEntries",
                "ssm:ListResourceComplianceSummaries",
                "ssm:ListTagsForResource",
                "ssm:DescribeParameters",
                "ssm:GetParameter",
                "waf:GetWebACL",
                "waf:ListWebACLs",
                "waf-regional:GetWebACL",
                "waf-regional:GetWebACLForResource",
                "waf-regional:ListWebACLs",
                "wafv2:GetWebACL",
                "wafv2:GetWebACLForResource",
                "wafv2:ListWebACLs",
                "workspaces:DescribeTags",
                "workspaces:DescribeWorkspaceDirectories",
                "workspaces:DescribeWorkspaces",
                "workspaces:DescribeWorkspacesConnectionStatus"
			],
			"Resource": "*"
		}
	]
}
Note
When using Cloud Asset Compliance, the AWS Policy needs additional permissions.
-
Click Review policy and fill in the details. Then click Create policy.
-
Select Users
>Add User>Programmatic access to allow Axonius to use the AWS API, and proceed to the Permissions dialog.
.png)
- In the Permissions dialog, click Attach existing policies directly, then attach the policy you just created.
.png)
- Click Create User. The Access Key ID and Secret Access Key are displayed. Save both of them in a secure location (they will not appear again) for the adapter configuration.

-
At this point, you can use the credentials to access Axonius. Fill in all required fields in the adapter configuration, click Save. The AWS adapter is configured.
-
If you want to use AWS EKS or AWS Roles, the configuration requires additional steps. Proceed to the next section to add permissions to your IAM User.
Policies for Inspector, GuardDuty, Macie, and SecurityHub
Enable Axonius to fetch information from Inspector, GuardDuty, Macie, and SecurityHub by assigning policies.
To assign policies
- In AWS, select Identity and Access Management (IAM).
- Select Policies and create a new policy.
- Select the service that you want to enable, such as Inspector, GuardDuty, Macie, and SecurityHub.
- In the Access level, select all List and Read permissions.
- Select Add additional permissions to add additional permissions for other services.
- Enter a proper name and description of the new policy.
EKS Configuration
When an Amazon EKS cluster is created, the IAM entity (user or role) that creates the cluster is added to the Kubernetes RBAC authorization table as the administrator. Initially, only that IAM user can make calls to the Kubernetes API server using kubectl. Thus, you need to add your new IAM account to the kubectl configurations to get read-only permissions.
First, you need to get the ARN of the user you just created. In the IAM Service, click "Users" and select the new user you just created. Copy its User ARN.

-
You need to use kubectl, Kubernetes' admin command line interface to add a read-only group and map our AWS user to it. For each cluster you want Axonius to connect to, do the following steps.
As a logged-in admin, create a ClusterRole that has permission to list pods and ClusterRoleBinding that maps to this newly created role:
kubectl create clusterrole axonius-view-role --verb=list --resource=pods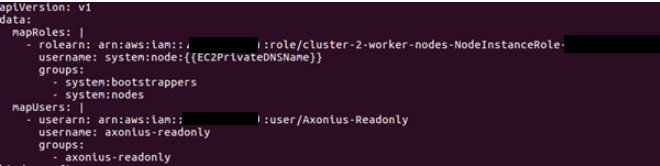
kubectl create clusterrolebinding axonius-view-cbr --clusterrole=axonius-view-role --group=axonius-readonly- Edit the Kubernetes AWS auth configurations, and add a new user mapping. If you don't already have the mapUsers block, create it.
Open the editor to edit the configurations:
kubectl edit -n kube-system configmap/aws-authThen, append the new user mapping, while replacing the 'userarn' field with the ARN you previously received.
mapUsers: |
    * userarn: arn:aws:iam::111111111:user/Axonius-Readonly

      username: axonius-readonly

      groups:

        * axonius-readonly
The first part of the most basic configuration file should look similar to this:
- Save the file.
- You should see a message indicating your edit was successful.
.png)
Your IAM account can now authenticate against the Kubernetes cluster.
AWS Roles Configuration
Axonius supports IAM Roles in the AWS adapter alongside the current IAM User for cross-account access, meaning that the AWS adapter can assume specified roles to allow fetching devices from other AWS accounts. To do this, you have to create a role in the desired additional AWS account(s), and allow the IAM User which is being used in the adapter to assume this role. In each of your additional accounts:
-
Go to IAM and create the same policy created at steps 1-4.
-
Go to IAM -> Roles and create a new role. Choose "Another AWS Account". Fill in your primary account ID (the one in which the primary IAM user resides) and leave the other 2 options unchecked.
.png)
-
Click "Next" and select the read-only policy.
.png)
- Click "Next" and fill in the details to create the role.
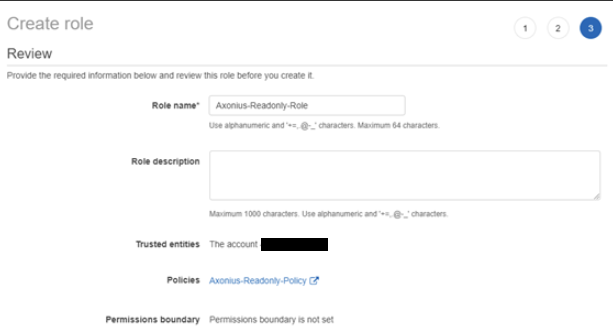
- Now select the role you just created. Change the maximum session duration to 4 hours and click "Save changes".
.png)
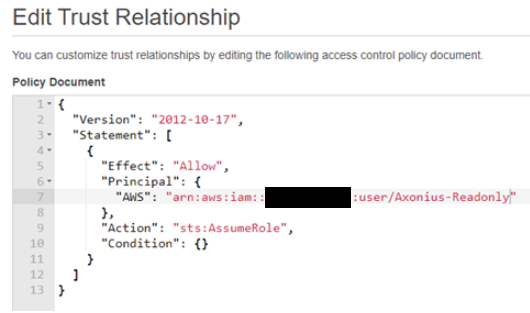
- Go to "Trust relationships" and click "Edit trust relationship". You need to edit this trust relationship to allow only your specific IAM user to assume this. Change the 'AWS' parameter in the policy document to the IAM UserARN you created in the beginning of the guide. If you don't know it, log in to your primary account , go to IAM -> Users and click the IAM user to get its ARN.
-
Save the policy and keep the role ARN.
-
Do this for every additional account you want the AWS Adapter to connect to. After you are done, go back to your main account (the one with the IAM User you created). Go to IAM -> Policies to create a policy which allows your IAM User to assume the roles you created. Click "Create Policy" and switch to the JSON tab.
-
Paste the following JSON Policy and append your Role ARNs. In this example, we have 2 roles.
{
    "Version": "2012-10-17",
    "Statement": [
        {
            "Sid": "VisualEditor0",
            "Effect": "Allow",
            "Action": "sts:AssumeRole",
            "Resource": [
                "arn:aws:iam::111111111111:role/Axonius-Readonly-Role",
                "arn:aws:iam::222222222222:role/AxoniusDevRole"
            ]
        }
    ]
}- Click Next and give this policy a name, then create it.
.png)
- Navigate to IAM
>Users, select the user you created for Axonius and click Add permissions. Attach the policy you created to allow this user to assume the roles.
.png)
- At this stage you can use Axonius to assume the roles you created. To assume these roles, create a file that contains all role ARNS and use it in the Adapter Settings screen. Two available formats:
-
List of comma-delimited role-ARNs
arn:aws:iam::111111111111:role/AxoniusDevRole, arn:aws:iam::222222222222:role/Axonius-Readonly-Role-
JSON format - list of dictionaries that define each role.-
external_id is only supported in the Json format. -
The external_id can be different for every role in the list.
-
[ {"arn": "arn:aws:iam::111111111111:role/AxoniusDevRole"}, {"arn": "arn:aws:iam::222222222222:role/Axonius-Readonly-Role", "external_id": "MY-SECRET"} ] -
Make sure to replace the account ID in our examples(111111111111/222222222222) with your own
Troubleshooting:
In case of missing assets from specific regions when using assume role, check if the target region is enabled in the source role account and target role account.
If they are not both enabled the assume role will fail.
Updated 9 months ago