
Managing Data Transformations
Note
Data Transformation is available only to users with the Action Center feature enabled.
You can apply a Data Transformation on a Field Mapping to perform additional manipulations on the mapped source fields.
- It is possible to use a predefined data transformation in a field mapping, or use a custom data transformation that you create according to your requirements.
- For single-value target types, the selected data transformation is performed on the first valid populated source field.
- For multiple-value target types, the selected data transformation is performed on all valid populated source fields.
Required Permissions
Admin users have access to Data Transformation by default. In order to use this module, Field Mapping permissions must be assigned.
Viewing Data Transformations
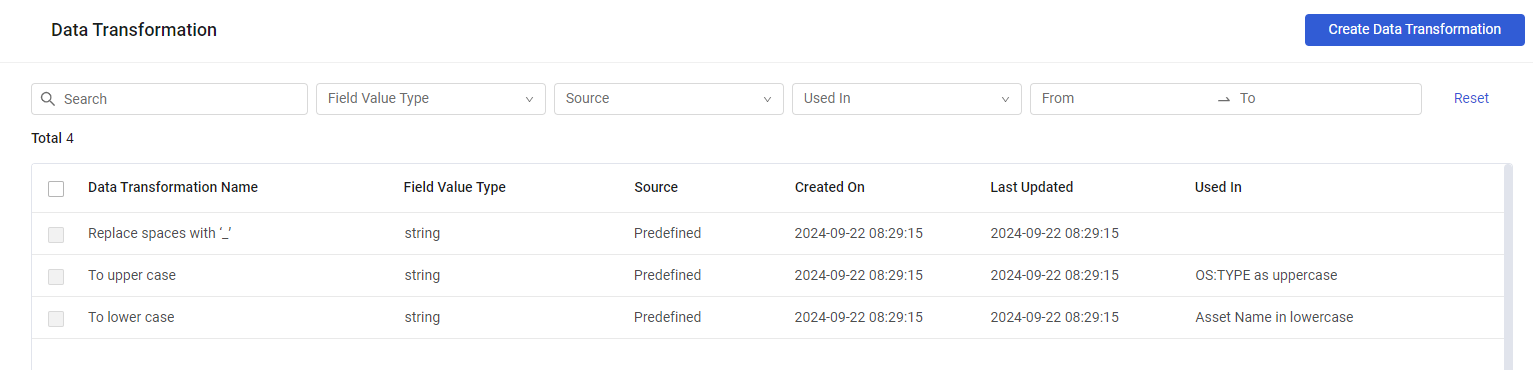
From the Data Transformation page, you can manage all data transformations in the system from one central location, and create new data transformations, as required.
The Data Transformation page shows the following data transformations:
-
Predefined - Data transformations that come with the system. These cannot be updated or deleted. These are:
- Replace spaces with '_' - During mapping, this data transformation replaces all spaces in the source field(s) with underscores in the target field.
- To upper case - During mapping, this data transformation replaces all lowercase letters in the source field(s) with uppercase letters.
- To lower case - During mapping, this data transformation replaces all uppercase letters in the source field(s) with lowercase letters.
-
Custom - User-defined data transformations. These can be updated or deleted.
To view the data transformations in the system
- From the top right corner of any page, click
.png) . The System Settings page opens.
. The System Settings page opens. - In the Categories/Subcategories pane of the System Settings page, expand Data, and select Data Transformation. The Data Transformation page opens.
Note
In some versions, you access this feature from the Adapters page by clicking Field Mapping and Transformations, and opening the Data Transformations tab.
The following information is displayed on the Data Transformations page:
- Data Transformation Name - The name assigned to the data transformation.
- Field Value Type - String
- Source
-Predefined (comes with the system) or Custom (user-defined). - Created On - The date and time that the data transformation was created.
- Last Updated - The date and time that the data transformation was last updated.
- Used In - The field mappings in which the data transformation is used. If there are more than two, the number of additional ones is indicated. Hovering over the number opens the Used In table with the list of field mappings that the data transformation is used in.
Creating a Data Transformation
You can create the following types of (custom) data transformations:
-
Basic transformation
- Regex Replace - Replaces the substring in the mapped field that matches the specified Regex expression with the specified replacement string.
- Substring - Extracts the substring that starts and ends at specified character positions in the string field.
- Concat- Concatenates at least two strings from the following: typed character string, source string field, and adapter string field (only if module is specified), and places the joined string in the mapped field.
-
Advanced transformation - Uses a Dynamic Values statement to define the data transformation.
To create a data transformation
-
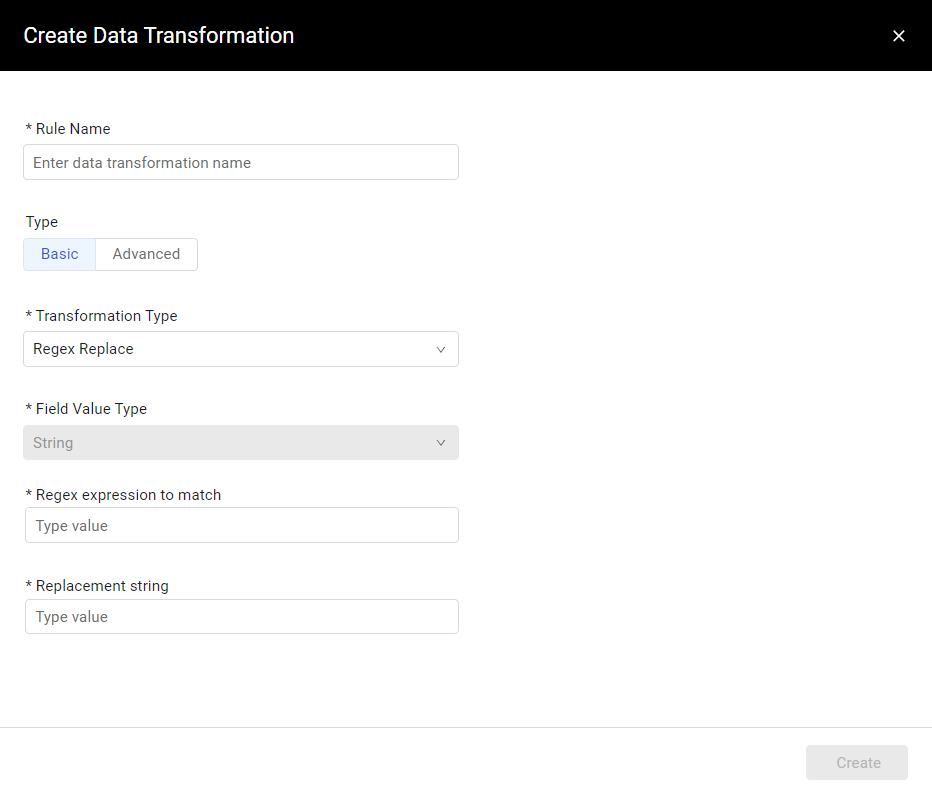
In the Data Transformation page, click Create Data Transformation. The Create Data Transformation drawer opens.
-
In Rule Name, type a meaningful name for the data transformation.
-
In Type, click one of the following rule types:
- Basic - See Creating a Basic Data Transformation.
- Advanced - See Creating an Advanced Data Transformation.
-
When done, click Create. A notification informs that the data transformation has been created successfully. It is added to the Data Transformations table.
Creating a Basic Data Transformation
To create a basic data transformation
- In the Transformation Type dropdown, select one of the following Transformation Types:
- Regex Replace .
- In Regex expression to match, type a Regex expression. Knowledge of Regex expressions is required.
- In Replacement string, type a relevant replacement string.
- Substring
- In From character and Until character, select the first and last character position in the string in the source field from which to extract a substring for the mapped field. The From character minimum value is 0 and not 1, i.e., the first character is at location 0.
- Concat
- From the Module dropdown, select None, or a relevant asset type.
- Under Concat the following, select from the dropdown at least two of the following, meaning one of each relevant type or two of a single type.
- String - A string to concatenate. In this case, in the second text box, type the string to concatenate to the other selected strings, source fields, and/or adapter fields (if relevant).
- Source Field - Select this option to concatenate the source field or fields in the Field Mapping to the other selected strings, source fields, and/or adapter fields (if relevant).
- Adapter field - This option is available only if an asset type is selected under Module. It allows using fields other than the field mapping source fields. In this case, select an adapter and a field in that adapter to concatenate to the other selected strings, source fields, and/or adapter fields (if relevant).
- Click +Add to select an additional item to concatenate.
- Regex Replace .
Creating an Advanced Data Transformation
Use advanced data transformations to create custom transformations using code. These statements have the same syntax as the dynamic value statements, but without the "device all then" prefix. You reference a source field that uses this transformation by using the [SOURCE_FIELD] keyword.
To create an advanced data transformation
-
In the Statement box, write a Dynamic Value statement to define the data transformation.

-
Click Validate to check the syntax of the statement.
Searching and Filtering
You can filter the data transformations displayed in the table. You can then use the filters to create System queries based on the filters and also save them as queries which can be used later on.Read more about System Queries.

The following filters are available:
-
Search - Search for any text in a data transformation.
-
Field Value Type - The type of field. String is currently the only option.
-
Source - Whether the data transformation is Custom or Predefined.
-
Used In - The field mappings that use the data transformation.
-
From - To - The field mappings created in the specified period of time.
* Click **From** and select the date and optionally the time (right pane) from which to display results. Repeat for **To** and then click **OK**.
* Both **From** and **To** dates must be filled in and be earlier than or on the current date.
* Click the arrows to the left/right of the Month/Year header to open the previous/next month's or year's calendar page.
* To filter results only for a specific date, select the same date twice.

<Image align="center" border={false} src="https://files.readme.io/6b19ca195289e1ee67a949b991005bec6fc46d86a40a9b080d92b17d01ead376-FromToFilter.png" />
You can click the following to perform quick actions on filters:
- Select All - Selects all options in a specific filter.
- Clear All - Clears all selections in a specific filter.
- Reset - Clears all filters and displays the entire table.
Performing Actions on Data Transformations
Deleting a Data Transformation
Note
You can only delete Custom data transformations; not Predefined ones.
You can delete one or more data transformations at a time. Deleting a data transformation deletes it entirely from the system. Existing field mappings, which use the data transformation, will fail.
To delete one or more data transformations
- Hover over a data transformation or select the checkboxes of one or more data transformations, and then click the Delete icon or action.
- In the notification box that opens, click Delete Rule to confirm deleting the data transformations.
Editing a Data Transformation
Note
Custom data transformations only can be edited (not Predefined data transformations).
To edit a data transformation
- In the Data Transformations table, click a Custom data transformation.
- In the drawer that opens, modify the fields, as required, and then click Save. See a description of the fields above. A notification appears that the data transformation has been updated successfully. The table is updated accordingly.
Updated 7 months ago