
Network Routes
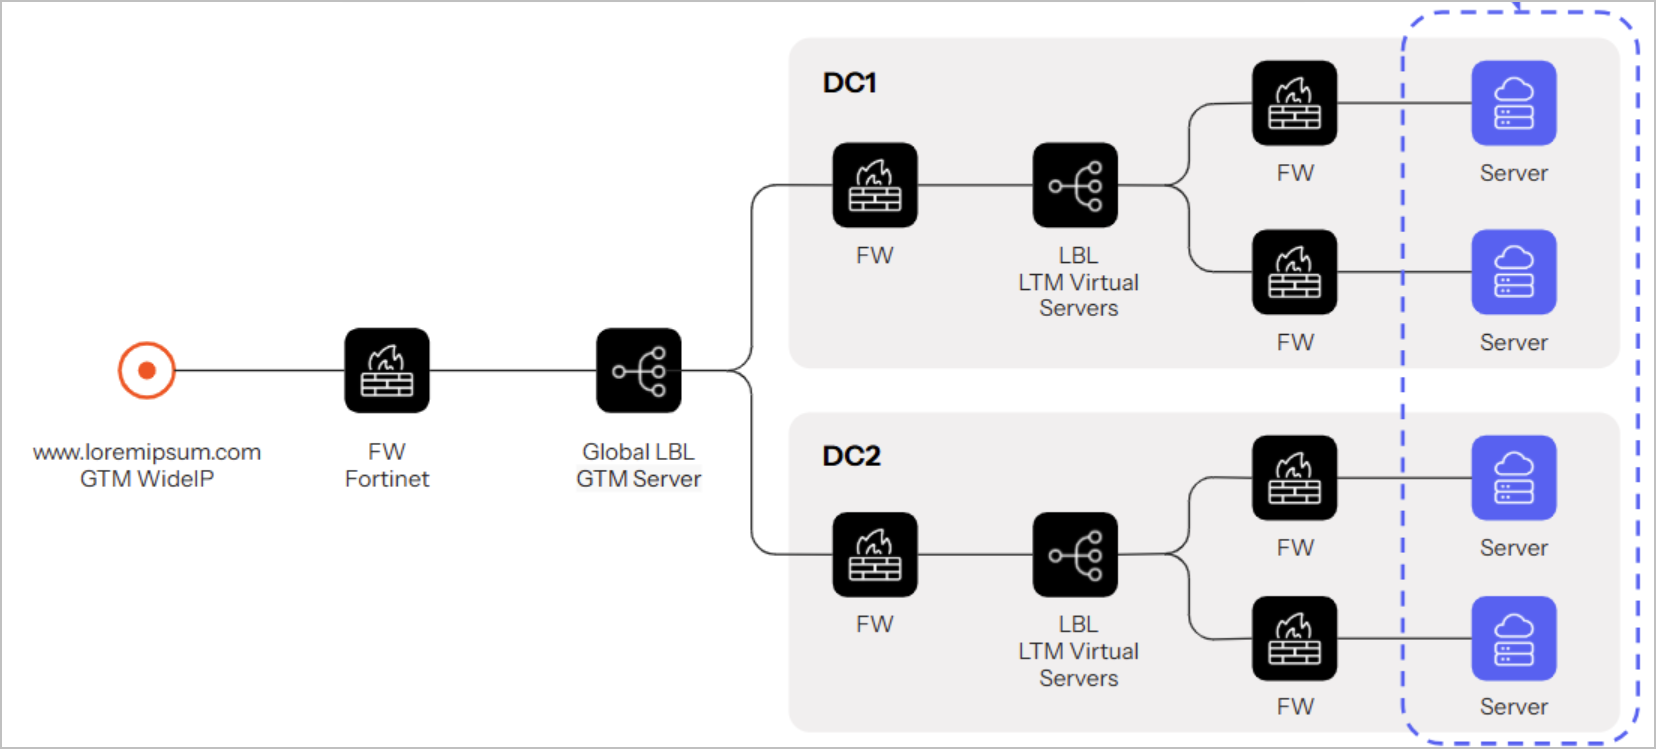
The Network Routes asset provides critical visibility into the paths that network traffic may potentially traverse within your infrastructure. Network Routes represent a modeled sequence of network elements (nodes) that a data packet might follow. Each Route captures the structure and characteristics of a potential network path: whether it passes through internal or public-facing devices, includes NAT rules, touches URLs, or goes through Load Balancers.
Notes
- The Network Routes asset type is only accessible to customers who have purchased the Exposures module.
- To ensure that Axonius correctly identifies public-facing elements, configure all networks outside the RFC 1918 address space as internal networks when appropriate. This configuration helps the logic of mapping Network Routes distinguish between truly public and internal routes, and reduce false positives when handling public IP addresses that should be treated as internal. For more information, see Configuring Network Settings
Mapping Network Routes always begins at the Device level: the system uses the Device's network interface IP addresses as the initial points of discovery, and queries the database to find any other entities that share or relate to those same IP addresses. Then, Network Routes assets are generated automatically as part of Axonius Discovery Cycle, specifically after the correlation phase, via an enrichment process.
How Network Routes Help You
- Security Visibility: Routes are enriched with metadata, allowing Axonius to easily identify whether a path contains public-facing elements, such as public IP addresses.
- Faster Investigations: During time-sensitive situations such as incident response or during a war room session, users can instantly find all Routes affected by a damaged network element, drastically reducing time-to-insight.
- Visual Representation: Routes are visualized in the Asset Graph, demonstrating directly the flow of traffic. This helps you easily identify weak points or key dependencies in your infrastructure.
Each node in the Route may be of the following asset types: Devices, Load Balancers, NAT Rules (Firewalls), or URLs.
Exploring Network Routes - General
Note
To further explore Network Routes and access use-case-specific insights, use the External Exposures Workspace.
Network Routes Page
To navigate to the Network Routes Assets page, from the Assets side panel, select this option under Networks.
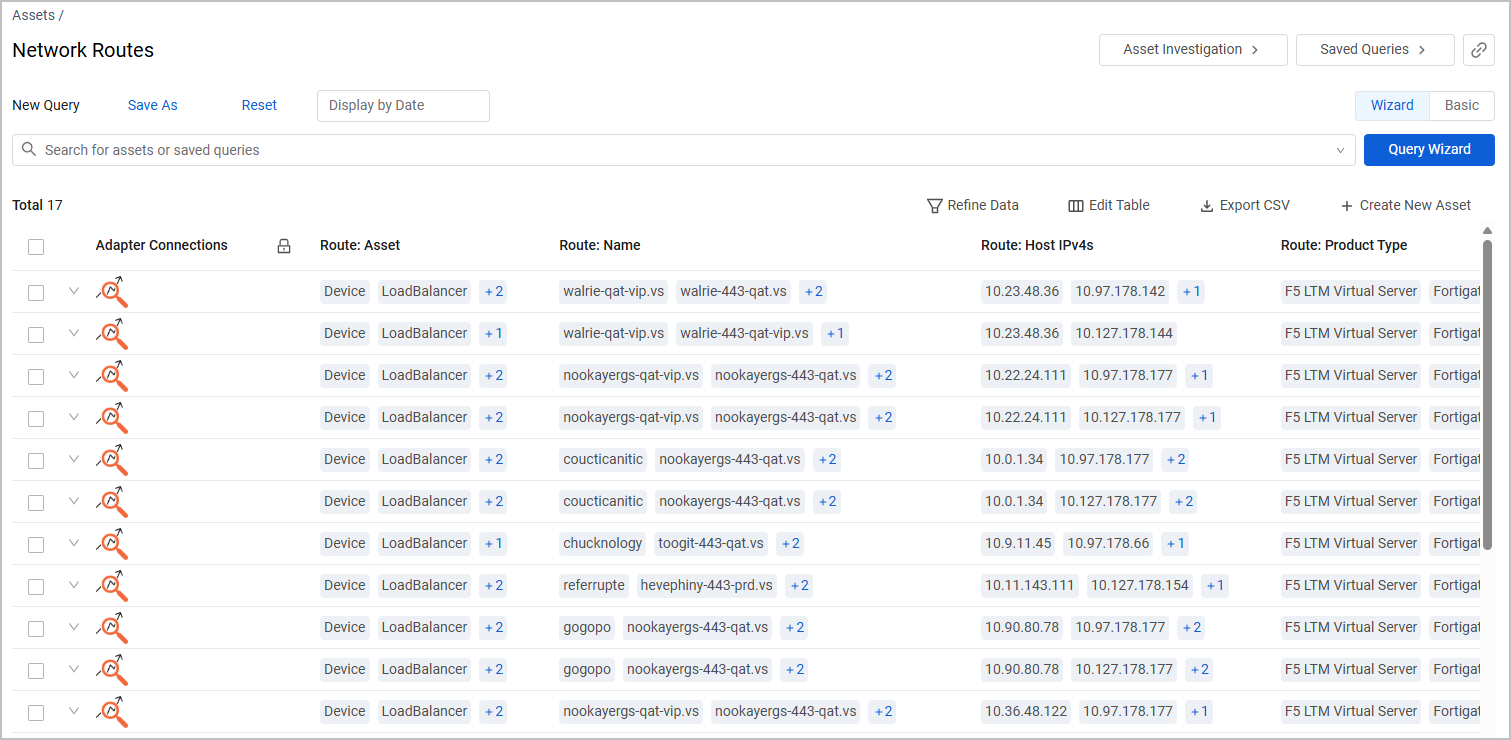
The Network Routes table is automatically expanded by the Adapter Connections field. However, for a more clear, accurate view, it is recommended to expand the table by the Route complex field. Click Edit Table > Expand Assets by > Routes.
Learn more about expanding assets by a complex field.
In the view expanded by Routes, for each Network Route (table row), the following columns and data are displayed for each asset that is part of the route:
- Route: Asset - The asset type: Device, Load Balancer, NAT Rule, etc.
- Route: Name - The name of the asset.
- Route: HostIPv4s - The HostIPv4s of the asset (when relevant).
- Route: Product Type - The product type of the asset. For example, F5 LTM Virtual Server.
- Traffic Direction - The direction of the Route traffic. The options are Public to Private or Public to Public. The direction is determined by whether there is a public-facing asset in the Route, for example: if the Route includes a public-facing NAT Rule that translates traffic into a private network, the Route's Traffic Direction will be Public to Private.
Notes
- The entry point of each Network Route is Device by default.
- When a Network Route contains a URL, it will necessarily be its End Point: a Network Route doesn't have to end with a URL, but when it does, the URL will always be the last point in the Route.
Example for a row expanded by Routes:

Additional fields you can add to the Network Routes table from the Edit Table button:
- Route: Associated Asset ID - The Asset ID of the asset.
- Route: Is Entry Point (Yes/No) and Route: Is End Point (Yes/No) - Whether the asset is the entry point or end point of the Route (or none of them).
- Route: is Public Facing (Yes/No) - Whether the asset is publicly accessible.
- Multiple fields titled Route: NAT: [description] - Fields containing information on the different IP addresses translated throughout the Route. For example: Route: NAT: From Source IP Address.
- Route: Order - The location of the asset on the Route: first, second, third, etc.
- Route: Vendor - The Vendors of the assets that are part of the Route. For example, the Route may contain a Palo Alto firewall, an F5 Load Balancer, and an Infoblox URL.
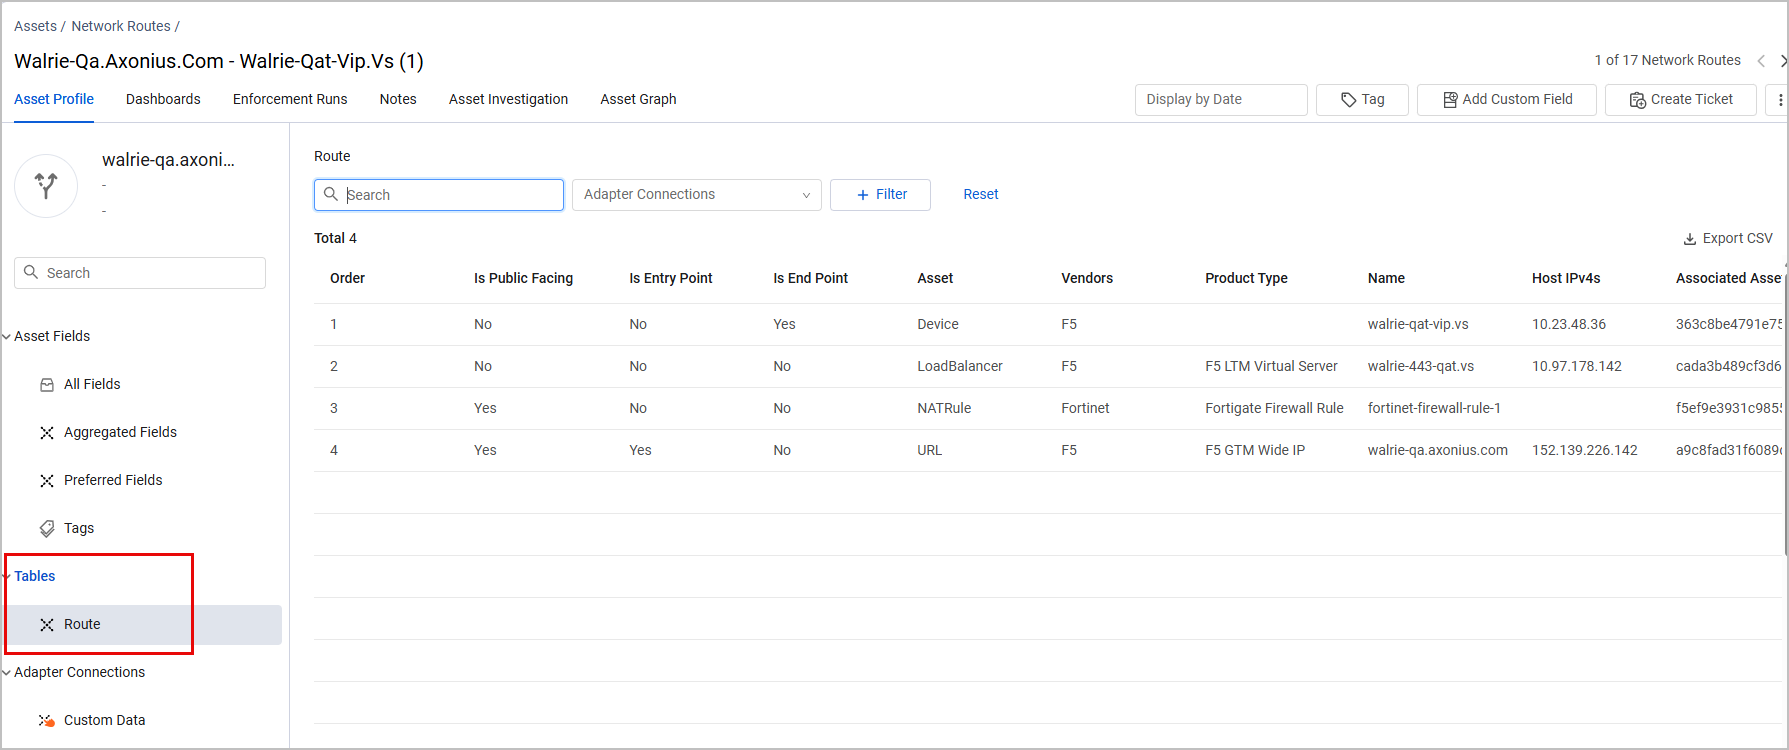
Network Routes Profile Page
Click on a row in the Network Routes table to go to this Route's Profile page. Under the Field Name column, select Route. This option instantly appears under the Tables section.
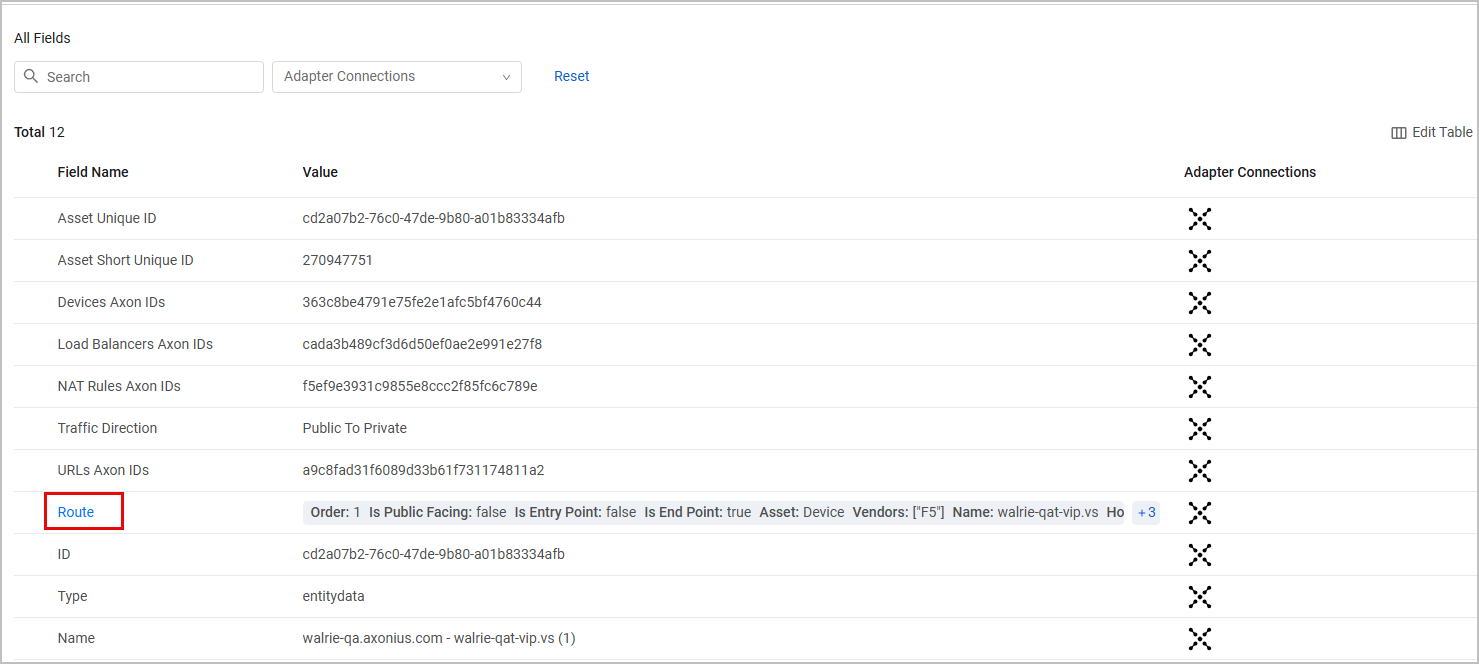
The Route table lists all assets that are part of this Route and their details.
Exploring an Asset's Network Routes
From each of the Assets page supported for Network Routes (Devices, Load Balancers, URLs, and Firewalls), you can view and explore all the Routes this asset is part of. We will show an example for exploring a Device's Network Routes.
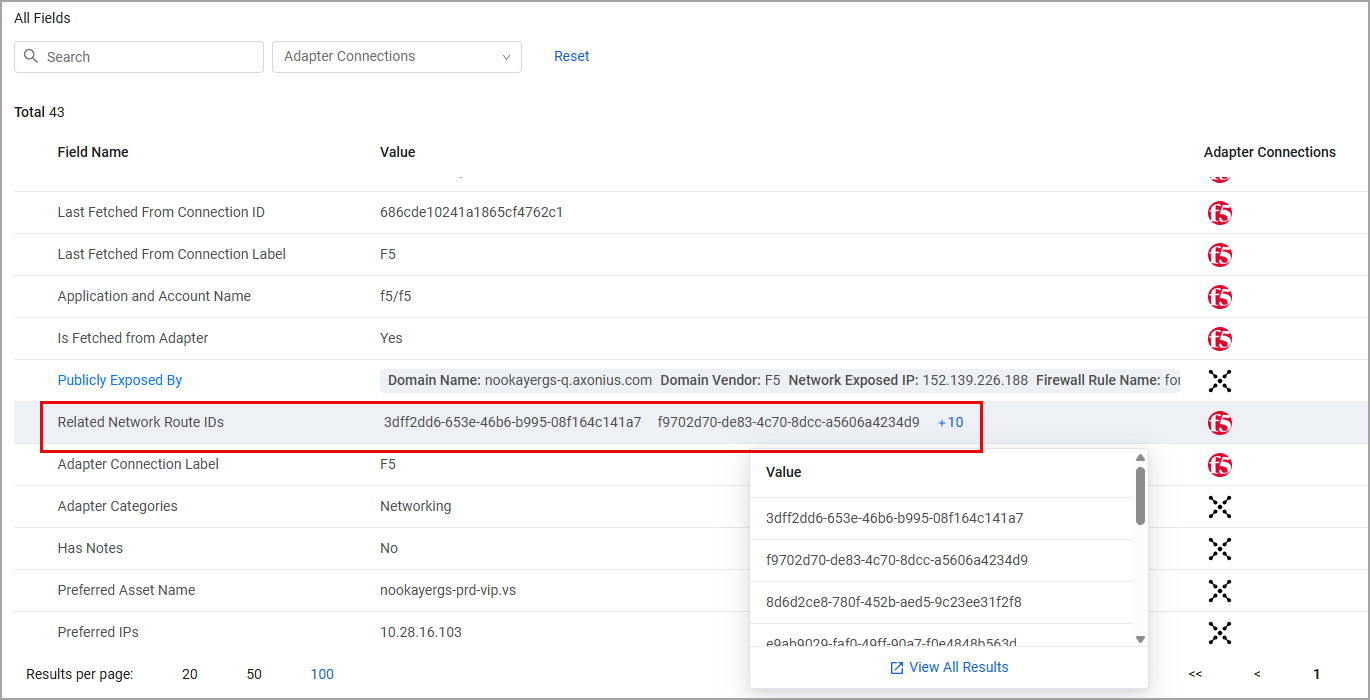
From the Devices page, select a device that has at least one Network Route. To easily find such Devices, it is recommended to filter the table by the Related Network Route IDs field.
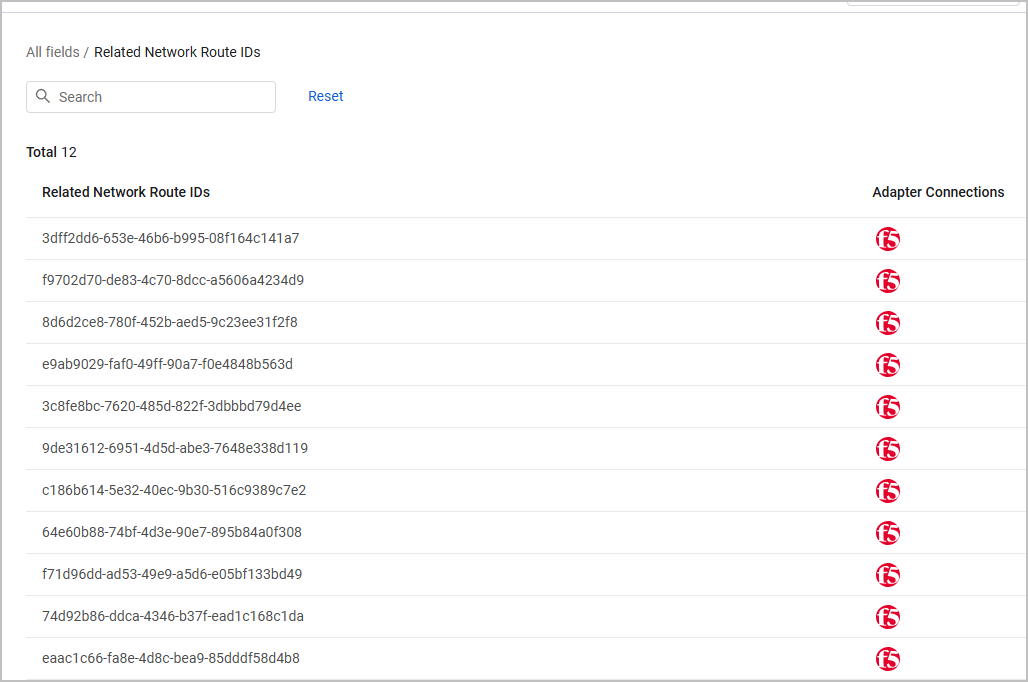
Go to the Device's Profile page. Then, from the Related Network Route IDs field row, click the value (or View all Results if there are multiple values that aren't visible in the row) to see the IDs of all Network Routes associated with this device.
The most useful tool to explore an asset's Network Routes is the Asset Graph, as explained later in this page.
Configuring Private CIDRs
Listing all the internal CIDRs in your organization affects how Axonius determines whether the traffic in each Network Route is public or private (internal). This helps Axonius avoid false positives when considering a network as public. For more information, see Network Settings for Internal CIDRs List.
Viewing an Asset's Internet Exposure Details
When exploring Devices, Load Balancers, URLs, or Firewalls, you can see the asset's status of internet exposure directly from its Assets table, plus additional fields that provide a richer security context for understanding how assets are exposed to the internet.
Internet Exposure Status
From the relevant Assets page, click Edit Table > Edit Columns and add the Internet Exposure column to the table. The possible values are:
-
Inbound Exposed - Asset is fully exposed to inbound traffic from the internet with broad source IP ranges (CIDR prefix ≤ /24, covering 256+ addresses)
-
Inbound Partially Exposed - Asset is exposed to inbound traffic from the internet with restricted source IP ranges (CIDR prefix > /24, covering less than 256 addresses)
-
Outbound Access To Internet - Asset has outbound access to the internet but is not exposed to inbound traffic
Note
The Internet Exposure field can receive an "Outbound Access To Internet" value only when the following setting is enabled in Network Settings: Add Outbound Access to Internet Results. When disabled, SNAT NAT rules and outbound ACL rules are filtered out to focus on inbound exposure.
-
Not Exposed - Asset has no internet exposure
-
Unknown - Exposure status cannot be determined
Internet Exposure Context
From the relevant Assets page, click Edit Table > Edit Columns and add the Internet Exposure Context column to the table. This is a complex field that includes the following sub-fields:
- Public IPs - The most external Public IPs that were detected
- FQDN- The full-qualified domain name from that route (whenever Axonius can link the route to a DNS Record)
- Allowed CIDRs- Which CIDRs are allowed to that route: all CIDRs or a smaller source range
- Port Ranges - On which ports this asset communicates with the next network element. For example: a Device communicating with a Load Balancer
- Protocols - On which protocols this asset communicates with the next network element. For example: a Device communicating with a Load Balancer
Exploring Network Routes on the Asset Graph
Note
The Asset Graph tab provides a visual representation of connections between assets in your inventory. To learn more working with the Asset Graph, refer to our Asset Graph docs.
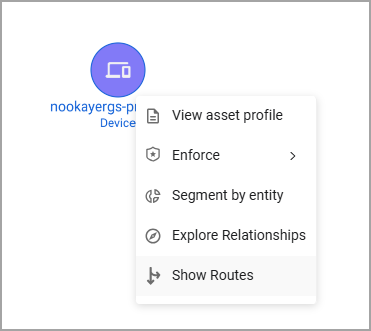
On the device's Profile page, select the Asset Graph tab. Click on the single node that appears at the center of the page and select Show Routes.
Note
The Show Routes option is only available for assets that have at least one Network Route.
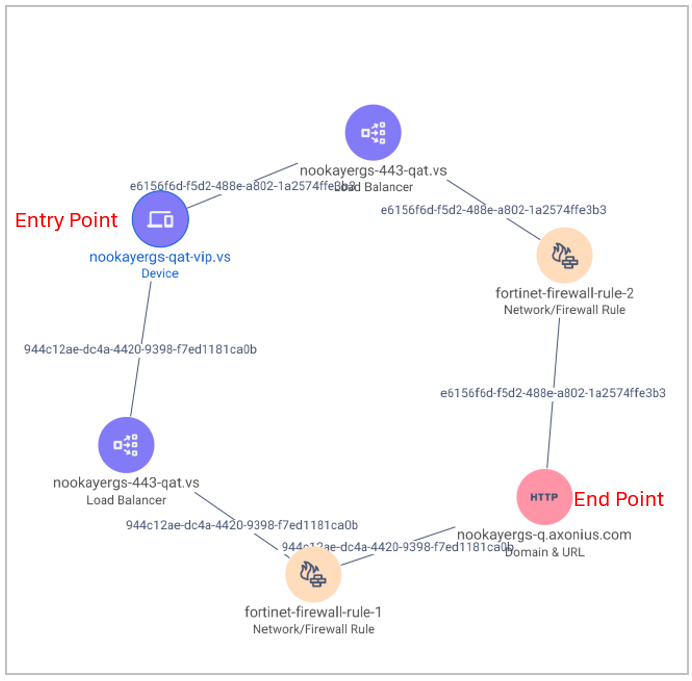
A visual representation of the device's Network Route(s) appears. Under each node in the graph, you can see the asset type this node represents and the asset`s name. Each connecting line between nodes displays the Route ID.
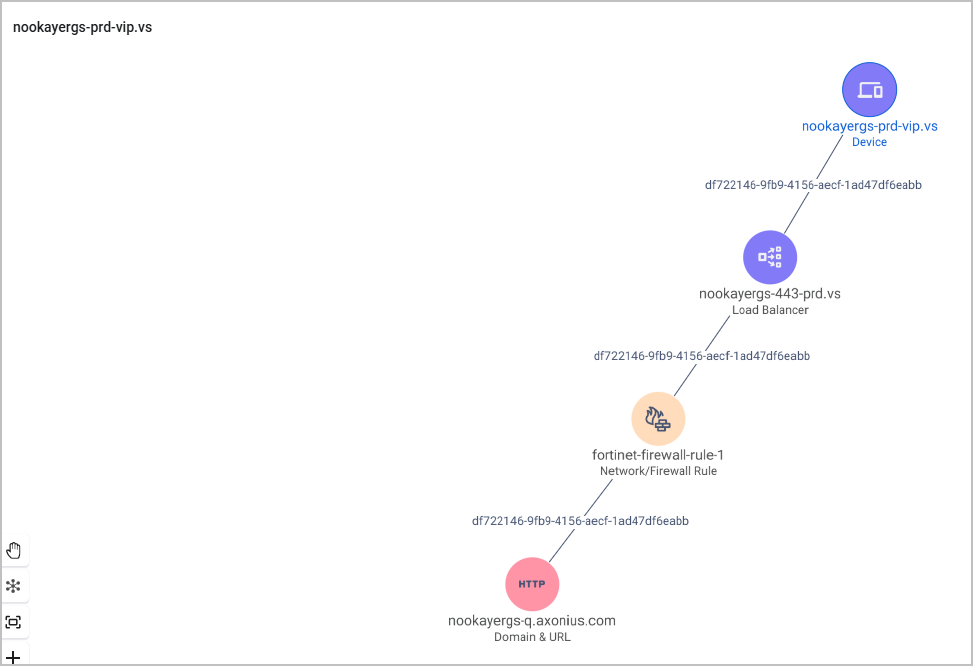
The above image demonstrates a device that is part of a single Network Route. An asset can also be part of multiple Network Routes, as demonstrated below. Not that in the following example, both Routes (starting at the device) are ending at the same endpoint.
To further explore the Network Routes map, click any node in the graph and select Show Routes again. For example, you can expand the graph by showing all Routes of this Load Balancer:
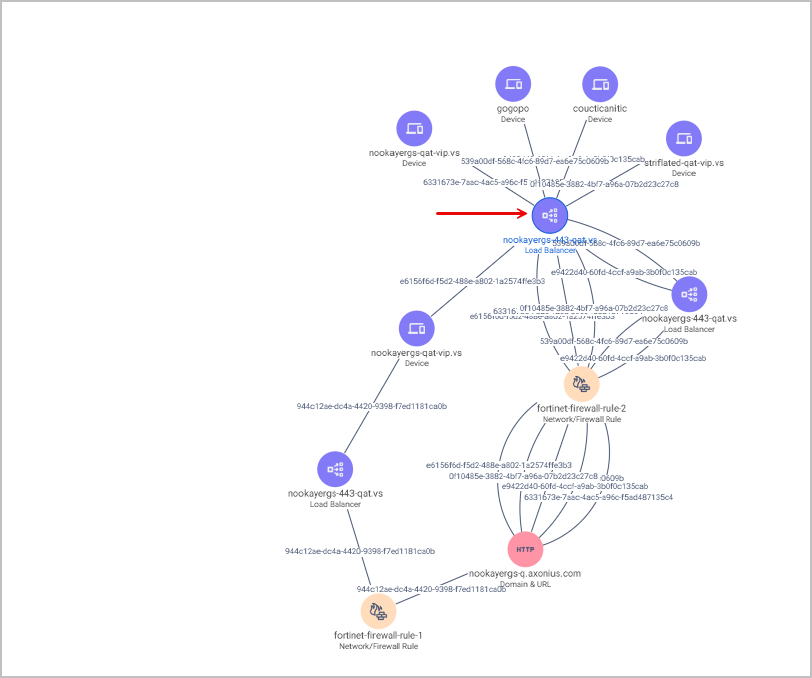
You can continue to click on nodes and show their Routes for a more thorough investigation, and also navigate to the Profile pages of the assets in the graph.
Note
You can't show Routes of nodes that represent a group of asset. You must first ungroup this node and then show the Routes of each sub-node individually.
Updated 18 days ago