
Configuring Event Conditions
You can configure Event Conditions within your Axonius Workflows. An Event Conditions node allows you to control your Workflow's run path, branching it based on the outcome of the preceding Event node or based on a condition using data from any previous node.
Event Condition Branches (IF/ELSE)
When you add an Event Conditions node after an Event node, it automatically creates true and after paths, and defaults to an IF condition structure:
-
true path - Nodes in this path run if the defined condition is met. Otherwise, this path is bypassed.
-
after path-
- If the condition is met, nodes in this path run after all nodes in the true path have completed.
- If the condition isn't met, the Workflow bypasses the true path entirely and proceeds directly to the nodes in this path.
The first node in the after path inherits the assets (meaning, 'Runs on') from the node immediately preceding the condition. For example, if Node X is followed by a condition and Node Y is the last node in the true path, the node following the condition in the after path will run on the assets resolved by Node X.
Building Complex Logic (ELSE IF / ELSE)
You can build advanced conditional logic by adding subsequent condition nodes on the after branch:
- ELSE IF - Add these nodes before an ELSE to define another specific condition that is checked only if the preceding IF or ELSE IF conditions failed.
- ELSE - This non-configurable branch runs only if none of the preceding IF or ELSE IF conditions were met.
If your logic requires a completely independent set of conditions, you can start a brand new IF condition further down the main Workflow path. This flexibility empowers you to create highly tailored and robust workflow branching.
Types of Event Conditions
Event Conditions can be based on Workflow Data repository data, i.e., data from any previous node in the Workflow, or based on the data of the preceding Event node.
Condition is Based on Workflow Data Repository
This condition checks data stored anywhere in the Workflow Data repository (from any previous node) for specified criteria. This is typically used for data that is static or has been previously saved within the workflow's run. Example Logic: Variable.failed_login_count > 3 AND Variable.account_status == "inactive"
Preceding Event Node Conditions
These conditions evaluate the details of the immediate preceding Event node. You can only select one of the following two sub-types in the condition drawer:
Fields Condition (Event/Asset Criteria)
A Fields condition allows you to define criteria based on the data contained in the event or the asset resolved by the event:
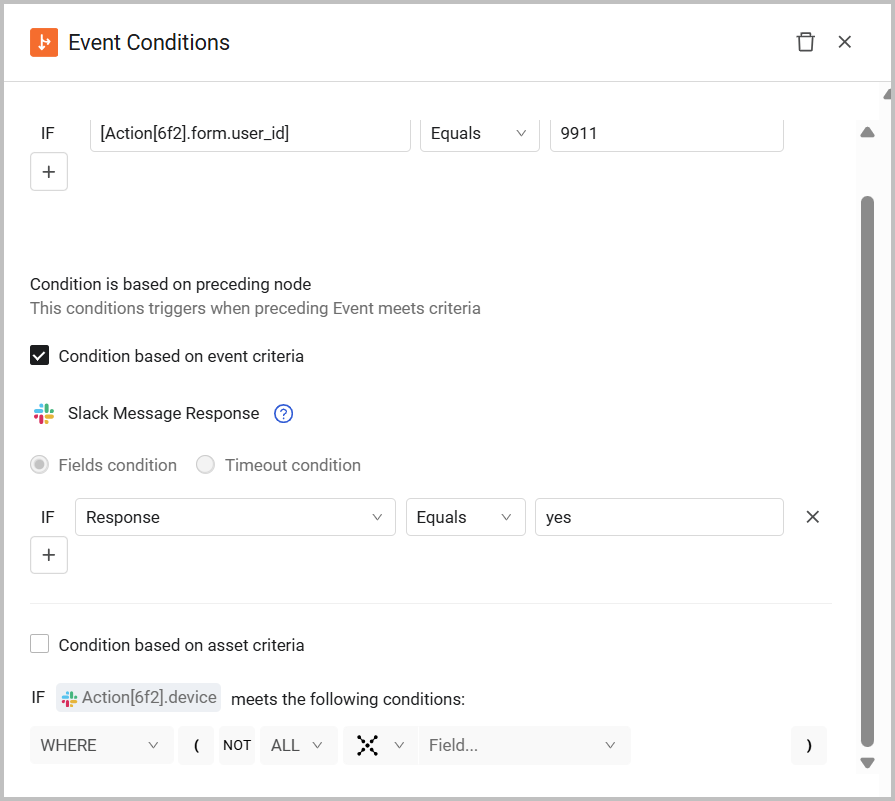
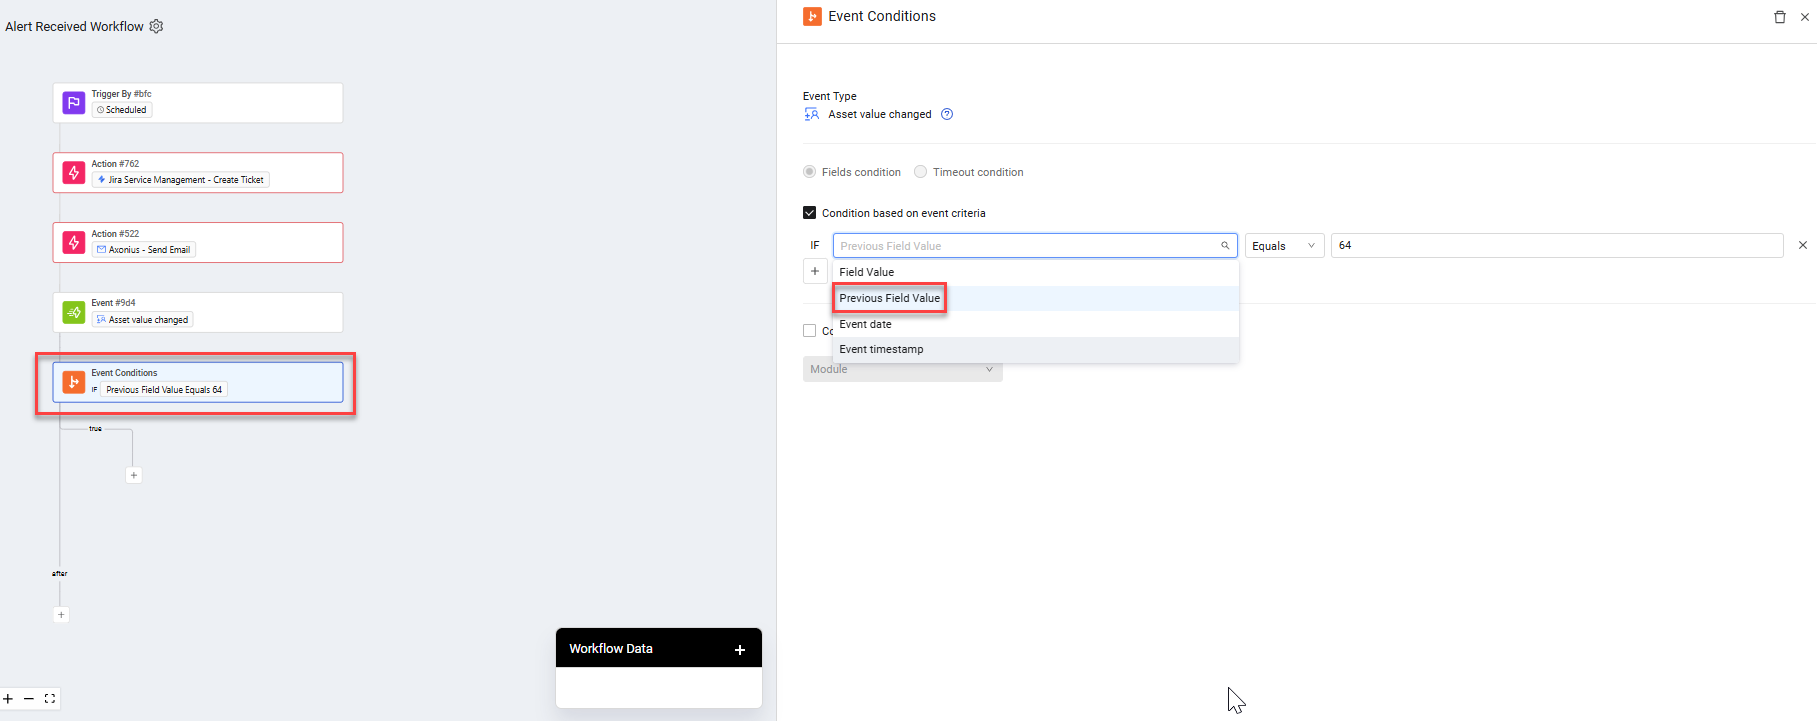
- Condition based on event criteria - Evaluates fields within the event data itself (e.g., event_type == "login_failure"). For the Asset value changed event, you can compare the Current Field value or the Previous Field value.
- Condition based on asset criteria - Checks if the asset resolved from the preceding Event node matches a defined Query (e.g., checking if the device is a 'Windows Workstation').
Note
For the Workflow to proceed along the true branch, the Event must match ALL specified event criteria AND the resolved asset must match ALL specified asset criteria.
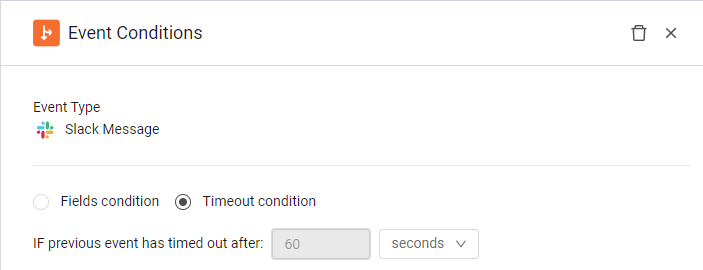
Timeout Condition
The Timeout condition is only available when the preceding Event node (non-triggering) is configured with a Timeout setting.
- This condition is met (and the true path runs) if the preceding Event node reaches its configured timeout limit without receiving a trigger.
- The Timeout settings are inherited from the previous Event node and cannot be modified within the condition itself.
Note
You can configure an Event Condition with either a Timeout condition or a Fields condition; not both.
Configuring an Event Condition
To configure an Event Condition
-
Select one or more of the following condition types:
- Condition based on data repository.
- Timeout condition or Fields condition (select only one).
- Select Timeout condition if you want to add a condition based on the timeout configured in the preceding Event node (non-triggering).
- Select Fields condition to set either of the following conditions on the preceding Event node:
- Condition based on event criteria - Select this to [add one or more conditions based on specific event field properties(#adding-fields-conditions-to-a-workflow).
- Condition based on asset criteria - Proceed as in the Adding Conditions Based on Asset Criteria section below.
-
Build the true branch:
- Add the first node: At the end of the True branch, hover over the
+icon and add the first node to run if the defined conditions are met. - Add more nodes: To add subsequent nodes, hover over the
+icon following the last node in the true branch, and select from the available node types. Repeat this for each node you want to add to the branch.
- Add the first node: At the end of the True branch, hover over the
-
Add additional conditions (Else if or Else): Above the after label, hover over the
+icon and click one of these options:- Else IF - This opens an Event Conditions node for configuration, similar to a regular Condition node, allowing you to define another specific condition.
- Else - This opens a non-configurable Event Conditions node. This branch will run if none of the preceding IF or ELSE IF conditions are met.
-
Build the after branch: At the end of the after branch, below the after branch label:
- Add the first node: At the end of the after branch, below the after branch label, hover over the
+icon and add the first node. This node will run after the true branch completes (if the condition was met), or directly if the true condition wasn't met. - Add more nodes: To add subsequent nodes, hover over the
+icon following the last node in the after branch, and select from the available node types. Repeat this for each node you want to add to the branch.
- Add the first node: At the end of the after branch, below the after branch label, hover over the
Note
You must add a node to the end of either or both the after and true branches of an Event Conditions node. If a branch has no subsequent node and is evaluated, the Workflow will complete, and the Run History will show the Workflow status as Completed.
Adding a Condition Based on Workflow Data Repository
You can configure an Event Condition on any previous node, using stored data from the Workflow Data repository. For example: Variable.high_risk_users contains "Avi"
To add a condition based on data from the Workflow Data repository
- Enable the Condition is based on data repository setting.
- From a tab in the Workflow Data repository that opens, copy a variable, and paste it in the Input field of the condition.
- From the Func dropdown, select a function or operator. Available functions and operators: Equals, Contains, Does not contain, Starts with, Ends with, Regex match,
>,<). - In the Field Value textbox, type a value or copy data from a field in a previous node in the Workflow Data repository, and paste it.
- To add an additional event criterion, click
+and repeat the process. All criteria in a single set are combined with an implicit AND logic. - To remove an event criterion, hover over it, and click the x . If it's the only criterion, its values are cleared; otherwise, it is removed.
Adding Fields Conditions to a Workflow
Note
You can configure an Event Condition with either a Timeout condition or Fields condition; not both.
A Fields condition enables you to define criteria based on Event data, Asset data, or both. When the Workflow runs, it proceeds along the True branch only if the event data matches all specified event criteria AND the asset resolved from the event matches all specified query criteria. If even one criterion does not match, the Workflow proceeds along the After branch.
To add Field conditions to your Workflow
- In the Fields Condition settings, configure at least one condition based on Event criteria or Asset criteria.
Adding Conditions Based on Event Criteria
Event criteria check if the event data matches specific conditions. For example, for an Asset value changed event, you might check if an asset's Host Name field contains 'HostA'. For a Workday New Hire event, you could verify if the Hire Date was in the current year.
-
For the Asset value changed event, you can base each criterion on the current Field value or Previous field value. This allows for conditions like 'status changed from Employed to Terminated' (and not from Onboarding).
-
You can also compare event data to values stored in the Workflow Data dialog (e.g., from a previous Event field or Action configuration (form) field).
To add conditions based on event criteria
- Select the Condition based on event criteria checkbox. The Workflow Data dialog opens.
- Configure the following:
- In the Select Field dropdown, choose a relevant field. For the Asset value changed event, select Field Value to compare the current value or Previous Field Value.
- In the Func dropdown, select a function or operator. Available functions and operators: Equals, Contains, Does not contain, Starts with, Ends with, Regex match,
>,<). - In the Field Value textbox, either type a value or copy data from a previous Event field or Action configuration field using the Workflow Data dialog, and paste it.
- To add an additional event criterion, click
+and repeat the process. All criteria in a single set are combined with an implicit AND logic. - To remove an event criterion, hover over it, and click the x . If it's the only criterion, its values are cleared; otherwise, it is removed.
Adding Conditions Based on Asset Criteria
Asset criteria check if the asset resolved from the preceding Event node matches a defined query. For example, you can check if a resolved Device asset is returned from a 'Windows Workstation' query. You can add an event condition based on one or more asset criteria by either creating a new query or using an existing one.
To add a condition based on asset criteria
- Under the Condition based on asset criteria section, determine if the resolved asset matches specific criteria by doing one of the following:
- Define a new Query using the Query Wizard
- Use an existing query - Select a predefined query to evaluate the resolved asset.
- To add an additional asset criterion, click
+and repeat step 1. All criteria in a single set are combined with an implicit AND logic. - To clear an asset criterion, hover over it and click the x. The criteria values are cleared.
Examples
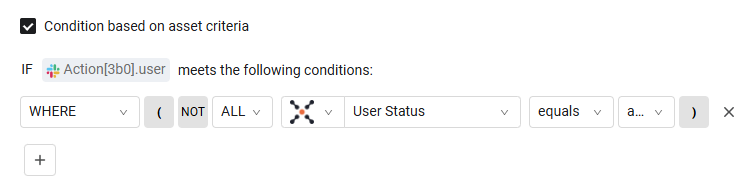
-
A newly created query that checks if the user resolved from the event is active.
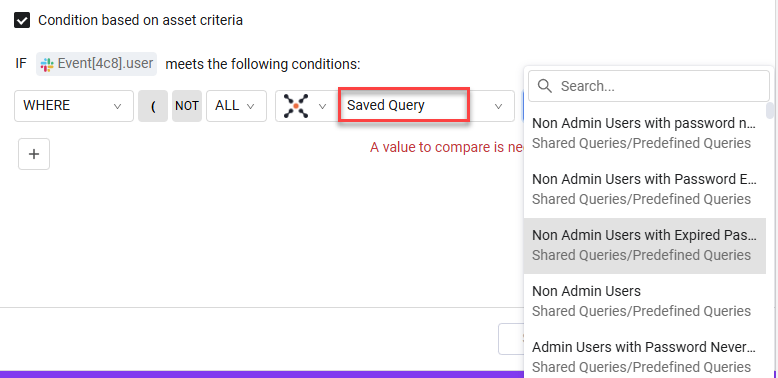
-
An existing query that checks if the user resolved from the event is a non-admin user with an expired password.
Adding a Timeout Condition to a Workflow
You can only add a Timeout condition directly following an Event node that has been configured with a Timeout setting. It cannot follow a triggering Event.
This condition checks if the Event in the previous Event node timed out.
- The Workflow proceeds on the True branch if the previous Event timed out after the defined duration.
- Otherwise, if the Event hasn't timed out, the Workflow proceeds on the After branch.
The Timeout settings displayed in the Event Conditions node for a Timeout condition are inherited from the previous Event node and cannot be modified within the condition itself. The Event Timed Out label is added to the Event Conditions node.
Once you configure a Timeout condition, you cannot configure a Condition based on event criteria or Condition based on asset criteria of the previous node.
Adding the First Branch Node
You can add any of the following nodes below the True and After branches:
- Add Action
 - To add and configure an Action node
 - Add Event
 - To add and configure another Event node
 - Add Delay
 - To add and configure a Delay node
 - Repeat for Each
 - To add a Repeat for Each node to define a query and flow for returned assets.
Testing Event Conditions
Event Conditions follow Event nodes. They evaluate based on event data, asset criteria, timeout settings, or workflow variables.
Prerequisites
- The preceding Event node must be tested first.
- All upstream nodes must complete successfully.
- Configure your condition and resolve any syntax errors.
Testing event criteria
Event criteria check whether the event payload data matches your condition.
To test event criteria:
-
In the canvas, select the Event Condition node.
-
Click Run Test.
-
Review the Test Panel, which displays:
- Event data evaluated — Field names and values from the event (for example,
event_type, field changes). - Condition statement — The expression you configured.
- For Asset Value Changed events: Comparison of the Current Field value and Previous Field value.
- Event data evaluated — Field names and values from the event (for example,
-
Interpret the result:
- Condition Matched (green checkmark) — Event data meets the criteria. The true branch will execute.
- Condition Not Matched (gray X) — Event data does not meet the criteria. The after or else branch will execute.
Example: Test whether an event's field_value contains "password_expired" when the previous value was "active".
Testing asset criteria
Asset criteria check whether the asset resolved by the Event node matches a query you define.
To test asset criteria:
-
In the canvas, select the Event Condition node.
-
Click Run Test.
-
Review the Test Panel, which displays:
- Tested on — The specific asset (name and ID) the condition evaluated against.
- Query used — The query name or filter that determined asset matching.
- Query results — Which assets from the event passed the query.
-
Interpret the result:
- Condition Matched (green checkmark) — The asset matches the query. The true branch will execute.
- Condition Not Matched (gray X) — The asset does not match the query. The after or else branch will execute.
Example: After a "user modified" event, test whether the user asset appears in an "Active Directory" query.
Testing timeout conditions
Timeout conditions are available only when the preceding Event node has a timeout configured. They check whether the event timeout was reached before a trigger arrived.
To test a timeout condition:
-
In the canvas, select the Event Condition node with the timeout configuration.
-
Click Run Test
-
Review the Test Panel, which displays:
- Timeout setting — The duration configured on the preceding Event node.
- Timeout status — Whether timeout was reached.
-
Interpret the result:
- Condition Matched (green checkmark) — Event timeout was reached. The true branch will execute.
- Condition Not Matched (gray X) — Event was triggered before timeout. The after or else branch will execute.
Example: Test whether a workflow waited 30 minutes for a user creation event before timing out.
Testing workflow data conditions
Workflow data conditions check variables or fields stored from any previous node.
To test workflow data conditions:
-
In the canvas, select the Event Condition node.
-
Click Run Test.
-
Review the Test Panel, which displays:
- Data evaluated — Values from workflow variables or event fields from earlier nodes.
- Condition statement — Your expression (for example,
Variable.failed_logins > 5).
-
Interpret the result:
- Condition Matched (green checkmark) — Workflow data met the condition. The true branch will execute.
- Condition Not Matched (gray X) — Workflow data did not meet the condition. The after or else branch will execute.
Testing multiple conditions (IF / ELSE IF / ELSE)
When you add multiple conditions using ELSE IF:
- Test the first (IF) condition — The test evaluates and shows which condition matched.
- If the first condition doesn't match, the second (ELSE IF) is automatically evaluated.
- Continue testing each condition in the sequence.
- The ELSE branch (no configuration required) executes if all preceding conditions fail.
The test result shows which branch the workflow would take based on all conditions.
Updated 2 months ago