
Previewing the Risk Score
Before saving the Risk Score you created, the system generates a Results Preview on a randomly selected instance and displays a breakdown of the factors contributing to the calculation, including original and normalized data. This capability ensures extra transparency and accuracy, as it allows you to go back and make changes to the calculation parameters before applying them in your environment.
Note that you can generate a preview only after you've completed all steps required for configuring a Risk Score:
- Selecting parameters
- Assigning fields alternative values and fallback values
- Ensuring that the total weight of parameters is 100%
- Defining Risk Levels (if you don't make any changes to this section, the system will use the Axonius default settings)
Generating a Preview
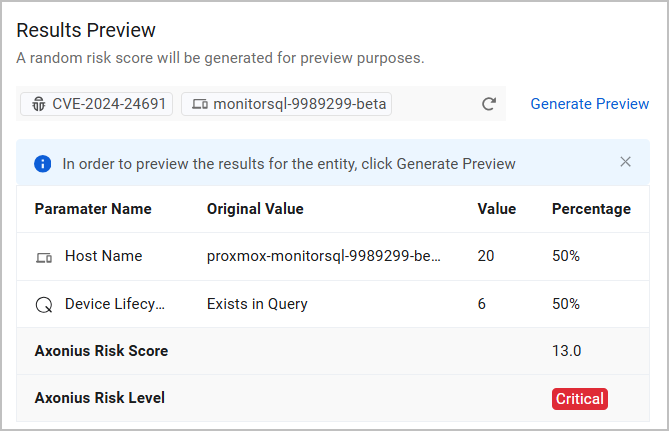
From the Results Preview section, click Generate Preview. The parameters contributing to the calculation are displayed with the following breakdown:
- Parameter Name
- Original Value
- If the parameter is an Asset Field, the Original Value is the field's original value (numeric or non-numeric).
- If the parameter is a Query Condition, the Original Value is either Exists in Query or Doesn't Exist in Query.
- Value - The actual parameter value, after a normalization process.
- Percentage - The weight of the parameter in the calculation.
The calculated Axonius Risk Score and Axonius Risk Level are displayed under the list of fields.
Note
When the Risk Score Level results in 0, the value of Axonius Risk Level is None:
ected instance and displays a breakdown of the factors contributing to the calculation, including original and normalized data. This capability ensures extra transparency and accuracy,
- The Host ID is displayed on the top left of the Preview table.
- If the Risk Score is calculated per Security Findings or per Security Finding per Asset - the CVE ID is displayed next to the Host ID, as seen in the above image.
- If the Risk Score is calculated for Aggregated Security Findings, only the CVE ID is displayed.
Clicking Generate Preview again generates a preview for the same instance. This is useful if you want to make changes to the Risk Score settings after the first preview, and then generate another preview to see the effect of the changes.
To generate a preview for a different random instance, click the  icon. To preview results for the new instance, click Generate Preview again.
Note
If you configure fallback fields for the Risk Score, the preview shows the fields actually used in the calculation. For example, if the primary field to be used in the calculation is the CVSS V4 Score field, but the system ends up using the CVSS V3 Score field - the latter will be displayed in the preview.
Saving a Risk Score
Click Save and Run to save the Risk Score. This creates a new Enforcement Set task and you can access the Risk Score from the Enforcement Center as well.
Note
If you define several conflicting Risk Scores, you can prioritize between them and configure their execution order from the Enforcement Center. The value from the action that runs last is the value written into the asset's Axonius Risk Score field. Currently, the Risk Score page itself does not contain a direct prioritization mechanism.
To find which Risk Score action was used to calculate an asset's Risk Score:
- Go to the asset's Risk Score Breakdown.
- Click the link navigating to the configuration page of this Risk Score. In this page, you can see the action's name, the parameters used and their weight, and all the other settings.
Learn more about Scheduling Enforcement Set Runs.
Updated 3 days ago