
SailPoint IdentityIQ
SailPoint IdentityIQ is an identity and access management (IAM) solution that delivers automated access certifications, policy management, access request and provisioning, password management, and identity intelligence.
Types of Assets Fetched
This adapter fetches the following types of assets:
- Users
- Roles
- Accounts/Tenants
Data Retrieved through the Adapter
Users - fields such as: Username, Department, Title, Country
Roles - fields such as: Name, Display Name, Role Type, Active
Accounts/Tenants - fields such as: Name, Display Name, Application Name, Owner Display Name
Before You Begin
Required Ports
- TCP port 443 (HTTPS)
Authentication Methods
This adapter supports two authentication methods:
Authenticate using a SailPoint IdentityIQ username and password.
Authenticate using a Client ID and Client Secret generated from the IdentityIQ API Management console. Supported in IdentityIQ version 7.1 and later.
APIs
Axonius uses the IdentityIQ SCIM REST API (8.3). The following endpoints are called:
GET /identityiq/scim/v2/Users- Fetch identity usersGET /identityiq/scim/v2/Accounts- Fetch accountsGET /identityiq/scim/v2/Applications- Fetch applicationsGET /identityiq/scim/v2/Roles- Fetch rolesGET /identityiq/scim/v2/Entitlements- Fetch entitlementsPOST /identityiq/oauth2/token- Obtain OAuth 2.0 bearer token (OAuth 2.0 authentication only)
Required Permissions
The following capabilities must be assigned to the service account in SailPoint IdentityIQ:
- SCIMExecutor — Grants access to all SCIM REST API endpoints. Includes the
ReadScimUserright by default. - WebServicesExecutor — Required alongside
SCIMExecutorto enable REST API access.
No write permissions are required. These capabilities grant read-only access.
Accessing the SCIM API — SailPoint Developer Community
IdentityIQ SCIM REST API — SailPoint Developer Community
Note:For a complete list of SPRights and capability requirements specific to your IdentityIQ version, refer to the SCIM API Reference guide on SailPoint Compass (login required) or contact your SailPoint administrator.
Supported From Version
Supported from Axonius version 4.5
Setting Up SailPoint IdentityIQ to Work with Axonius
-
Log in to SailPoint IdentityIQ as an administrator.
-
Navigate to Admin > Security Settings.
-
Select API Management.
-
Click +New to open the New API Client dialog.
-
Enter a description for the API client.
-
Select Client Credentials as the access method.
-
Click Create. A Client ID and Client Secret are generated.
-
Copy the Client ID and Client Secret and store them securely — they may not be shown again.
-
Assign the SCIMExecutor and WebServicesExecutor capabilities to the service account under Preferences > Capabilities.
-
-
-
Create a dedicated service account in SailPoint IdentityIQ.
Assign the SCIMExecutor and WebServicesExecutor capabilities to the account under Preferences > Capabilities.
-
-
Connecting the Adapter in Axonius
- Navigate to the Adapter Catalog, search for SailPoint IdentityIQ, and select the adapter.
- Click Add Connection.
- Provide the following parameters.
Connecting the Adapter in Axonius
- Navigate to the Adapter Catalog, search for SailPoint IdentityIQ, and select the adapter.
- Click Add Connection.
- Provide the following parameters.
Required Parameters
-
Host Name or IP Address - The hostname or IP address of the SailPoint IdentityIQ server. You must include https:// or http:// at the beginning of the Host Name or IP Address
-
Auth Method - Select Authentication method either Basic Authentication (default) or OAuth 2.0.
- Basic Authentication:
- Username and Password - The credentials for a user account that has the permissions to fetch assets.
- OAuth 2.0:
- Client ID and Client Secret - Parameters for SailPoint IdentityIQ OAuth2 authentication.
- Basic Authentication:
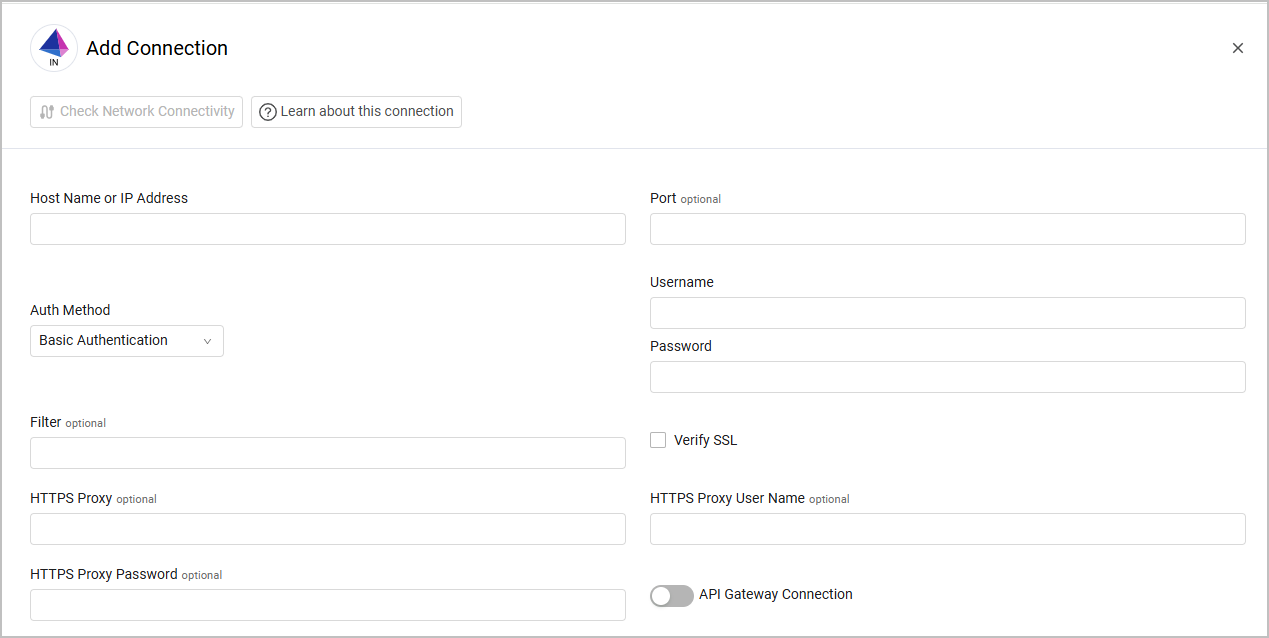
Optional Parameters
-
Port - The port for the SailPoint IdentityIQ instance.
-
Filter - A filter to use. Note that the filter only works for the Users asset type.
-
Verify SSL - Select whether to verify the SSL certificate of the server against the CA database inside of Axonius. For more details, see SSL Trust & CA Settings.
-
HTTPS Proxy - Connect the adapter to a proxy instead of directly connecting it to the domain.
-
HTTPS Proxy User Name - The user name to use when connecting to the value supplied in Host Name or IP Address via the value supplied in HTTPS Proxy.
-
HTTPS Proxy Password - The password to use when connecting to the server using the HTTPS Proxy.
-
API Gateway Connection - Enable this to use API gateway parameters for authentication. After enabling this option, under API Gateway Type, choose Layer7 and fill in the parameters that are displayed (in addition to the SailPoint IdentityIQ host name or IP address). Read more about Layer7 API Gateway Parameters.
Note
When you use an API gateway connection, the other authentication parameters are not required. However, to add the connection successfully, you need to enter placeholder values in these fields.
To learn more about common adapter connection parameters and buttons, see Adding a New Adapter Connection.
Advanced Settings
Note
Advanced settings can either apply for all connections for this adapter, or you can set different advanced settings and/or different scheduling for a specific connection, refer to Advanced Configuration for Adapters.
To learn more about Adapter Configuration tab advanced settings, see Adapter Advanced Settings.
- Fetch user entitlements - Select this option to fetch user entitlements.
- Fetch user roles - Select this option to fetch user roles.
- Fields to exclude from fetch - Enter a comma-separated list of fields to exclude from the fetch. When you select "Fetch SailPoint Accounts as Users." The adapter fetches SailPoint accounts and ingests them as Axonius users and then removes the fields from the account data before ingestion.
- Fields to include exclusively from the fetch - Enter a comma-separated list of fields to include from the fetch. Only the specified fields are included in the fetch; all others are excluded. IMPORTANT: The 'id' field MUST be included — users without it will be skipped and not ingested. It is also recommended to include 'userName' to strengthen the identifier. When you select "Fetch SailPoint Accounts as Users." The adapter fetches SailPoint accounts and ingests them as Axonius users and then only these fields are included in the account data.
- Custom attributes to fetch - Enter a comma-separated list of extra fields to fetch.
- Users per request (default: 1000) - Enter a number of users to receive in each request from the server, in order to reduce strain on the server.
- Exclude disabled users - Select this option to not fetch users whose “active“ status is false or non-existent.
- Async batch chunk size (default: 50) - Specify the size of the chunk size per async request batch. This can be helpful when the SailPoint IdentityIQ server crashes due to loads.
- Fetch users seen in the last X days - Fetch only users that have been seen within the given number of days.
- Save entitlements raw data - Select this option to save the raw data for the entitlements field in JSON format.
- Fetch Sailpoint Applications as Accounts - Select this option to fetch SailPoint Applications as Accounts.
- Fetch Sailpoint Accounts as Users - Select this option to fetch SailPoint Accounts as Users.
- Fetch Roles as Assets - Select this option to fetch SailPoint Roles as Roles.
- Fetch Entitlements as Roles - Select this option to fetch SailPoint Entitlements as Roles.
Updated about 2 months ago