
Managing Field Mapping
Note
Field mapping is available only to users with the Action Center feature enabled.
The Field Mapping feature enables mapping source field data fetched from one or more adapters during the Discovery Cycle to a target custom field.
- Field Mapping Enforcement sets are triggered in the Post-Correlation phase of the Discovery Cycle after all other Enforcement set runs have concluded, but continue running asynchronously outside the Discovery Cycle. This enables the Discovery Cycle to proceed to the next phase before the Field Mapping Enforcement set runs are completed. This means that a Field Mapping goes into effect after it concludes running, and not necessarily after the Post Correlation phase.
- Field Mappings map only the first valid populated value from a selection of adapter string fields to a single-value target string field.
- Field Mappings map all valid populated values from a selection of adapter string fields to a multi-value target string field.
- Field Mappings can be configured to perform additional manipulations and calculations on the mapped data using predefined or user-defined Data Transformation rules.
Note
- If a complex object (for example, installed software) source field is selected, it randomly selects the first object from the list for the mapping.
Required Permissions
Admin users have access to Field Mapping by default. In order to use this module,Field Mapping permissions must be assigned.
Viewing Field Mappings
From the Field Mapping page, you can manage all field mappings in the system from one central location, and create new field mappings, as required.
To view the Field Mappings in the system
- From the top right corner of any page, click
.png) . The System Settings page opens.
. The System Settings page opens. - In the Categories/Subcategories pane of the System Settings page, expand Data, and select Field Mapping. The Field Mapping page opens.
Note
In some versions, you access this feature from the Adapters page by clicking Field Mapping and Transformations.
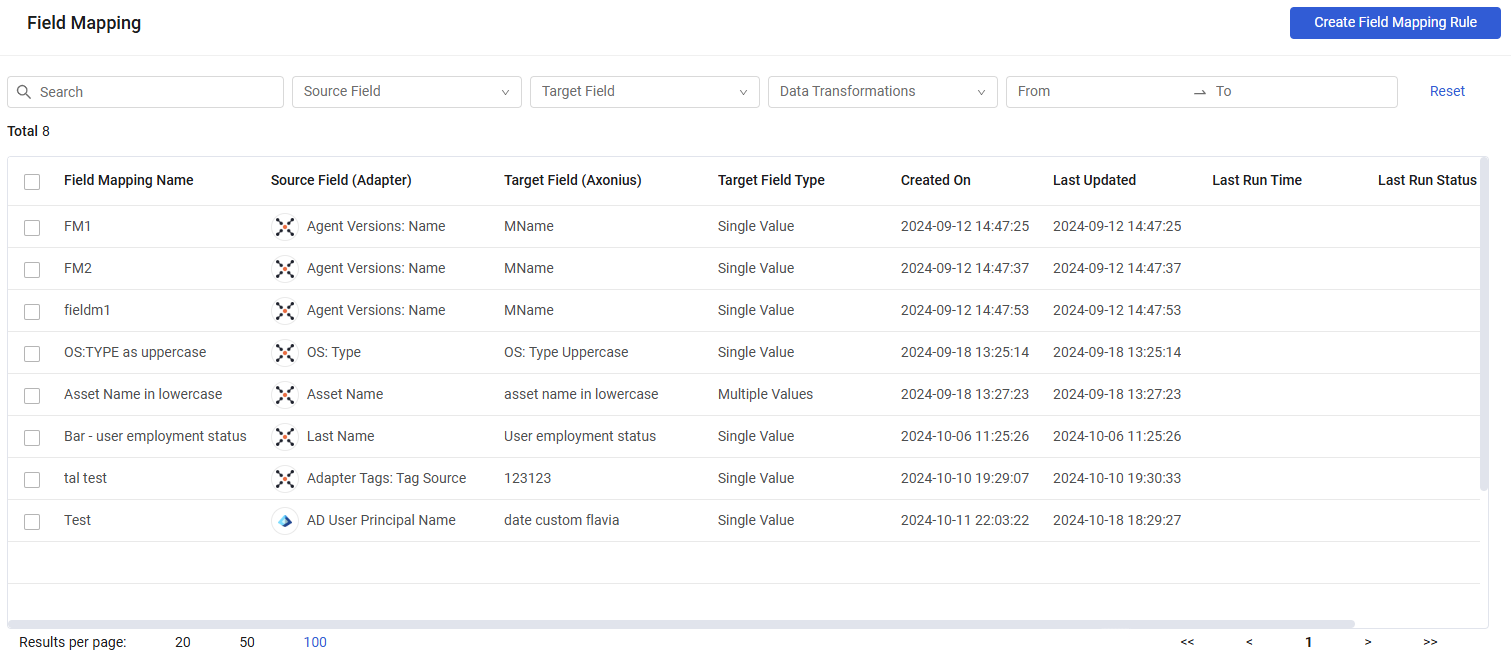
The following information is displayed on the Field Mapping page:
- Field Mapping Name - Name assigned to the Field Mapping. A red badge appears near the name to indicate an error with the field mapping. Hovering over the badge shows the error. For example, This Field Mapping is disabled due to a data transformation error.
- Source Field (Adapter) - One or more field names. If there are more than two, the number of additional ones is indicated. Hovering over the number opens the Source Field (Adapter) table, with the list of fields that are mapped.
- Target Field (Axonius) - The field that the source field is mapped to.
- Target Field Type - Whether the target field is a Multiple Values (Aggregated) or Single Value field (Preferred).
- Created On - The date and time that the mapping was created.
- Last Updated - The date and time that the mapping was last updated.
- Last Run - The start date and time of the latest Field Mapping Enforcement Set run.
- Last Run Status - The latest status of the Enforcement Set run. View status options for the Result field in the Enforcement Sets Run History table.
Note
As the Field Mapping Enforcement Set runs outside the Discovery Cycle, the Last Run and Last Run Status columns enable tracking their status.
Creating a Field Mapping
The following procedure describes how to create a new mapping from source adapter fields to a single-value or multi-value target field.
Note
Only string fields are supported.
To create a new Field Mapping
-
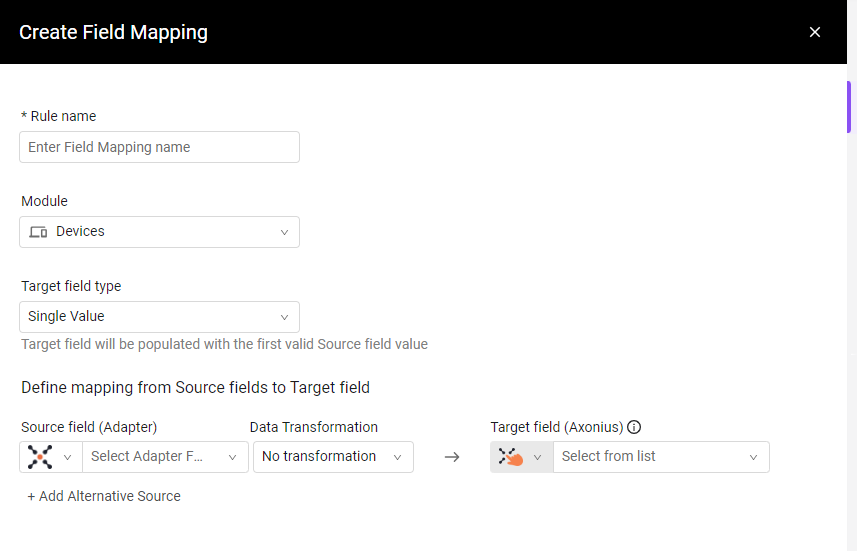
In the Field Mapping page, click Create Field Mapping Rule. The Create Field Mapping drawer opens.
-
In Rule Name, type a meaningful name for the field mapping.
-
From the Module dropdown, select an asset type.
-
From the Target field type dropdown, select one of the following as the target field type:
- Single Value - To create a single-value string field from the first source field with a valid populated value.
- Multiple Values - To create a multi-value list field with values from all valid populated source fields.
-
Under Source Field (Adapter), select the adapter and the field in that adapter to map.
-
From the Data Transformation dropdown, select No transformation for pure mapping or a defined data transformation (Predefined or Custom) for mapping with a transformation. Only data transformations that are relevant for the selected module are shown.
- For single-value target types, the selected data transformation will be performed on the first valid populated source field.
- For multiple-value target types, the selected data transformation will be performed on all valid populated source fields.
-
Under Target field (Axonius), select the Target field name. This field is always in the Custom Data adapter (and therefore the adapter is not selectable).
-
If you want to add alternative sources for the Target field, click +Add Alternative Source for each additional source, and perform steps 5 and 6 above.
- If Target field type is Single Value, OR is displayed between the selected source fields as only the first valid populated source field is mapped to the target field.
- If Target field type is Multiple Values, AND is displayed between the selected source fields as all valid populated source fields are mapped to the target field.
- Click X near any alternative source that you want to remove.
-
Click Create. The new Field Mapping is added to the Field Mapping table.
Searching and Filtering
You can filter the field mappings displayed in the table. You can then use the filters to create System queries based on the filters and also save them as queries which can be used later on.Read more about System Queries.

The following filters are available:
-
Search - Search for any text in a field mapping.
-
Source Field - The field or fields being mapped.
-
Target Field - The custom field or fields that hold the mapped field values.
-
Data Transformations - The data transformations used in the field mappings.
-
From - To - The field mappings created in the specified period of time.
* Click **From** and select the date and optionally the time (right pane) from which to display results. Repeat for **To** and then click **OK**.
* Both **From** and **To** dates must be filled in and be earlier than or on the current date.
* Click the arrows to the left/right of the Month/Year header to open the previous/next month's or year's calendar page.
* To filter results only for a specific date, select the same date twice.

<Image align="center" border={false} src="https://files.readme.io/6b19ca195289e1ee67a949b991005bec6fc46d86a40a9b080d92b17d01ead376-FromToFilter.png" />
You can click the following to perform quick actions on filters:
- Select All - Selects all options in a specific filter.
- Clear All - Clears all selections in a specific filter.
- Reset - Clears all filters and displays the entire table.
Performing Actions on Field Mappings
Editing a Field Mapping
To edit a field mapping
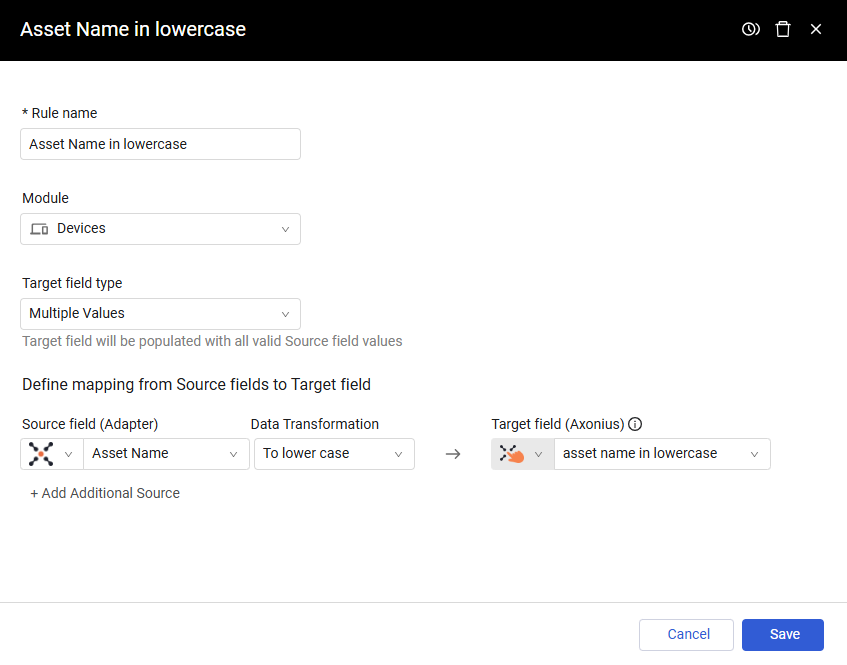
- In the Field Mapping table, click a field mapping.
- In the Field Mapping drawer that opens, modify the fields, as required, and then click Save. See a description of the fields above. A notification appears that the field mapping has been updated successfully. The Field Mapping table is updated accordingly.
Viewing Field Mapping Enforcement Set Run History
You can navigate to the Run History page of one or more field mappings to view complete information on the runs of one or more Field Mapping Enforcement Set runs. This is useful as these Enforcement Sets are triggered in the Discovery Cycle, but continue their runs outside the Discovery Cycle.
To view the run history of one or more field mapping runs
- Hover over a field mapping or select the checkboxes of one or more field mappings, and then click the View Run History icon or action. The Enforcement Sets Run History page opens, filtered by the selected Field Mapping Enforcement sets.
You can also navigate to the Run History of a single field mapping by clicking the View Run History icon in the header of the Field Mapping details drawer.
Deleting Field Mappings
You can delete one or more field mappings at a time. Deleting a field mapping deletes it entirely from the system.
To delete one or more field mappings
- Hover over a field mapping or select the checkboxes of one or more field mappings, and then click the Delete icon or action.
- In the notification box that opens, click Delete Rule to confirm deleting the field mappings.
You can also delete a single field mapping by clicking the Delete icon in the header of the Field Mapping details drawer.
Updated 9 months ago