
Managing Device Scan Jobs
Use the Device Scan Jobs tab to view and manage all device scan jobs configured across your active scanning adapters. The tab provides a centralized view of scan job configurations, their status, and scheduling details.
To open the Device Scan Jobs tab, navigate to the Device Intelligence Hub and click the Device Scan Jobs tab.
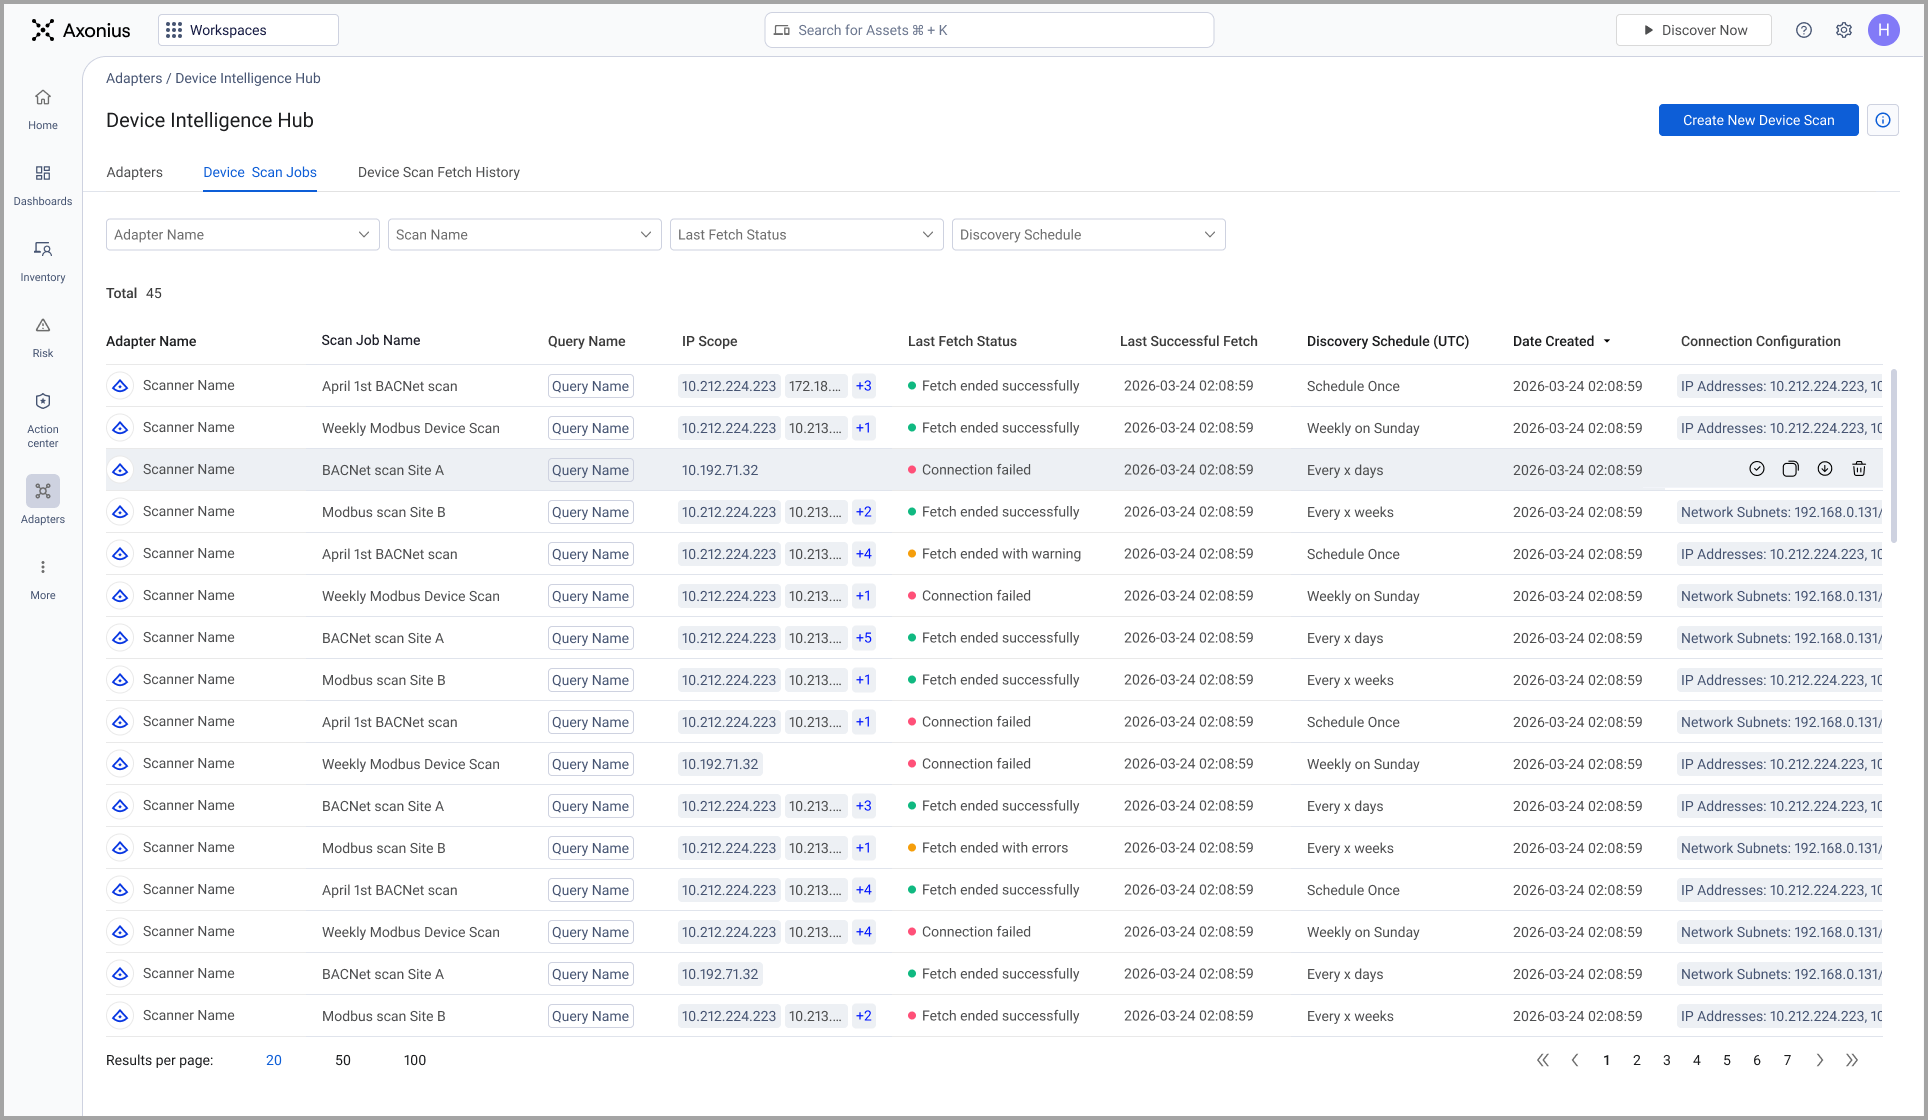
The total number of scan jobs is displayed at the top left of the table.
Creating a New Device Scan
Click Create New Device Scan at the top right of the Device Intelligence Hub to configure a new scan job, including its target devices, schedule, and connection settings. You can also click the More menu on an adapter tile and select Create New Device Scan. See Creating a Device Scan Job.
Search and Filter Device Scan Jobs
You can filter the scan jobs displayed in the table using the following options:
-
Search Adapters - Enter free text to search for scan jobs by adapter name.
-
Adapter Name - Select one or more adapter names from the dropdown list to filter by adapter.
-
Scan Name - Select one or more scan job names from the dropdown list to filter by scan name.
-
Last Fetch Status - Select a status to filter by the most recent fetch result.
-
Discovery Schedule - Select a schedule type to filter by discovery schedule configuration.
Device Scan Jobs Table
The following information is displayed for each device scan job:
-
Adapter Name - The name of the scanning adapter associated with the scan job (for example, Modbus Scanner, CIP Scanner, Bacnet Scanner).
-
Scan Job Name - The name assigned to the scan job when it was created.
-
Query Name - The name of the saved query that defines which assets the scan targets. This column is empty if the scan job uses an IP address or subnet instead of a query.
-
IP Scope - The IP address or subnet range targeted by the scan job. This column is empty if the scan job uses a saved query instead of an IP address.
-
Last Fetch Status - The status of the most recent fetch for the scan job. Possible values include "Fetch ended successfully" and "Fetch ended with errors".
-
Last Successful Fetch - The date and time (UTC) of the last successful fetch for the scan job.
-
Discovery Schedule (UTC) - The configured schedule for the scan job (for example, "Every day at 13:00", "Every 12 hours", "Mon, Sun at 13:00", "Enabled"). A dash (-) indicates no schedule is configured.
-
Date Created - The date and time the scan job was created.
-
Connection Configuration - The connection configuration parameters for the scan job (for example, "Inter Packet Delay Ms: 100"). Click the +N indicator to view additional connection parameters.
Sorting Device Scan Jobs
Click a column header to sort the table by that column. Click again to reverse the sort order. The Date Created column is sorted in descending order by default.
Device Scan Job Actions
You can perform actions on individual scan jobs or on multiple scan jobs at once.
Row Actions
Click the more options menu (⋮) at the end of a scan job row to access the following actions:
- Activate - Run the scan job according to the configured trigger. When you activate a scan job, Axonius begins fetching data from the target devices at the next triggered run.
- Duplicate - Create a copy of the scan job with the same configuration. You can then edit the duplicated scan job and save it with a new name.
- Fetch - Trigger an immediate fetch for this scan job, regardless of its configured schedule. Use this to run the scan on demand without waiting for the next scheduled fetch.
- Delete - Delete the scan job. This action is irreversible.
Bulk Actions
To perform actions on multiple scan jobs at once, select the checkboxes next to the relevant scan jobs, then click Actions at the top right of the table. The following bulk actions are available:
- Activate - Activate all selected scan jobs.
- Fetch - Trigger an immediate fetch for all selected scan jobs.
- Delete - Delete all selected scan jobs. This action is irreversible.
Updated 2 months ago