
Nessus - Create and Launch Scan
Nessus - Create and Launch Scan creates a Nessus Network Vulnerability Scan or Web Application Scan from the assets returned by a query. It can launch the scan immediately or apply a schedule.
This action runs for:
- Assets returned by the selected query or assets selected on the relevant asset page.
See Creating Enforcement Sets to learn more about adding Enforcement Actions to Enforcement Sets.
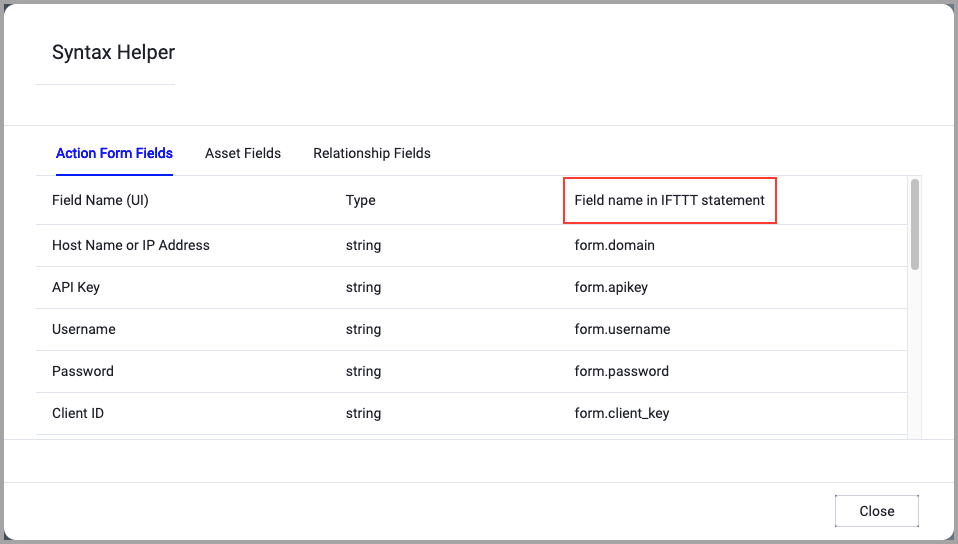
When accessing an enforcement action using the API, you must use the backend form of field names.
Use the Syntax Helper to find the correct name. In the enforcement action, enable Configure Dynamic Values and select Syntax Helper.
Note
- Not all asset types are supported for all Enforcement Actions.
- See Actions supported for Activity Logs, Adapters Fetch History, and Asset Investigation modules.
- See Actions supported for Aggregated Security Findings.
- See Actions supported for Software.
APIs
Axonius uses the Nessus API:
- GET
/policiesto find the policy for a Network Vulnerability Scan. - GET
/editor/policy/templatesto find an available Web Application Scan template. - POST
/scansto create the scan. - POST
/scans/{scan_id}/launchto launch the created scan when Launch scan immediately is selected.
Required Ports
Axonius must be able to communicate via the following ports:
- TCP port 443 (HTTPS) — confirm the exact port with your Nessus administrator.
Required Permissions
The stored credentials, or those provided in Connection and Credentials, must have the following permission(s) to perform this Enforcement Action:
The following permissions and requirements are needed:
- Use a Nessus account that can list policies and scan templates, create scans, and launch scans.
- Authenticate with either a user name and password or an access key and secret key.
The JIRA ticket's permissions and requirements details were not available in the workspace. Confirm the exact permission names and scopes with your Nessus administrator, because the patch does not define vendor role or scope names.
Required Fields
These fields must be configured to run the Enforcement Action.
- Action name - The name of this Enforcement Action. The system sets a default name. You can change the name.
- Configure Dynamic Values (optional) - Toggle on to enter a Dynamic Value statement. See Creating Enforcement Action Dynamic Value Statements to learn more about Dynamic Value statement syntax.
- Scan Type - Select Network Vulnerability Scan (default) or Web Application Scan.
- Scan Name - Enter a name for the scan created in Nessus.
- Use stored credentials from the Nessus adapter - Select this option to use credentials from an existing Nessus adapter connection. By default, the first connection is selected.
-
When you select this option, the Select Adapter Connection drop-down becomes available. Select the adapter connection to use for this Enforcement Action.
-
Compute Node - The Axonius node to use when connecting to the specified host. For more details, see Working with Axonius Compute Nodes.
For a Network Vulnerability Scan, Policy Name is required. The specified policy must exist in Nessus.
Additional Fields
Required Additional Fields
Configure the following scan settings:
-
Use public IP addresses - Select whether to include public IP addresses when the target source is Devices.
-
Use private IP addresses - Select whether to include private IP addresses when the target source is Devices.
-
Use hostnames - Select whether to include hostnames when the target source is Devices.
-
Exclude IPv6 addresses - Select whether to exclude IPv6 addresses when the target source is Devices.
-
Launch scan immediately - Select whether to launch the scan after it is created. This option is selected by default.
Optional Additional Fields
- Policy Name - Enter the name of an existing Nessus policy for a Network Vulnerability Scan. Policy matching first uses an exact name, then a case-insensitive name match.
- WAS Template Name - For a Web Application Scan, optionally enter the Nessus Web Application Scan (WAS) template name or title. When empty, the action uses the standard WAS template. Web Application Scans require a Nessus Expert WAS license.
- Target Source - Select the asset type that supplies scan targets: Devices (IPs), Networks (CIDRs), or Domains & URLs. The default is Devices (IPs).
- Source Adapter - Optionally limit target extraction to a specific source adapter.
- Scan schedule - Optionally enable a schedule and set its Frequency, Interval, Start Date (DD/MM/YYYY), Start Time, and Timezone. Weekly schedules also use Days of the week; monthly schedules use Repeat by.
For Web Application Scans, bare domain and host targets are sent to Nessus as HTTPS URLs.
Connection Settings
Connection and CredentialsWhen Use stored credentials from the adapter is toggled off, some of the connection fields below are required to create the connection, while other fields are optional.
- Host Name or IP Address - Enter the Nessus host used for the connection.
- Authentication credentials - Authenticate with either a user name and password or an access key and secret key.
Verify SSL (Optional) (default: enabled) - Selects whether to verify the SSL certificate of the server against the CA database inside of Axonius. For more details, see SSL Trust & CA Settings. This setting is enabled by default on all new adapter settings. If you need to disable SSL verification, make sure you disable this setting.)
HTTPS Proxy (optional) - Connect the adapter to a proxy instead of directly connecting it to the domain.
HTTPS Proxy Password (optional) - The password to use when connecting to the server using the HTTPS Proxy.
HTTPS Proxy User Name (optional) - The user name to use when connecting to the server using the HTTPS Proxy.
Gateway Name - Select the Gateway through which to connect to perform the action.
To learn more about Enforcement Actions, see Enforcement Actions.
Updated 6 days ago