Configuring Enrichment Settings
To open the Enrichment Settings:
- From the top right corner of any page, click
.png) . The System Settings page opens.
. The System Settings page opens. - In the Categories/Subcategories pane of the System Settings page, select Enrichment.
Configuring Data Enrichment Settings
Note
Users with the
View system settingspermission can only view enrichment settings. Users with theModify system settingspermission can enable or disable enrichment settings.
- Fetch software vulnerabilities from NVD DB (default: true) - Select this option to fetch software vulnerabilities details from the NIST National Vulnerabilities Database (NVD) using Axonius Static Analysis.
- Enrich software vulnerabilities from NVD DB (default: true) - Select this option to enrich software vulnerabilities with additional information from the NIST National Vulnerabilities Database (NVD).
Note
If this option is cleared, software vulnerabilities details from NVD are only enriched using Axonius Static Analysis.
- Enrich software vulnerabilities from CISA DB (default: true) - Select this option to enrich software vulnerabilities details from the CISA Known Exploited Vulnerabilities Catalog via connected adapters.
- Enrich software vulnerabilities from EPSS DB (default: true) - Select this option to enrich software vulnerabilities details from the Exploit Prediction Scoring System via connected adapters.
- Enrich software vulnerabilities from EUVD DB (default: true) - Select this option to enrich software vulnerabilities details from EUVD via connected adapters.
- Enrich software vulnerabilities from MSRC DB (default: true) - Select this option to enrich software vulnerabilities details from MSRC via connected adapters.
Note
When all of the above options are cleared, all enrichments are cleaned from devices in the next discovery cycle.
- Fetch software vulnerabilities even when the vendor name is unknown (default: false) -
- Select this option to have Axonius fetch vulnerabilities even if the software vendor name is unknown.
- Clear this option to have Axonius fetch vulnerabilities only if they include both software and vendor names.
- Fetch OS vulnerabilities from NVD DB (This product uses the NVD API but is not endorsed or certified by the NVD) (default: false) - Select this option to include CVEs based on OS findings from the NIST National Vulnerabilities Database (NVD) using Axonius Static Analysis.
Note
This setting only applies to OS that are not Windows
-
Enable CVE enrichment proxy settings (default: switched off) - Set a proxy to download the CVE database used for CVE enrichment.
- Toggle on to enable CVE enrichment proxy settings.
- You can set a Proxy address and Proxy port. The default port value is 8080. When this is set, the proxy configured here is used, otherwise the proxy configured in Settings → Access Management → Proxy → Proxy Settings is used. When no proxy is configured in either of these settings, then a proxy is not used.
-
Prioritize Top Console User for last used users association (default: true) - Axonius runs an ongoing process that associates devices with users. It does so by looking at various device fields that come from adapters and determines if they might indicate the ownership of a particular user of that device. Selecting this option includes only top console users (if there are any) in the Last User association list.
-
Associate Devices to users only if seen in last X days (default: 90) - Enable this option so that devices that were not seen in the last X days are not associated with the user.
-
Enable device location mapping (default: switched off) - Toggle on to upload a CSV file that maps between subnets and locations. Note that device location mapping only enriches devices fetched from the time that they are loaded, and not devices already existing in the system. You will be able to see the device location mapping in the 'Network Interfaces' complex field in each device to which it was added.
- In Device location mapping CSV file, select a CSV file that meets the following requirements, and then click Upload File to upload it.
- The CSV file must be encoded in UTF-8.
- The CSV file must include two columns and headers: (case-insensitive):
- Subnet, must be in CIDR notation.
- Either of the following:
- Location
- Location Name
- The CSV file supports additional optional columns and headers (case- sensitive):
- Location ID
- Facility Name
- Facility ID
- Region
- Zone
- Country
- State
- City
- Postal Code
- Street Address
- Full Address
- Latitude
- Longitude
- AD SiteName
- AD SiteCode
- Site Criticality
- Site Function
- Comments
- In Device location mapping CSV file, select a CSV file that meets the following requirements, and then click Upload File to upload it.
Note
If the file contains the same subnet more than once, with different values for the other fields, the last match (that is, the value in the latest row) is used.
If a file contains Subnet values that overlap each other when one set has more detailed information, devices are enriched with all the information in the files.
- Get location information only from the smallest subnet of each device (default: false) - Enable this option to determine the location information based only on the smallest subnet of each device. This option is available only when Enable device location mapping is toggled on.
- MAC address metadata enrichment (DeepMac) (default: switched off) - Toggle on to enrich each MAC address with data from the DeepMac database, which adds the Production Date, Manufacturing Country, Device Type, and Company Name.
- Enrich Windows EOL without OS Edition (default: true) - Select this option to enrich Windows with End of life information even if a specific edition for Windows OS is not provided. This setting is relevant for Windows 10 and 11.
- Prefix Common Enrichment field as "CE" (default: false) - Enable this option to shorten Common Enrichment field prefixes to CE: instead of Common Enrichment: (the default). For example: CE: Hostname instead of Common Enrichment: Hostname
Configuring Custom Enrichment Settings
.png)
Use Custom Enrichment to enrich assets with data received from adapters, and add columns (fields or aggregated field values) containing additional useful information. This allows you to add a large number of custom or proprietary fields.
It is recommended to use the Manage Custom Enrichment - Enrich assets with CSV file enforcement action, as opposed to configuring Custom Enrichment from the System Settings, as it has the following benefits:
-
It adds powerful scheduling and customization capabilities to Custom Enrichment.
-
It enables you to select adapter fields for the statement using the Syntax Helper.
-
It automatically validates the statement syntax and that the uploaded CSV file is compatible with the statement.
-
It provides the option of writing enriched values based on aggregated or custom data fields into the EC artifacts adapter enrichment fields.
Creating the Custom Enrichment
This section describes how to create the Custom Enrichment from System Settings.
Before doing so, create the following:
- CSV file - Learn how to create a Custom Enrichment CSV File.
- Enrichment statement - Learn how to write a Custom Enrichment statement.
To create a Custom Enrichment from System Settings:
-
From the top right corner of any page, click
.png) . The System Settings page opens.
. The System Settings page opens. -
In the Categories/Subcategories pane of the System Settings page, select Enrichment.
-
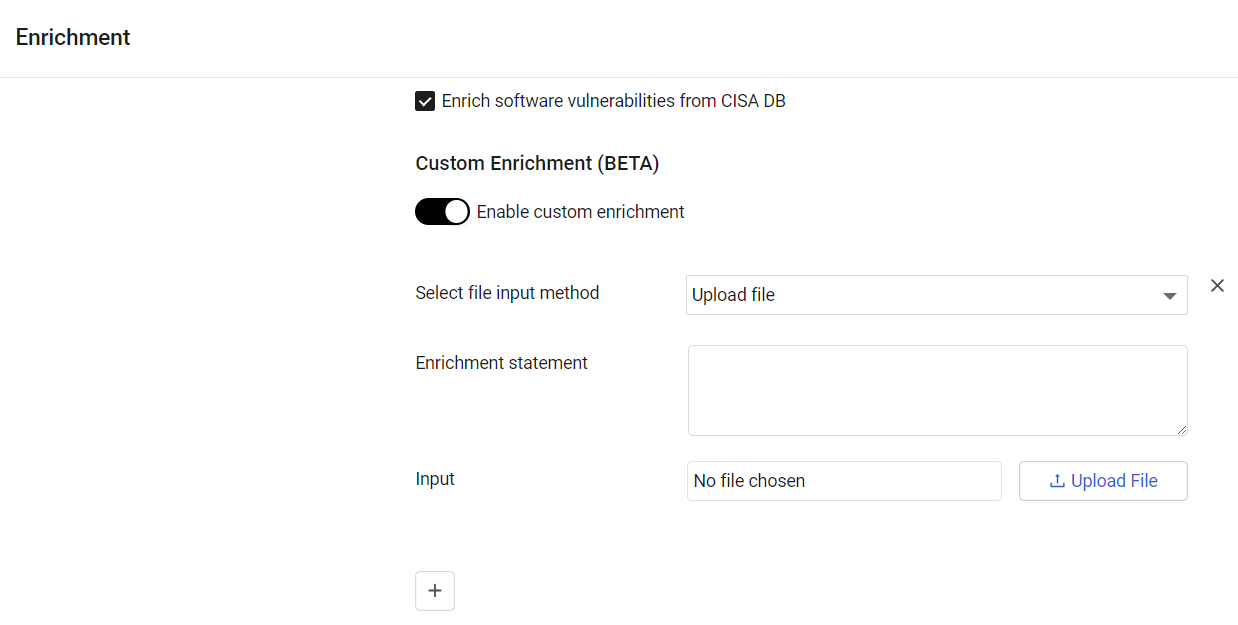
In the Custom Enrichment section on the Enrichment page, toggle on Enable custom enrichment to activate Custom Enrichment.
-
Copy the statement, which you wrote, to the Enrichment statement field.
-
Choose the location of the CSV file. You can either upload a file from your system, or use a file saved in a storage system.
-
To upload a file from your system:
-
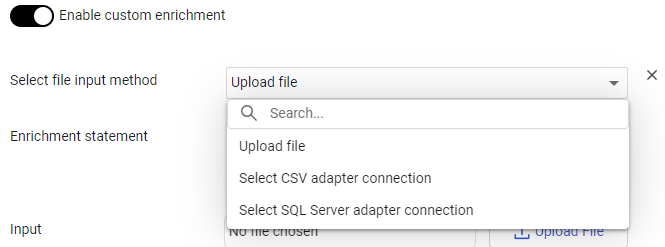
From the Select file input method dropdown, choose Upload file.
-
Click Upload File to browse for and upload the CSV file.
-
-
To use a file from an online storage location:
-
Note
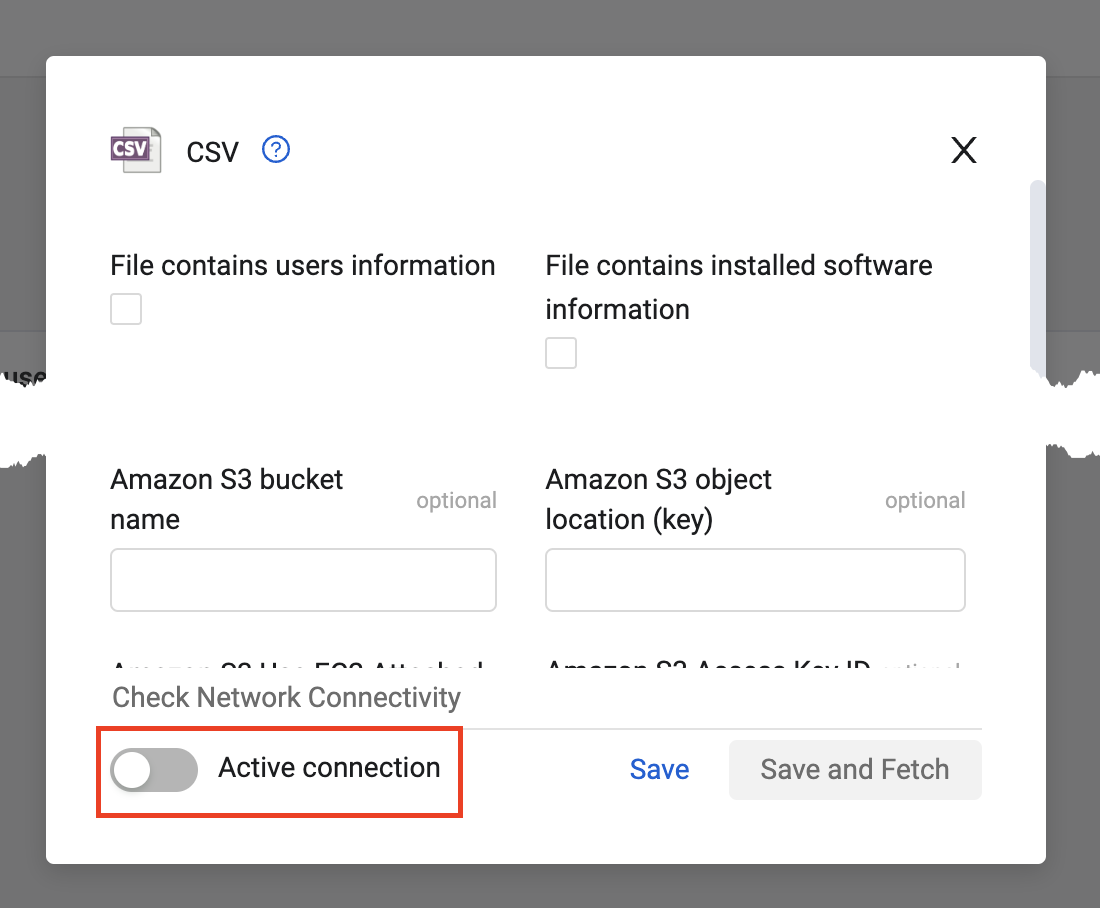
If you are uploading a file from an online storage location and want to use it only for custom enrichment, you must disable the Active connection setting on the CSV adapter connection. In this case, the CSV adapter connection will not fetch new assets.
- Axonius uses the capabilities of the CSV adapter to use a CSV file from a storage location.
- Prerequisite: Make sure you have configured the relevant CSV file using a CSV adapter connection. Give a name to the connection (connection label) so that you can identify it in the dropdown list.
-
Configure the file name, location, and credentials required to access the file using the CSV adapter. These can be SMB, Azure, blob, Amazon S3 bucket, and more.
-
From the Select file input method dropdown, choose Select CSV adapter connection.
-
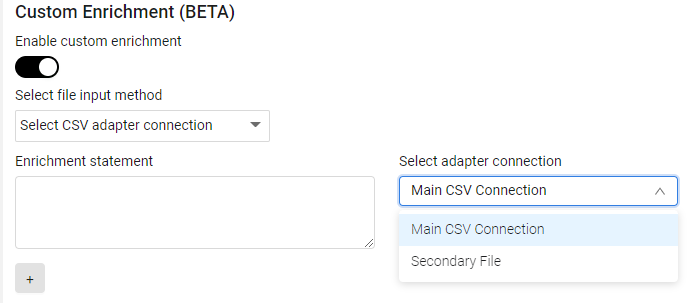
From the Select adapter connection dropdown, select the connection that contains the file to be used.
-
Do one of the following:
-
Select
+to add another Custom Enrichment. You can add more than one Custom Enrichment. They run sequentially and are dependent on each other, meaning that one Custom Enrichment can use the results of a previous one. It is possible to reorder the sequence of the Custom Enrichments. -
Click Save at the bottom of the page. The system validates the statement and the CSV file.
-
The Custom Enrichment runs the first time you create it after you click Save, and then every 60 minutes. If you make changes to the Custom Enrichment, it runs again immediately. If the enrichment CSV file was updated but the enrichment statement was not changed, the enrichment does not run immediately but runs during the next hourly cycle. It also runs in the post-correlation phase of each global discovery cycle.
Removing a Custom Enrichment
When you remove an enrichment, all the information it added is removed.
This section describes how to remove a Custom Enrichment from System Settings.
To remove a Custom Enrichment
-
In the Custom Enrichment section, click the small x to the right of the Enrichment you want to remove.
.png)
Refer to Custom Enrichment to learn more about how to work with this feature.
Filtered Affiliated Users Settings
Filtered Affiliated Users Settings - Enable this option to configure dynamic fields to further filter the Affiliated Users field.
Sometimes, users want to view only a subset of the Users affiliated with a certain application. For instance, they do not want to see Service Accounts, only actual users.
You can create your own filtered field for the system that will appear as a field on the SaaS Applications assets page to filter the Affiliated Users without having to create a new query using the Query Wizard.
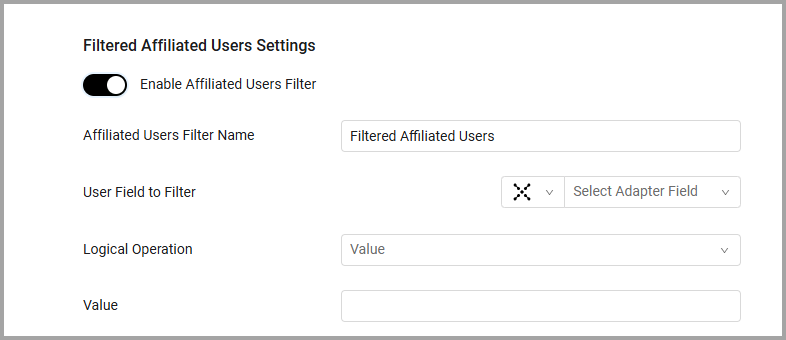
- On the Enrichment page toggle on 'Enable Affiliated Users Filter'.
-
Enter a name in the ‘Affiliated Users Filter Name’ field, this is the name that will be displayed as a column on the SaaS Applications page.
-
Configure a field to filter by. In ‘User Field to Filter’, first select an adapter (Aggregated, or a specific adapter), then select a field in that adapter, for instance Mail.
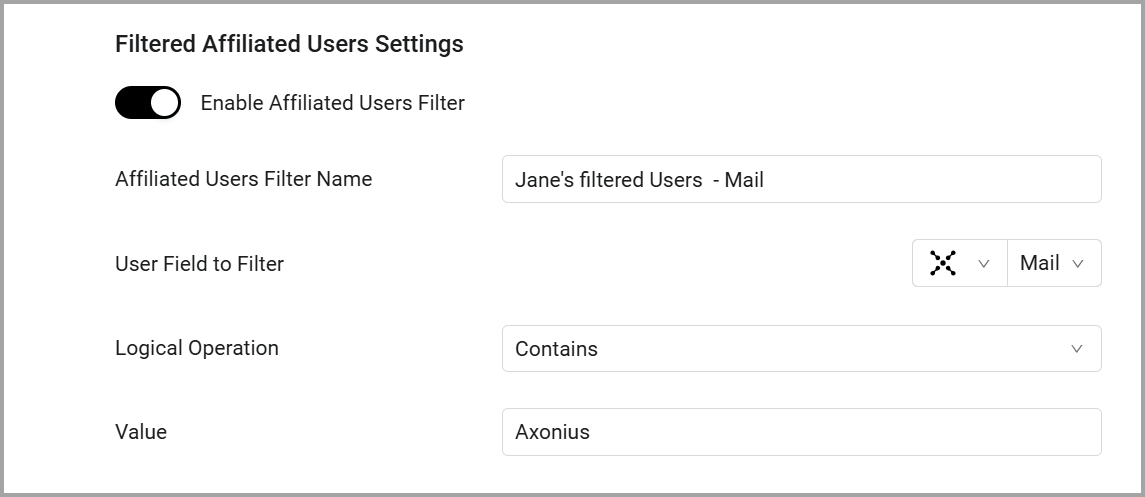
- Define the Logical Operation ‘contains’, ‘Equals’ or ‘Not Equals’
- Enter a Value (a string).
- Save your settings.
After the next Discovery Cycle the new field you created will appear in the Query Wizard as a field that you can select, and as a column that you can add to the SaaS Applications table.
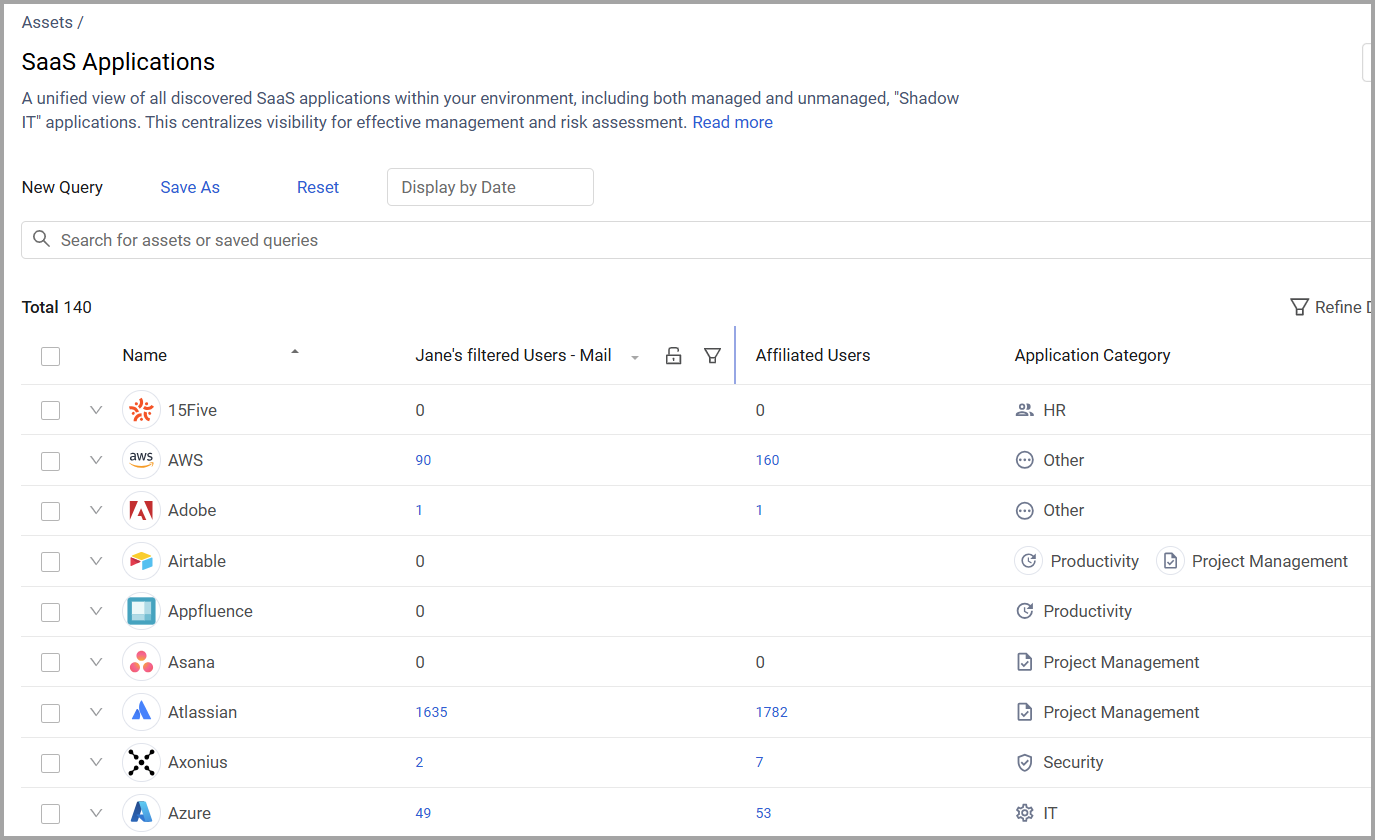
From the SaaS Applications table, you can select the value in the new column and open it on the Users page filtered by this value. You can also use this field in charts, Enforcement Actions etc as an Axonius field.
Association
Association settings relate to user-device association in Axonius.
-
Associate Users to Devices and Devices to Users as long as their domains are not different (default: true) - Users with domains can associate to devices without domains as long as there is no domain contradiction. It is not advised to disable this setting.
-
Avoid association if device doesn't have a domain (default: false) - Select this option to set the Association process to skip devices that don’t have a value populated in their Domain field.
-
Filter terms for User-Device association (optional; comma separated) - Enter a list of users to remove from relevant user/device fields used to associate the entities. Depending on how you enter the filter criteria, you can filter the list of users in relevant user/device fields based on values that start with, end with, or contain the entered filter criteria. The filtered criteria is not case sensitive. Use the following logic when you enter the criteria:
- To filter for user names that start with the entered criteria, enter the text before the % symbol. For example: John Smith%
- To filter for user names that end with the entered criteria, enter the text after the % symbol. For example: %John Smith
- To filter for user names that contain the entered criteria, enter the text between two % symbols. For example: %John Smith%
-
Enable email identifier matching in User-Device association - When this option is enabled, Axonius matches user names to email address identifiers (for example, 'john.doe' to '[email protected]'). When disabled, Axonius only associates users with devices that have matching full user names, and will not extract the email identifier as a new identifier.
Updated 4 months ago

