
Network Inspector Troubleshooting
This topic provides troubleshooting information that can be useful when operating the Axonius Network Inspector device.
Cloud connectivity issues
If you encountered any of the following indicators of cloud connectivity issues:
- During initial setup, the Cloud indicator at the top of the Appliance Dashboard shows a red bullet with a warning (⚠️) icon.
- Audit logs indicate:
Cloud Connectivity Lost - <server IP address> unable to connect to the Cynerio cloud.
To view the specific error message:
- Log in to the appliance dashboard at
https://<server IP address>:8080. - Click the drop-down icon near the Cloud indicator to expand the view.
- Hover over the indicator marked with a red bullet and a warning (⚠️) icon.
Errors:
- Connectivity: Ensure that the required cloud connectivity allowances are in place for the appliances' MGMT IP addresses, as detailed on the dedicated Axonius support page.
- Secure Connection: Ensure that connectivity is not TLS terminated by the firewall and / or transparent proxy.
Note
It is not recommended to perform TLS termination on the Axonius Network Inspector’s communications as it may cause performance issues. However, if it is required, you may upload a certificate in DER or PEM file format via the Appliance Dashboard:
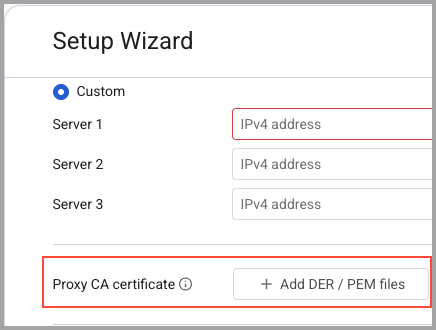
Click the gear (⚙️) icon at the top right to open the Setup Wizard.
Scroll down to Proxy CA certificate and click Add DER / PEM files.
No link through the fiber optic interface
Use the checklist below to resolve any SPAN connection issues on the fiber optic interface.
- Check and adjust the physical connections:
- Hardware match - Ensure that the fiber transceivers (SFP/SFP+) and cables are compatible at both ends of the connection. Confirm that you are using multimode transceivers with multimode cables, and single-mode transceivers with single-mode cables.
- Plug check - Unplug and re-plug the transceivers to ensure that they are securely seated in the ports.
- Cleanness - Check for and clean any dust from the transceiver and cable ends (using compressed air or any other applicable method).
- Cable replacement - Try replacing the existing fiber cable with a known-good one.
- Transceivers replacement - Use the two Axonius-provided transceivers on both ends (on the Axonius Network Inspector server and the switch).
- Adjust the configuration:
- Fixed speed - Instead of the auto-negotiate setting, configure a fixed link speed on both the server and the switch.
Important
Any changes to the configuration of the Axonius Network Inspector device must be made by an Axonius support engineer during a remote support call.
Server is not responsive during initial connection
If during the initial connection of the server, you are unable to connect to the management interface, or the server does not boot properly, perform the following steps.
Note
It is possible that a hardware component moved during the shipment.
- Completely power down the server.
- Disconnect all power supplies (PSUs) and network cables from the back of the unit.
- Wait at least 30 seconds to allow any residual charge to dissipate.
- With the power disconnected, carefully reseat the following hardware components by unplugging each one and plugging it back in firmly:
Important
Ensure that each component is reseated in its original slot. Ensure it is fully and securely seated to make proper contact.
- Power supply unit (PSU) - Check both the primary and any secondary PSUs.
- Hard disk drive (HDD) - Remove any hard disk drive (one or more) by opening its brackets on the front panel, and then reinsert the drive until it clicks into place.
- PCI Express (PCIe) cards - Carefully reseat any installed PCI Express cards.
- Reconnect the power supplies and network cables.
- Wait two minutes for the iDRAC to fully initialize before powering on the system.
- Power the system back on and check for a successful boot.
If the server still does not respond after these steps, contact technical support for further assistance.
Server becomes unresponsive after normal operation
If the server was previously working but is now unresponsive and does not boot or reboot, it is possible that a power issue is preventing it from starting correctly. A full power drain can often resolve this by clearing any residual charge from the system's components.
Since the steps for a power drain can vary slightly between server models, follow the detailed instructions provided on Dell's official support website.
Updated 22 days ago