Creating a New Campaign
Use the Campaign Wizard to create a new Campaign with minimal definitions and configurations.
The Campaign Wizard comprises four steps:
- Step 1 - Users, Approvers and Applications
- Step 2 - Message and Response
- Step 3 - Settings
- Step 4 - Summary
The following are some features of the Campaign Wizard:
-
The wizard steps are interactive, allowing you to click and progress from one step to the next in order, as long as the step is not disabled.
-
The step that you are currently configuring marks the step number with a dark blue background. For example:

-
A step whose configuration is complete displays a checkmark with a light blue background.

-
Each step of a Campaign that is not complete or has not been configured, marks the step number with a light gray background. For example:

-
Hovering over a gray step opens it, unless it is disabled, in which case it does not open.
-
At any of the Campaign Wizard steps, when you fill in a field or update it, the changes are automatically saved.
-
At any step in the Campaign wizard, you can select Previous or Next to open the previous/next configuration step; or you can select Close to return to the Campaigns page. The Campaign appears in the table with the information you have configured for it so far.
To create a new Campaign, from the Access Reviews page, select Create Campaign. The Create New Campaign dialog opens with Step 1. Review the following sections for a detailed, step-by-step guide to creating a new Campaign.
Configuring Users, Approvers and Applications
Selecting a User Query
In the first step of the Wizard - Users, Approvers and Applications, the Users module is selected and is the only option.
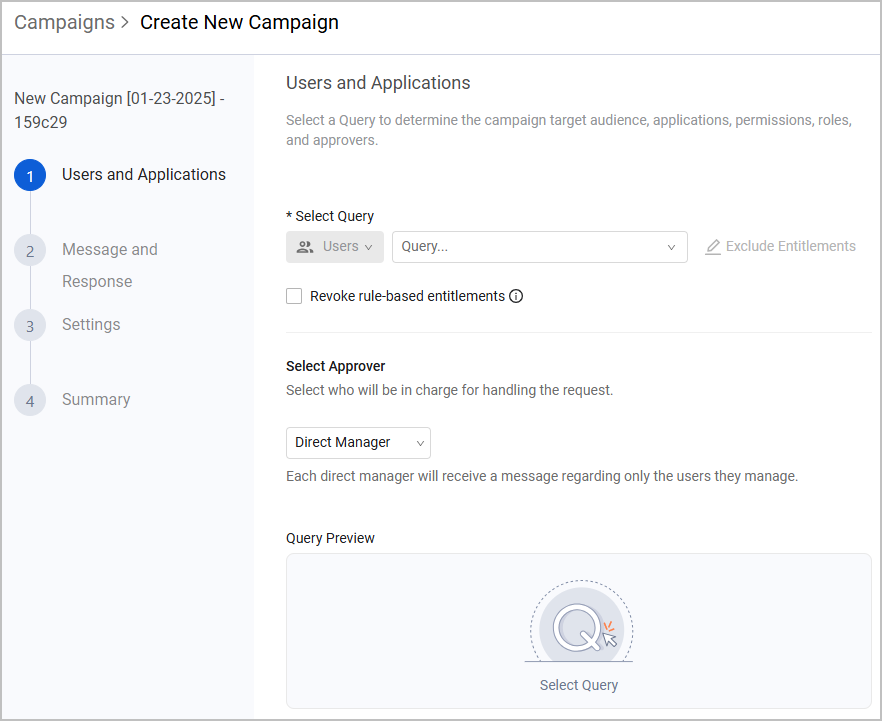
In the Query dropdown, select a query to determine the Campaign's target audience, applications, permissions, roles, and approvers; or click + Add Query to create and add a new Query.
Note:
The selected query must include at least one user with an Assigned Permissions / Assigned Roles / Assigned Groups field, fetched from an Identity Management adapter.
The following example shows how to use the Query Wizard to create the Campaign Query Permissions query that searches for users that have the following:
- Permission to use Slack (Slack adapter with Assigned Permissions field)
- Approver email address (User Manager Email custom field exists)

The Campaign Query Permissions query can then be selected in a Campaign.

The following example shows how to use the Query Wizard to create the Campaign Query Roles query that searches for users that have the following:
- Role that permits use of Slack (Slack adapter with Assigned Roles field)
- Approver email address (User Manager Email custom field exists)

The Campaign Query Roles query can then be selected in a Campaign.

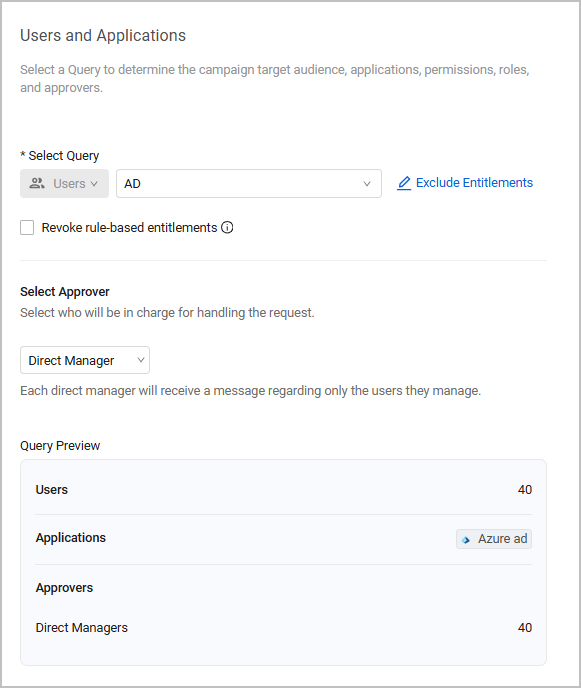
- The Query Preview begins loading, and when done, shows the number of Users, number of Approvers in case they are Direct Managers (If a Specific Approver is selected, the approver's email address is displayed - see Selecting Approvers), and the icons of the Applications.
- If the selected query is not suitable, the Query Preview displays a message notifying that the selected query does not meet Campaign requirements and that you should select another user query that includes at least one adapter, and either an 'Assigned Roles' or 'Assigned Permissions' field.
- If the query is correct but does not return results, the Query Preview notifies that no data was found.
Excluding Entitlements
By default, all entitlements assigned to a user are included in the access review. Use Exclude Entitlements to select entitlements you don't want to be part of the review.
Notes:
This step is optional - you don't have to exclude entitlements to successfully define and run a Campaign.
You must select a query before you can access the Exclude Entitlements module.
After you select a query, the Exclude Entitlements button turns blue. Use this button to select specific entitlements to exclude from the Campaign.
Entitlements are access rights granted to users based on their job roles and responsibilities. You can select specific entitlements to exclude from the Campaign, for example, if the Campaign targets users who have access to Figma, GitHub and Zoom, you can exclude all users with the entitlement to access to Figma and Zoom, and run the Campaign only on GitHub users; or, if the Campaign targets multiple teams such as Product Managers, Design Teams, Engineers, etc., you can select specific groups to exclude and run the Campaign, for example, only on users who belong to the Design Team.
The selected query automatically includes all the entitlements associated to the selected users. Axonius Campaigns support the following entitlement types:
- Permissions (Field name: Assigned Permissions)
- Roles (Field name: Assigned Roles)
- Groups (Field name: Assigned Groups)
To exclude entitlements from the Campaign
-
Click Exclude Entitlements.
-
The Exclude Entitlements drawer opens. It lists all entitlements included in the query, and each entitlement row includes the following details:
- Entitlement Name - For example, a group name such as "All Company", "Design Team", or a username.
- Application - The application that the user(s) with this entitlement can access.
- Type - Entitlement type: Permission, Role, or Group.
-
Hover over the right edge of an entitlement row and click the
 icon to change its status: exclude it from or include it in the Campaign. The default status is that all entitlements are included. You can repeat this action on multiple rows to exclude multiple entitlements.
 -
If you want to include only one or few entitlements, a quick way to do so is to select Exclude All on top of the All Entitlements table. Then you can go to the specific entitlements you want to include, hover over them and click Include. You can also choose to Include All entitlements.
-
To go back to the Campaign page, click Save.
Note:
If you select Exclude All, you cannot save your changes. You must include at least one entitlement to be able to save.
Rule-Based Entitlements
By default, the Campaign ignores entitlements granted by the Identity Management Rule Engine: such entitlements are not part of the approval process, they are not visible for the approval at any stage, and they cannot be revoked or approved.
To include these entitlements in the Campaign, enable the Revoke rule-based entitlements checkbox. Note that this might affect the entitlement list displayed on the Exclude Entitlements drawer.
From the top of the Exclude Entitlements drawer, you can:
- Use the Search box to search for specific entitlements.
- Filter your search by Entitlement Type (Permission, Role, or Group - the options available depend on the entitlement types included in the query) or Status (Excluded or Included).
- Click Reset to clear your search and show all entitlements again.
After selecting entitlements to exclude and saving your changes, the Exclude Entitlements button changes into Edit Excluded Entitlements. You can go back to this button at any step in the Campaign creation process to exclude or include additional entitlements.

Selecting Approvers
In the Select Approver section, select who will be in charge of handling the request.
- The default option is Direct Manager. In this case, each direct manager will receive a message regarding only the users they manage. Note that not all users in the select query necessarily have a direct manager.
- The other option is Specific Approver. In this case, you select a single approver that will receive a message regarding all the users in the query. Select the specific approver from the Select User dropdown.
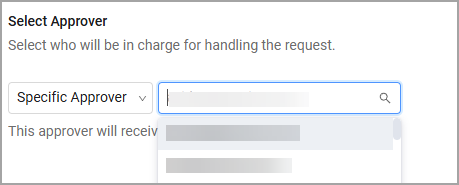
When you choose Select Approver, the Exclude Entitlements button is greyed out again, so if you want to include or exclude additional entitlements, you must select an approver first.
Creating Campaign Message and Response
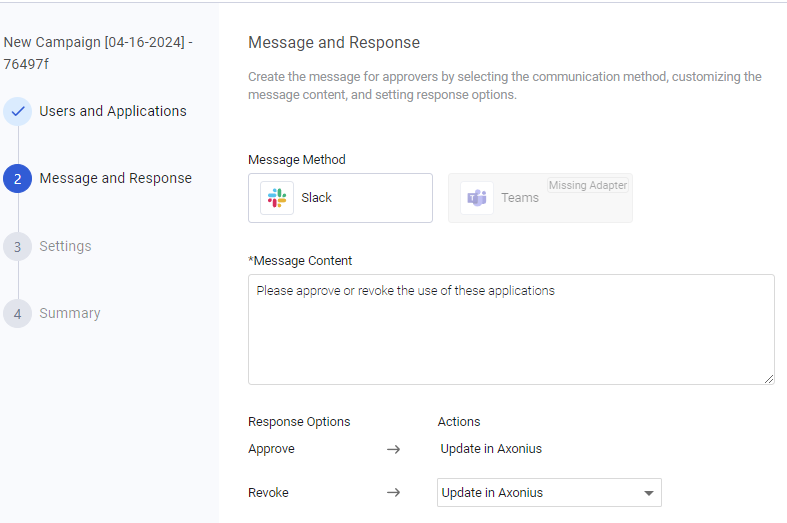
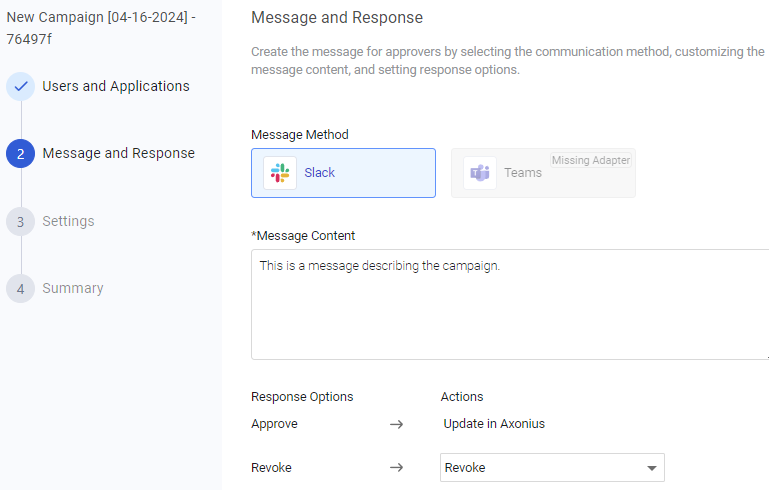
In the second step of the wizard, select either Slack or Teams to send a message regarding the Campaign to each Approver (manager) regarding their users and the applications of each user (all resulting from the selected query in the previous step).
To configure the Campaign message and response
- In the Message and Response dialog, under Message Method, select one of the enabled methods (white background): Slack or Teams. The selected method gets a light blue background.
- If the method does not have an adapter in the system or the adapter is not available, the method is disabled, and Missing Adapter appears on top of the method tile.
- If you previously selected a Specific Approver that cannot be reached via the selected message method, a warning appears and prompts you to Change Approver.
- In Message Content, type the content of the message to send. The message content should be static.
- Under Response Options, for Revoke, from the Actions dropdown, select one of the following options:
- Update in Axonius (default) - Update the answer in the Axonius Campaigns Approval field, using the Custom Data enforcement action, without actually revoking. You can see this field in the Asset Profile Custom Data.
- Revoke - Perform an action to revoke the user's permission to the selected application (regardless of the included entitlements), and also update the answer in Axonius (in the Campaign Approval field). The Revoke action is automatically selected according to the adapter connection selected in the query. For example, for a query with an Okta adapter connection, the Revoke action is Okta Suspend User.
Configuring Campaign Settings
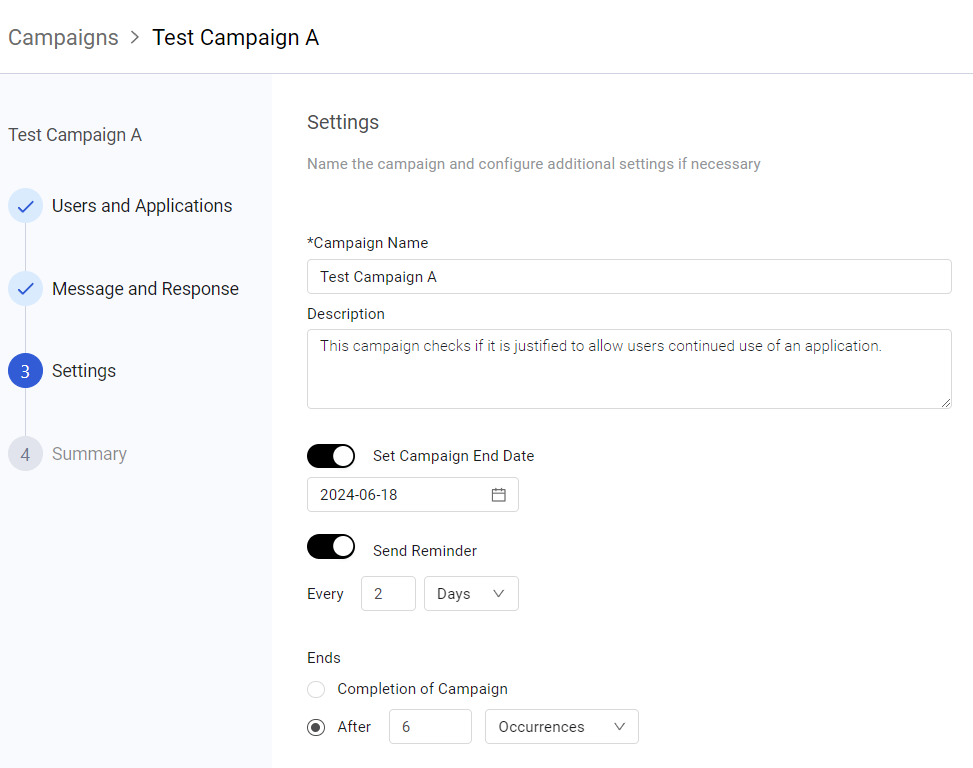
In the third step of the wizard, assign a meaningful name for the Campaign, set the Campaign's End Date, and send a reminder for the Approver to respond about the Campaign.
Note:
The system sends a reminder, if configured, even if the Approver has already responded to the Campaign email.
To configure the Campaign settings
- In the Campaign dialog, in Campaign Name, assign a unique and meaningful name to the Campaign (default: Campaign Default Name). The Campaign name is updated in the top left pane.
- To add a description of the Campaign, click + Add description, and in the Description field that opens, type a meaningful description for the Campaign.
- To set the end date of the Campaign, toggle on Set Campaign End Date, click the End Date field that opens, and in the calendar that opens, select the end date.
- To send a reminder about the Campaign, toggle on Send Reminder, and then do the following:
- Select every how many Minutes, Days (default), or Weeks the reminder will be sent. For example, Every 2 Weeks.
- Under Ends, optionally select when to stop sending the reminders:
- Select the Completion of Campaign option (the default) to stop sending reminders once the Campaign has been completed.
- Select the After option to select when to stop sending reminders: after a selected number of Occurrences (default: 7 Occurrences), Minutes, Days, or Weeks.
For example:
Reviewing the Campaign Configuration
After configuring all the Campaign steps and checking that the status of each step is completed, review the Campaign configuration in the Summary page - the fourth and final step of the Wizard.
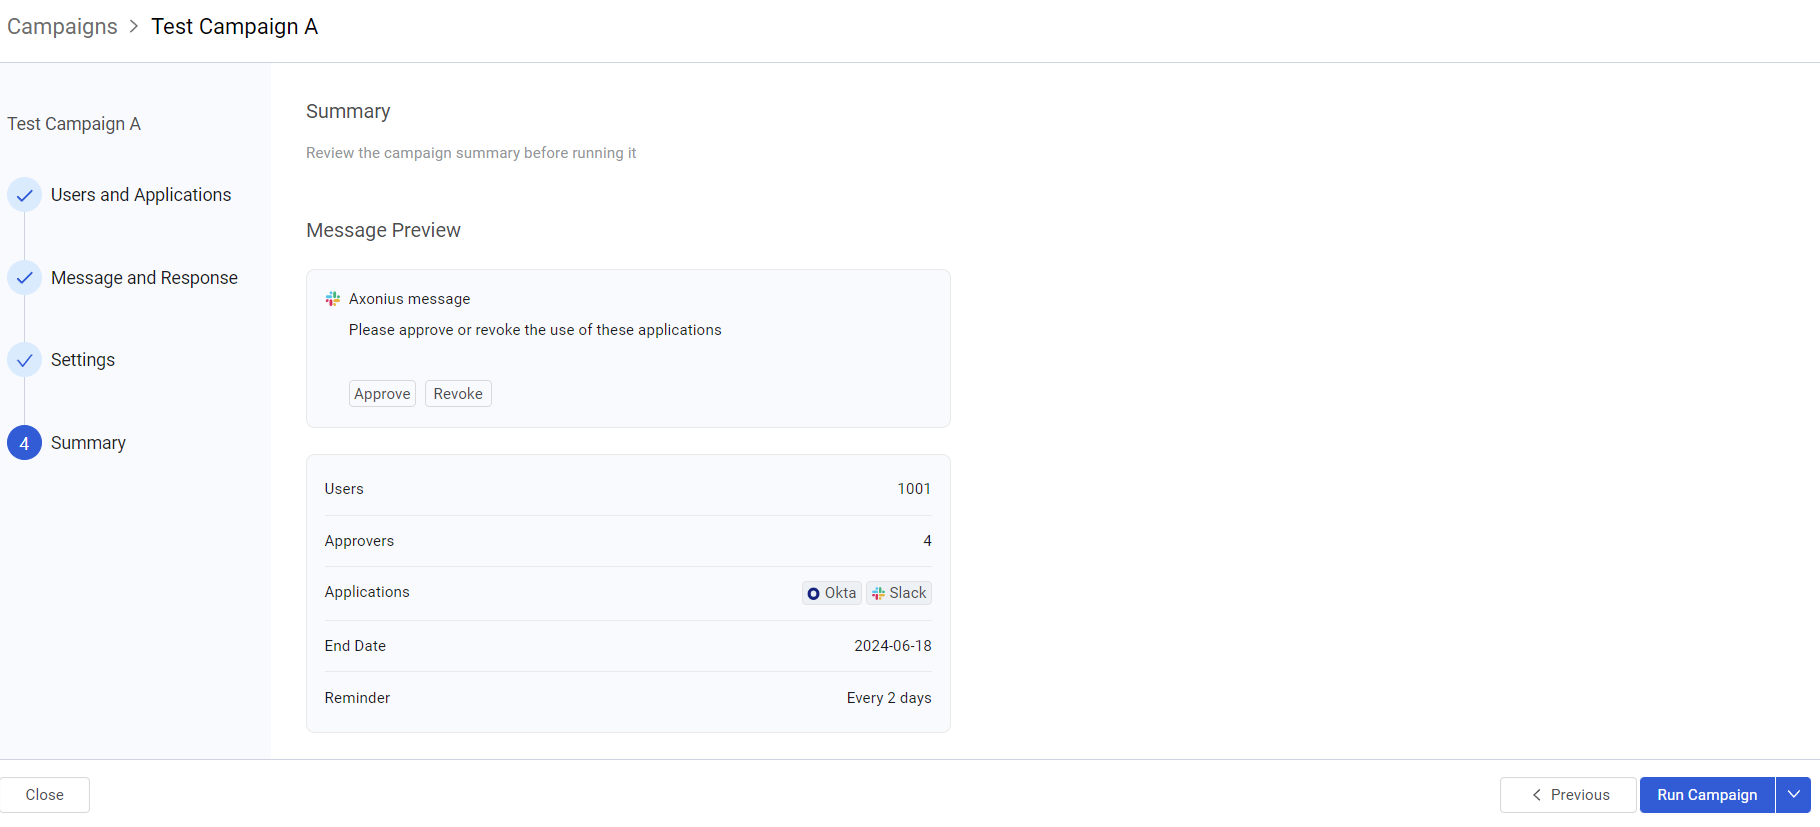
Go back to a previous step if you want to change something in the configuration, and then look at the Summary again.
When finished, do one of the following:
- Begin running the campaign.
- Schedule the Campaign to run automatically at a later time.
After you select Run Campaign or schedule it to run at a later time, the Campaign Wizard closes and redirects you to the Campaigns page. The newly created Campaign appears on the top row of the Campaigns page and a popup notifies that the Campaign was created successfully.
Updated 3 months ago
