
Expenses
Use the Expenses page to see a consolidated view of payments related to the SaaS applications used in your organization.
This page can help you:
- Identify redundant SaaS applications
- Prevent hidden costs and shadow expenditure
- And more
Click the Assets icon and from the left pane, select Expenses.
In Axonius New Navigation Experience from the Inventory menu, select All Assets and from the left-pane, under Applications, select Expenses.
Overview
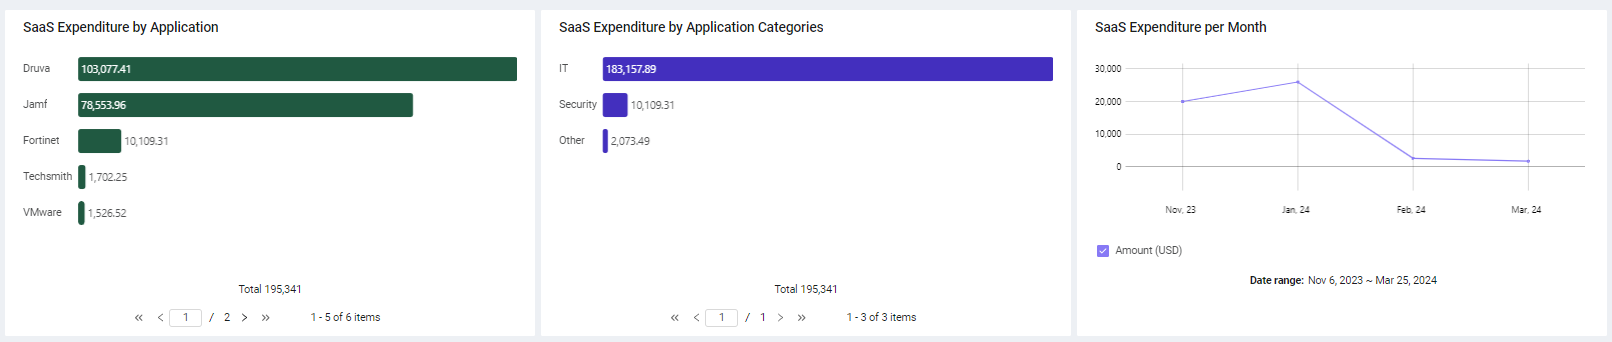
The Overview section contains two visual displays of the Expenses in your organization. These charts adjust to reflect any query applied to the page.
You can click the Hide Charts icon  to hide the graphs in the Overview section. Click it again to display the graphs.
- The SaaS Expenditure by Application chart shows how much your organization is spending per application. Hover over the various bars to see the percentage of expenditures for each application.
- The SaaS Expenditure by Application Categories chart shows how much your organization is spending per application category. Hover over the various bars to see the percentage of expenditures for each application category.
- The SaaS Expenditure per Month graph shows the timeline of how much your organization spent on SaaS applications per month.
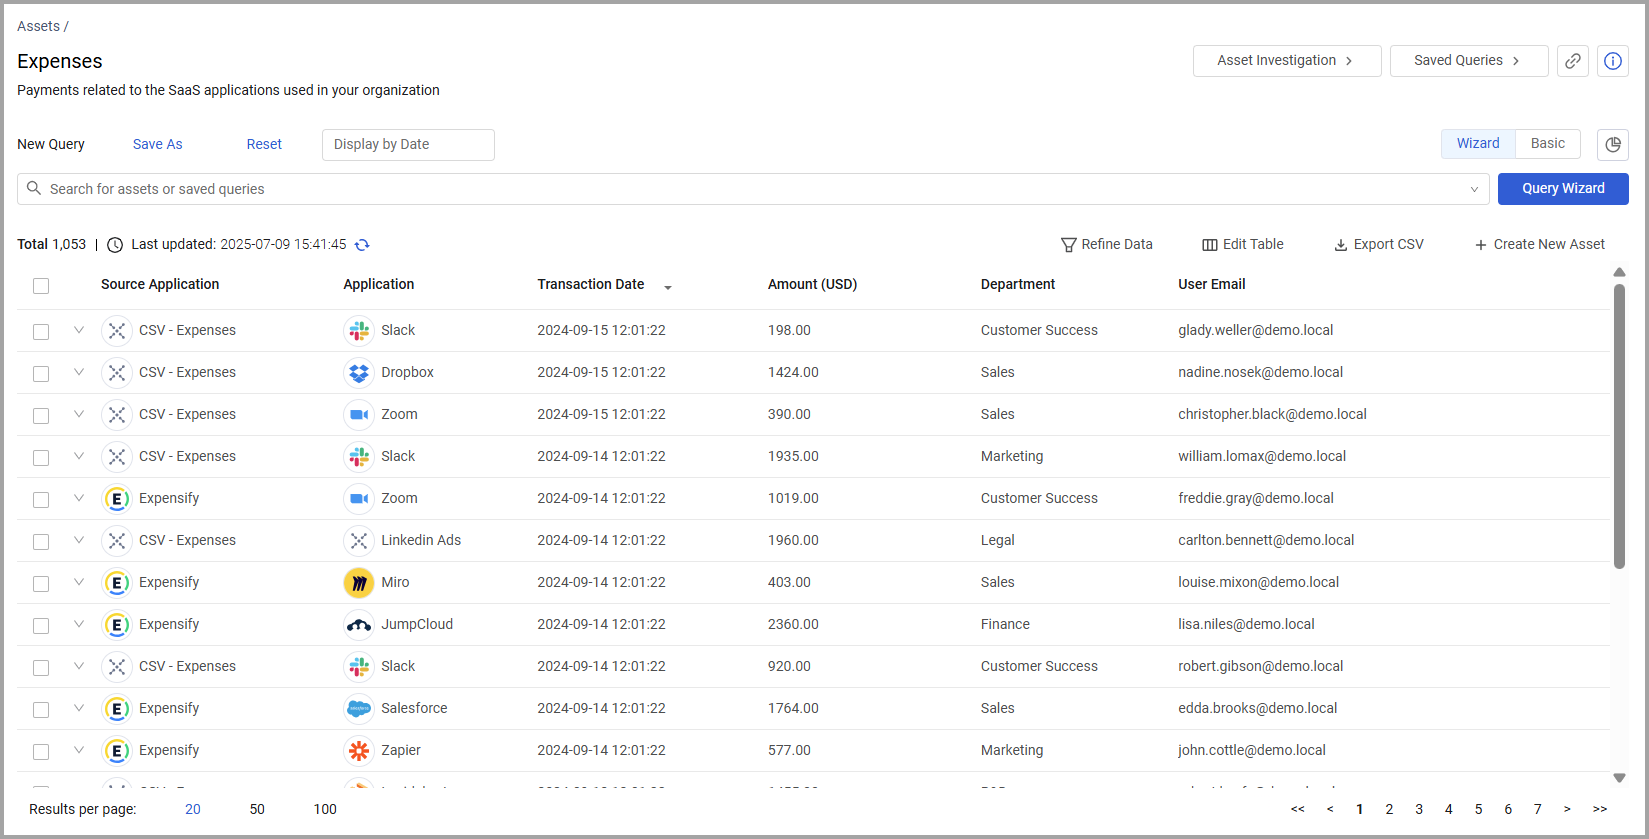
Expenses Table
The Expenses table opens displaying the default view. Not all of the fields are displayed by default. Use Edit Columns to add or remove columns. Each user can customize what fields appear in their own, personalized default view. For more information, see Setting Page Columns Displays.
Click the arrow next to any of the fields to see more details about that field.
Adapter Connections
Expenses are added automatically using data from your organization's financial applications. To see the current list of adapters that support Expenses, navigate to the Adapters List and search for “expenses.” You can also manually add Expenses via a CSV adapter.
The icon in the Adapter Connections column indicates what source Axonius is drawing its data from for any of the displayed expenses. Expense data can also be manually uploaded through the CSV adapter (for more information, see CSV - expenses).
Expense Fields
There are many fields that you can view and query on the Expenses page. This includes the following fields:
- Application - The specific application the expense applies to.
- Application Category - The type of application the expense applies to.
- Amount - The amount of the expense.
- Description - Expense description.
- Transaction time - Timestamp marking when the expense's transaction occurred.
- User Email - Email of the person who reported the expense.
Manually Add Expenses
For expenses that are not added automatically with an adapter, you can manually add the expense records in your system.
To Manually add an Expense
-
In the Expense page, click Create new asset.
.png)
-
Enter the fields for the Expense you want to create. The following fields are required for new licenses:
- Amount
- Transaction Date For descriptions of Expense fields, see the list of Expense fields.
-
Click Save Changes.
For more information on manually creating assets, see Manually Creating an Asset.
Creating Queries on Expenses
You can create queries on this page using the Query Wizard or the Basic Query and query fields such as the application, adapter connections, or amount. Refer to Creating Queries with the Queries Wizard and how to create Queries in Basic mode to learn more about creating queries.
For example, this query enables you to locate expenses for collaboration applications in the past 90 days:
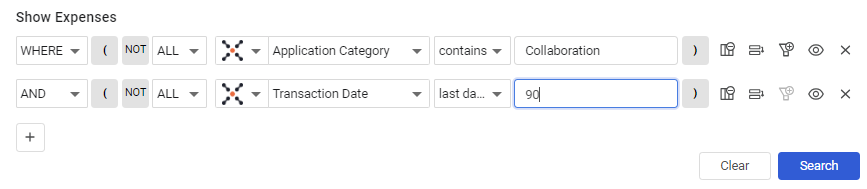
After running the query, the overview and table show the relevant Expenses, filtered by the criteria you defined in your query.
Adding Custom Data to an Expense
You can add custom fields to one or more Expenses at the same time. You can use this to add additional details like a description or manually add an associated email address.
Select one or more Expenses and from the Actions menu choose Add Custom Fields.
Refer to Working with Custom Data to learn about adding custom fields.
Add Tags to an Expense
Use tags to assign context to your Expenses for granular filters and queries. Apply new or existing tags to the selected Expenses. The list of selected tags is applied to all selected applications.
Refer to Working with Tags to learn about adding tags to Expenses.
View an Expense Profile
You can click on an individual asset in Expenses to see all its relevant data. For more information, see Asset Profile Page.