
Rapid7 InsightCloudSec
Rapid7 InsightCloudSec manages cloud security posture, secures cloud workloads, and governs identity and access management.
Rapid7 InsightCloudSec (formerly DivvyCloud) manages cloud security posture, secures cloud workloads, and governs identity and access management.
Asset Types Fetched
Devices, Aggregated Security Findings, Roles, SaaS Applications, Application Services, Containers, Object Storage, Serverless Functions, Secrets
Before You Begin
Required Permissions
The credentials used to connect the adapter must have Read-only permissions to fetch assets.
Rapid7 InsightCloudSec must add IP addresses to a permissions list in order to accept API requests. If you are working with an Axonius hosted system and your internal network is already on a permissions list, you can use a gateway to connect. Contact Axonius Support for the external IP.
Creating a User in the Rapid7 InsightCloudSec Console
To create a user in the Rapid7 InsightCloudSec Console:
-
Log in as an administrator to the Rapid7 InsightCloudSec console.
-
Click Identity Management and add a user. Axonius only uses the Username and Password fields, so it does not matter what you specify in the Email field.
.png)
-
In the Identity Management page, select Roles > Add Role.
-
Create a role that allows Viewing only and enable Global Scope.
-
Select User Groups > Add User Group.
-
Add a new group, then assign the role to the newly created user.
.png)
.png)
.png)
-
Log in with the new user at least once to create it and verify that you can view your cloud accounts.
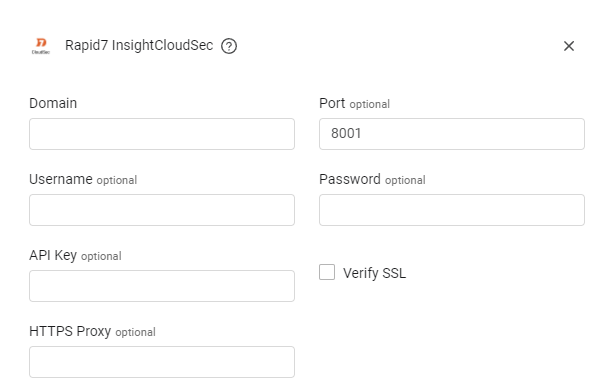
Connecting the Adapter in Axonius
To connect the adapter in Axonius, provide the following parameters:
Required Parameters
-
Domain - The hostname or IP address of the DivvyCloud server.
-
Username and Password - The credentials for a user account that has the Required Permissions to fetch assets.
When API Key is not supplied, Username and Password are required.
-
API Key - An API key associated with a user account that has the Required Permissions to fetch assets.
When Username and Password are not supplied, API Key is required.
Optional Parameters
-
Port - The port used for the connection. If not supplied, Axonius uses port 8001. Use port 443 for the SaaS instance of InsightCloudSec.
-
Verify SSL - Select whether to verify the SSL certificate of the server against the CA database inside Axonius. For more details, see SSL Trust & CA Settings.
-
HTTPS Proxy - A proxy to use when connecting to the value supplied in Domain.
To learn more about common adapter connection parameters and buttons, see Adding a New Adapter Connection.
Advanced Settings
Note
Advanced settings can either apply for all connections for this adapter, or you can set different advanced settings and/or different scheduling for a specific connection, refer to Advanced Configuration for Adapters.
-
Fetch Containers (optional, default: true) - Select whether to fetch information from container objects.
-
Do Not Fetch Powered Off Machines - Select to not fetch machines that have a State field value of
stopped. -
Fetch Badges as Tags - Select this option to fetch badges and parse them as asset tags.
-
List of tags to parse as fields - Enter a list of tags to parse as additional asset fields.
-
Fetch Insight Findings - Select this option to fetch Insight findings.
-
Categorize Assets Advanced Settings - Enable the Categorize Assets by Asset Type toggle to parse fetched assets as their specific asset type, such as Container, Secret, or Serverless Function, rather than Instance type, which is the default behavior.
For example, when Categorize Assets Advanced Settings is disabled, Containers and Instances are both fetched as Instances, and no other asset type is fetched. When it is enabled, Containers are fetched as Containers, and any other asset type selected from the Extra Assets list is fetched and parsed as its respective asset type.
When you enable this, the following fields become available:
- Extra Assets list - A multi-select field that enables fetching and parsing assets from an expanded list of asset types.
- Fetch Findings Per Asset Type - A multi-select field that enables fetching Insight Findings and Aggregated Security Findings from the Extra asset types selected previously. This option might significantly increase the fetch time.
Note
For details on general advanced settings under the Adapter Configuration tab, see Adapter Advanced Settings.