
Tanium Asset
Tanium Asset provides an inventory of hardware and software assets including servers, laptops, and desktops for thorough insight.
Asset Types Fetched
- Devices, Software, SaaS Applications
Before You Begin
Ports
- TCP port 443: REST API
Authentication Methods
- User Name/Password
- API Token ID/API Token
- Client-side Certificate Authentication (Mutual TLS)
Permissions
The following Module permission is required:
- Asset Report Read
To assign the permission to the value supplied in User Name:
- Log in to the value supplied in Hostname or IP Address with an account that has the permissions necessary to edit users.
- Go to the Administration
>Users page. - Select the value supplied in User Name from the list of users and click View User.
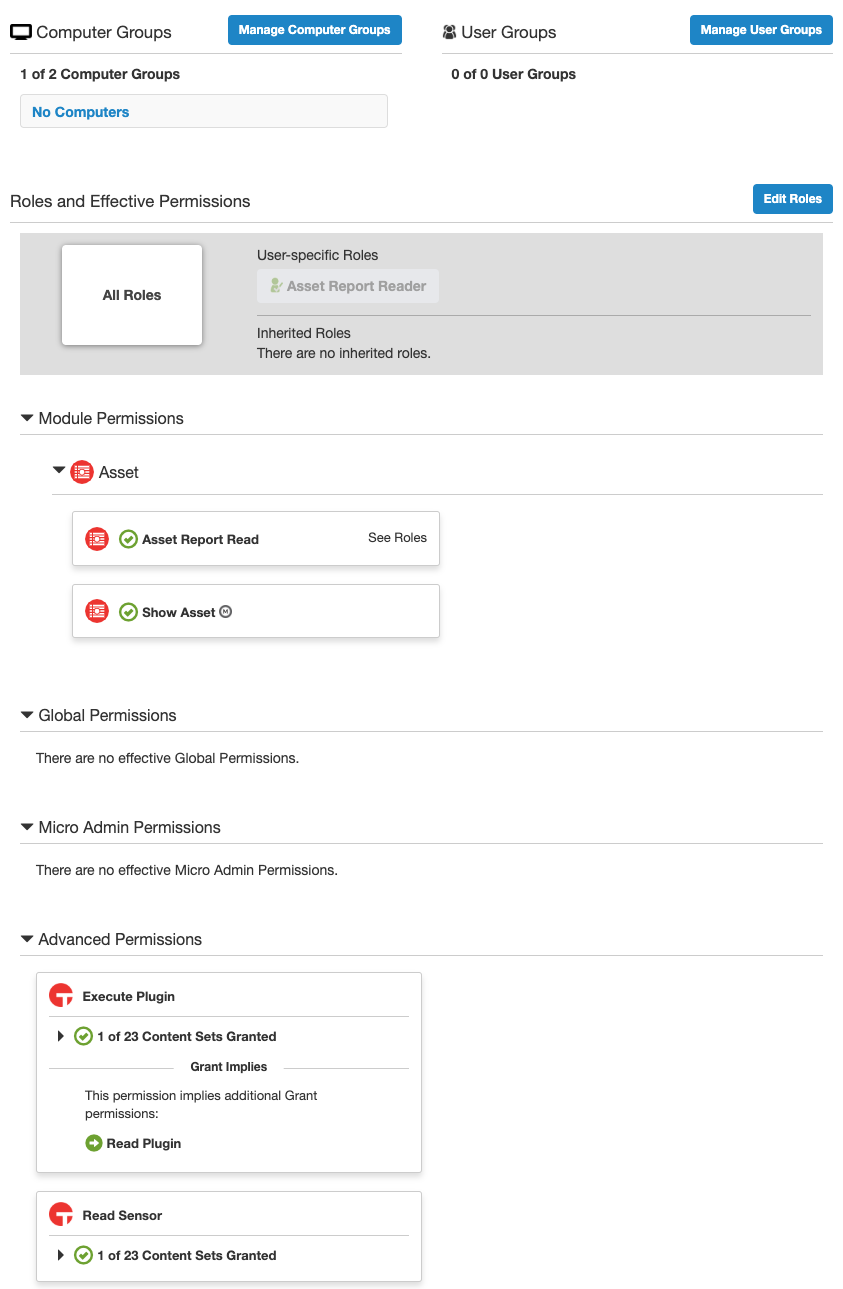
- Go to Roles and Effective Permissions
>User Administration and click Edit Roles. - Under Role Management, go to Assign Roles
>Grant Roles. Then, click Edit. - In the Edit Grant Roles dialog window, select Asset Report Reader and click Save.
- Back on the Assign Roles page, click Show Preview to Continue.
- Click Save and Continue.
- The User Administration page should now look like this:
Verifying Permissions
- Login to Tanium Asset with the values supplied for User Name and Password.
- Go to Asset
>Reports. - Under Asset Reports, click the All Assets report to verify the permission was assigned properly.
Additional Setup
Creating an API Token
An API Token that is bound to a dedicated Axonius persona is mandatory to connect to a Tanium Cloud instance. To create this token, follow the steps in Managing API Tokens.
Important Guidelines:
- Creating an Axonius-dedicated persona - The default persona to which the API Token is bound is the Default persona. You need to create an Axonius-dedicated persona and bind the token to this persona.
- Log into Tanium as a user with permissions to Create Personas and Edit Users.
- From the main Tanium screen, click on your profile icon at the top right corner.
- Click Persona.
- In the Select a Persona dialog, select your Axonius-dedicated persona from under Other Personas.
- Assign this persona the Asset API User permission to successfully generate an API Token.
- Click Apply.
- The API token must have the Token - Use permission, which is required to send requests to Tanium Cloud for new API tokens. To assign this permission, go to Administration
>Permissions>API Tokens, then select the relevant token and permission. - In the Create API Token dialog:
- It is recommended to set the value of Expiration to 365 (the maximum allowed).
- Under Trusted IP Addresses, enter the edge URL(s) of your Axonius instance. A
/is required, for example,192.0.2.0/24. You can enter 0.0.0.0/0 for testing or troubleshooting purposes.
Configuring a View
If you are connecting to Tanium 7.5 or higher, it is strongly recommended to use a dedicated Axonius View when fetching assets from the Tanium Asset module. See Configuring Views for more information.
Important Guidelines:
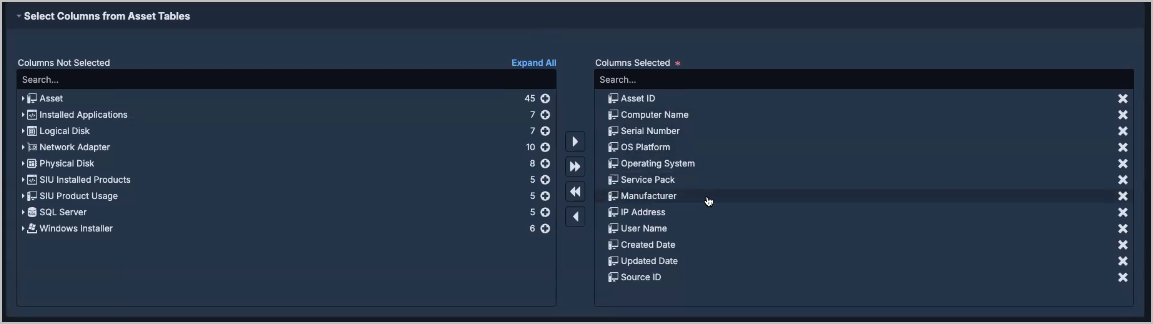
- In the Select Columns from Asset Tables section, select the machine attribute you want to include in Axonius. Axonius accepts the following attributes:
-
Asset ID, Computer Name, Serial Number, OS Platform, Operating System, Service Pack, Manufacturer, IP Address, Username, Created Date, Updated Date, Source ID
-
Connecting the Adapter in Axonius
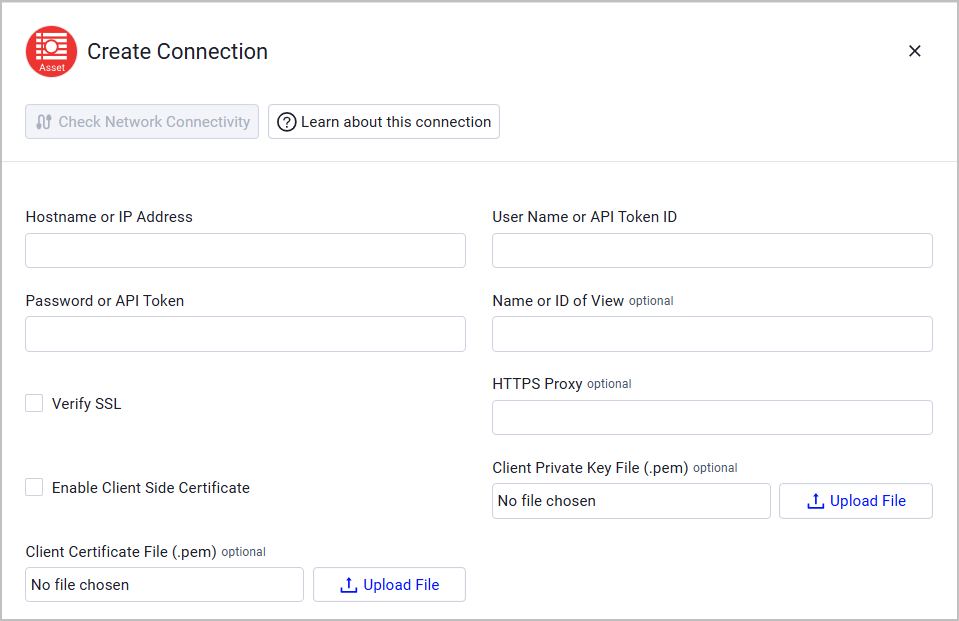
To connect the adapter in Axonius, provide the following parameters:
Required Parameters
- Hostname or IP Address - The Hostname or IP address of the Tanium server that Axonius can communicate with via the required Ports. This adapter supports both on-premise and Tanium Cloud instances. When connecting to a Tanium Cloud instance, "-api" must be added to the end of the subdomain of your Tanium Cloud instance. For example:
domain.cloud.tanium.commust be entered asdomain-api.cloud.tanium.com. - User Name or API Token ID AND Password or API Token - The credentials for a user account that has the Required Permissions to fetch assets.
- If you’re authenticating with an API Token, follow these steps:
-
In Tanium, go to Administration > Permissions > API Tokens. This page displays attributes of valid API tokens.
-
Select the relevant API token in the grid and click View Token.
-
Copy the token's ID from the ID column, and paste it into the User Name or API Token ID Axonius field. Note that the ID column might be hidden by default.
-
Copy the token value and paste it into the Password or API Token Axonius field.
Note
You can see the token value in the Tanium console only within 5 minutes after its creation. If you wait longer than that, or refresh the page, or navigate to another page in the console - you will no longer be able to see it.
-
- If you’re authenticating with an API Token, follow these steps:
Optional Parameters
-
Enable Client Side Certificate - Check this option to authenticate to Tanium servers using client certificates, meeting advanced security requirements for organizations that enforce mutual TLS authentication. When this is enabled, provide the following:
- Client Private Key File (.pem) - Upload the client private key file in PEM format.
- Client Certificate File (.pem) - Upload the client certificate file in PEM format.
Notes
- Certificates are securely stored in Axonius and used only for authenticating to Tanium servers.
- The system validates the certificates while establishing the connection to prevent misconfiguration. If the certificate and private key do not match, or missing, or parsed incorrectly, you will receive an appropriate error message.
-
Name or ID of View - The name or ID of the a View in Tanium Asset used to fetch assets.
-
Verify SSL - Select whether to verify the SSL certificate of the server against the CA database inside of Axonius. For more details, see SSL Trust & CA Settings.
-
HTTPS Proxy - Connect the adapter to a proxy instead of directly connecting it to the domain.
To learn more about common adapter connection parameters and buttons, see Adding a New Adapter Connection.
Advanced Settings
Note
Advanced settings can either apply to all connections for this adapter, or to a specific connection. Refer to Advanced Configuration for Adapters.
- Number of assets to fetch per page (required, default: 200) - Control the number of assets that are fetched per page.
- Number of seconds to wait in between each page fetch (required, default: 1) - Control the number of seconds to wait in between each page.
- Devices to exclude by host name (optional) - A comma-separated list of device host names to exclude.
- Devices to exclude by model (optional) - A comma-separated list of device models to exclude.
- Devices to exclude by domain (optional) - A comma-separated list of device domain names to exclude.
- Populate Dynamic Attributes (optional) - Dynamically create fields in Axonius for all attributes returned by Tanium Asset.
- If enabled, adapter specific fields will be dynamically created in Axonius for all attributes returned for each asset with the appropriately mapped type as defined in Tanium.
- If disabled, adapter specific fields will not be dynamically created in Axonius.
- Add running services to installed software (optional) - Select to make ci_running_services visible and queryable.
- Round RAM memory to the closest power of 2 - Select this option to round the
Total RAM (GB)field to the closest power of 2. Example: 14GB is presented as 16GB. - Deduplicate devices - Select this option to deduplicate devices.
- Remove SIU from installed software - Select this option to filter out all software with the source “SIU”.
- Parse Installed Software: Uninstall String - Select this option to parse the
uninstall_stringfield from raw data to table view for the Installed Software table on assets in the Software module.
Note
To learn more about Adapter Configuration tab advanced settings, see Adapter Advanced Settings.
Related Enforcement Actions
Version Matrix
This adapter has only been tested with the versions marked as supported, but may work with other versions. Please contact Axonius Support if you have a version that is not listed and it is not functioning as expected.
| Version | Supported | Notes |
|---|---|---|
| Tanium versions prior to 7.3.314.3424 | No | This adapter utilizes the REST API, which was added in Tanium 7.3.314.3424 |
| Tanium 7.3.314.3424 | Yes | |
| Tanium 7.3.314.3668 | Yes | |
| Tanium 7.3.314.4147 | Yes | |
| Tanium 7.3.314.4250 | Yes | |
| Tanium 7.4.4.1250 | Yes | |
| Tanium 7.4.6.1088 | Yes | |
| Tanium 7.5.5.1162 | Yes | |
| Tanium Cloud | Yes |
Asset Module Versions
Modules within Tanium have their own version, which is separate from the platform version.
| Version | Supported | Notes |
|---|---|---|
| Asset Module 1.6.5.0002 | Yes | |
| Asset Module 1.8.0.0078 | Yes | |
| Asset Module 1.9.1.0007 | Yes | |
| Asset Module 1.19.158.0000 | Yes |
Updated 3 months ago