
Connecting to Another Data Scope
In Axonius, each user is assigned to one Data Scope. Users with the Move between data scopes permission can temporarily connect to another Data Scope, if necessary, without having to log in as a different user. A user can connect to those Data Scopes allowed to their assigned role. This can be useful to solve issues and explore additional data.
NOTES
This permission is enabled by default for Admin users.
Granting the Move between data scopes permission to a user that does not have access to System settings enables the user to access the Data Scopes tab within System Settings and to see all Data Scopes assigned to their role listed in the Data Scopes list.
All actions performed while connected as this Data Scope are logged with an indication that they were performed in the selected Data Scope.
The following actions are not available when connected to a Data Scope other than your assigned one, even if the user has the relevant permissions:
- Creating and assigning users
- Changes to System Settings
- Viewing Activity logs
- Creating, using or editing Asset Scope queries
Items created by a user accessing another Data Scope will be available only when in that specific scope. This includes:
- Queries
- Dashboards
- Reports
- Enforcement Sets
Note
When you connect to another Data Scope, you are taken to the corresponding page in the connected Data Scope as you were in your Data Scope. If a corresponding page doesn't exist, the closest similar page is displayed. If that is also not available in the Data Scope, the Dashboard page is displayed.
To connect to a different Data Scope:
Do one of the following:
-
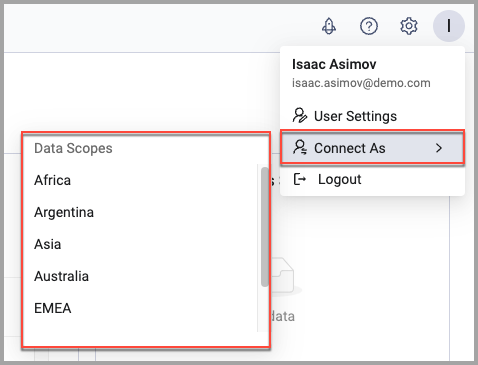
From your user avatar:
- In the lower-left corner, click your avatar and then Connect As.
- From the Data Scopes list, select a Data Scope.
- In the Connect to another Data Scope popup, click Yes, connect.
You are taken to the connected data scope.
A yellow banner at the top of the window lets you know to which data scope you are connected.

- Click Disconnect in the yellow banner to return to your assigned data scope. You are taken to the Dashboard page.
-
Alternatively, you can click your user avatar on the lower-left, and select whether to connect to a different data scope or to disconnect and return to your main Data Scope.
-
From within the data scope details drawer:
-
From the top right corner of any page, click
 . The System Settings page opens.
 -
In the Categories/Subcategories pane of the System Settings page, expand User and Role Management, and select Data Scopes.
-
In the Data Scopes page, select the data scope that you want to enter.
-
In the header of the data scope drawer, click Connect as Data Scope.

- In the Connect to another Data Scope popup, click Yes, connect.
You are connected to the selected Data Scope. A yellow banner at the top of the window lets you know to which Data Scope you are connected.
- Click Disconnect in the yellow banner to return to your assigned Data Scope. You are taken to the Dashboard page.
-
Updated 9 months ago